• The move to the new server is done. There are some software and database maintenance updates in process. This has us passing the hat around to help out. We appreciate any donations. Seriously, even a dollar helps. The payment page may be found here - https://www.audiokarma.org/support.html

I invented the Flexi! well not quite...

audiozaz

rtfm!? - tl;dr
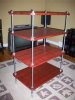
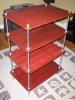
It started as a weekend project to build myself a second audio rack. I had built a small bookshelf the previous weekend an was satisfied of the results. Only I wanted this rack to be adjustable, so I decided on threaded rod for the legs.

That was all before coming accross posts by users in here who had built the same thing, all the way down to rubber washers and acorn nuts on top and discovering they call it a Flexi! But hey! Great minds think alike don't they? :D

I decided to go with ¾in pine for the shelves and ½in zinc-plated steel hardware. I wanted to keep it simple for a first time. 4 shelves were enough for now. The unit is sturdy enough but ameliorations will be made in the next iteration. I'm talking solid oak planks and ¾in brass or stainless steel hardware, which would make it very heavy and très beautiful.

Instead of getting the feet turned to spikes, I made adjustable feet with coupling nuts and pointy-type acorn nuts, so I could accomodate the unit to the very uneven floors of my apartment.

Below are some pics of it.

az
 

Attachments

  • AR_1_sm.jpg
    AR_1_sm.jpg
    72.1 KB · Views: 231
  • AR_2_sm.jpg
    AR_2_sm.jpg
    59.6 KB · Views: 209
Register to hide this ad
No, not quite. Actually, I built a similar one, the length of a sheet of plywood, and I used 3/8 inch all thread. I used Acorns on the top and bottom, nice finishing touch for the top, nice contact on the bottom. They were the most expensive part of the project in theat the Acorns cost as much as eveythign else. I house the TT on top and have shelves for components below it. I also have room for record storage and at the ends a place for two speakers. If I did it again, I wouldn't place speakers there (vibration). Here's the kicker: yes they do flex, and if you live in earthquake zones and play records, this is a GOOD thing. I have twice now gone through tremors while playing a record. Grant it I have the turntable sitting on a 3 inch thick piece of eggcrate foam, but it took a 4.0 tremor and never skipped. The rack swayed side to side, but the record never missed a beat. Nice Job, and you saved yourself a ton of money!
 
I used Acorns on the top and bottom, nice finishing touch for the top, nice contact on the bottom. They were the most expensive part of the project in theat the Acorns cost as much as eveythign else.

How much exactly?

I acquired mine from an industrial supplier of nuts and bolts for CAN0.90$/unit and CAN1.10$/unit standard and pointy-type respectively and that was because I bought by the unit. A 50 unit box would have come down to approximately CAN0.60$ per unit. And we're talking ½inch hardware, 3/8inch is even cheaper.

Just wondering! :)

az
 
I have limited resources here, so, Stainless Steel 3/8 inch Acorns, and I used 24 total, were about two bucks each. I think the pricing you have is very good from my perspective. I spend about $150.00 total: two sheets of one sided veneer 1/2" plywood, twelve 3/8" all-threads; which is the height of the rack, 24 acorns, about 80 nuts and larger diameter flat washers (one on each side of the shelf at each all-thread), and paint. The paint wasn't cheap and dry plywood sucks it up. Between a quart and a 1/2 gallon. I should have used a cheap primer, but sometimes I have more money than time.......(read that brains)......... I used a semi gloss latex, but if I did it again I'd use an oil based, or if I really wanted to spend time an energy, sand the veneer side and stain it. I pre-cut everything and clamped it all together to drill: Longer items on the bottom and then the smaller items on top; lined up, or in position, where they would actually go. I drilled once for the hole that went for that stack, if you can picture this, and as a result everything lined up when I went to put it together. I have recieved compliments on it, but it "fits" where I need it to go,as I could npt buy anythign that can do that. I doubt I'll eve rbuy another rack again, I'll make one. They're inexpensive, but they look good too, and you can custom fit it whereever it needs to go.
 
24 acorns

Ah! That's why, didn't know you had 12 legs total, so yeah, at 2$ each I can see how it runs on the more expensive side.

[EDIT] Did not see you wrote yours were Stainless Steel acorns, mine were Zinc plated, thus cheaper. But I checked, Stainless ½ inch acorns would have run me 2$ per unit too! [/EDIT]

I'd say mine cost me around 150$ total.

Got any picture of yours? It sure sounds like a nice job!

az
 
Last edited:
Very nice job, Zaz. Looks professional. One question though, like you I did not use rubber washers under each flat washer but I did apply latex paint on all sides as a vibration damper.

If you knock on each shelf do you hear a ringing sound or a dull thud? Some here have claimed vibration problems with certain combos of supports and shelf material. Basically I'm wondering if I screwed up by not adding rubber washers.

On the other hand I have no idea of where to get rubber washers,heh,heh...
 
That is a very nice looking shelving unit. I did something similar but used 1-inch diameter galvanized electrical conduit for the uprights and conduit couplers below and above the shelves as height adjusters (the little lip inside the couplers needed to be ground out so they can slide up and down the conduits). I cleverly thought that use of the conduit would be a nice way to carry along the electrical component theme. I was not clever enough as it is a bit wobbly (need to work on that). Functional, though.
 
Very nice job, Zaz. Looks professional. One question though, like you I did not use rubber washers under each flat washer ....... On the other hand I have no idea of where to get rubber washers,heh,heh...

I did use rubber washers under each flat washer. They are available at Home Depot or most other hardware stores for that matter. I could also buy some from my industrial nuts&bolts supplier. I don't think not puting them is a big screw-up, unless for extreme situations, but I'd say they help with the damping and their cost should not be too prohibitive.

az
 
"I did use rubber washers under each flat washer. They are available at Home Depot or most other hardware stores for that matter."

Oops, missed that. Would these be washers for garden hoses?
 
"I did use rubber washers under each flat washer. They are available at Home Depot or most other hardware stores for that matter."

Oops, missed that. Would these be washers for garden hoses?

I'm not sure what standard ID is for garden hose washers, but OD would be a bit too small I guess. I found mine in the hardware sections. They had them in drawers next to regular washers, acorn nuts and all that kind of stuff.

az
 
Good looking racks fellas! Thanks for this insight, as something along these lines had not occurred to me at all. As I have never looked into building the racks in this manner I'm assuming a trip to a local Lowe's will give me the rods I need in order to build such a beast?
 
As I have never looked into building the racks in this manner I'm assuming a trip to a local Lowe's will give me the rods I need in order to build such a beast?

Yup, I got my 6 footers there along with nuts and washers. The rods are 15 bucks each. The 3 footers about half of that. A tip, buy the nuts and washers by the box, much cheaper that way.
 
Back
Top Bottom