• The move to the new server is done. There are some software and database maintenance updates in process. This has us passing the hat around to help out. We appreciate any donations. Seriously, even a dollar helps. The payment page may be found here - https://www.audiokarma.org/support.html

In search of a Fisher X1000 faceplate

aacaudio

New Member
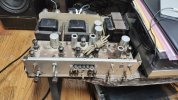
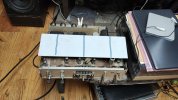
I have a Fisher X1000 that I have just brought back to life, but I don't have a face plate. I have a blank piece of material. Does anyone out there have one of these that they can take measurements for me or a template that I can work from to recreate? Thanks.
 

Attachments

  • IMG_20241112_174811452_HDR.jpg
    IMG_20241112_174811452_HDR.jpg
    123.7 KB · Views: 10
  • IMG_20241112_174819292.jpg
    IMG_20241112_174819292.jpg
    108.6 KB · Views: 10
Register to hide this ad
You might be better served having a Moderator move this to the dedicated "Fisher" forum here on AK where I'm guessing you'll get more traction.

 
In the service manual, 16 15/16th x 4 13/16th for the dimensions on page 14 for the plate size.

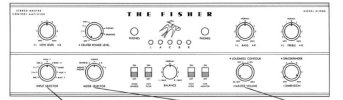
Page 10 has a diagram of the faceplate that you might be able to print out and use as a template match to the face for the holes needed and potentially the silk screen if you know someone who knows how to match fonts and create raster images.

May need some adjustment, but at least you're not starting from scratch.


x1000 template.jpg
 
ps, you can print and tape to a piece of thin cardboard from a cereal box and redo as needed, until you have all the holes lined up and a good fit with the cardboard, before cutting into the metal using your final piece of cardboard as a template.

Knob holes are hidden by the knob itself, so a little wiggle room there. Seems the difficult part will be the LED looking bulb holes and the square switch holes may have a tiny bit of ability to reposition. Appears your version doesn't have headphone jacks, so that part should be easier. If the bulbs are on flexible legs, then those might have a bit of tolerance too or you can make the holes larger and put colored plastic behind it. I do see 'jewel' light covers online.

You could also print on clear sheet for the printing, if you don't want to screen print, but will need a clear image from somewhere or a better scan that the one above I pulled from rclabs.com.br

ps....correction of my error above... the images are in the owner's manual, not the service manual

 
Back
Top Bottom