• The move to the new server is done. There are some software and database maintenance updates in process. This has us passing the hat around to help out. We appreciate any donations. Seriously, even a dollar helps. The payment page may be found here - https://www.audiokarma.org/support.html

Infinity Renaissance 90 Grilles

Are you interested in getting new grilles made for your Infinity Renaissance 90 speakers?


  • Total voters
    6

Blackbeerd

Active Member
I'm finally getting around to finishing the restoration of my Infinity Renaissance 90 speakers, and one of the last steps is to make new grilles for them.

The originals for mine were broken when I bought them over 10 years ago (I can't believe it's been that long), and they've never been able to fit. Since they're essential to the sound of the speakers, I definitely want to have a pair in working condition!

My plan is to have a pair of grilles CNC routed out of Baltic birch plywood, or an equivalent high quality hardwood plywood. This should be much stronger than the factory MDF board, and less likely to break.

I've gone through and measured both the speakers and grilles in preparation for making a 3D model and drawing of the replacement grille. I want it to be as accurate as possible - possibly even with a tight fit around the tweeter and midrange, with a bevel leading into the drivers to replace the vinyl flap on the original grilles.

The final details of the design are yet to be determined. I will be making the model and drawing soon, and then I have to find someone capable of making them - hopefully at a reasonable price.

Here's my initial measurements of the grilles - I do need to go back and confirm some of the measurements that ended up at odd dimensions. They're definitely built to inch dimensions, which mostly made things easy. The final new grille dimensions on the drawings will not necessarily match all of those here, since I'll tweak those based on the vendor's process.

20201020_003233-X2.jpg


Please forgive me if this is the wrong forum for this, but I thought I should ask: Is anyone else in need of grilles for their Renaissance 90? It probably is minimal added cost to do more, as most of the cost will be in the setup for milling these out.

Regards,
Blackbeerd Ben
 
Last edited:
Register to hide this ad
I'm finally getting around to finishing the restoration of my Infinity Renaissance 90 speakers, and one of the last steps is to make new grilles for them.

The originals for mine were broken when I bought them over 10 years ago (I can't believe it's been that long), and they've never been able to fit. Since they're essential to the sound of the speakers, I definitely want to have a pair in working condition!

My plan is to have a pair of grilles CNC routed out of Baltic birch plywood, or an equivalent high quality hardwood plywood. This should be much stronger than the factory MDF board, and less likely to break.

I've gone through and measured both the speakers and grilles in preparation for making a 3D model and drawing of the replacement grille. I want it to be as accurate as possible - possibly even with a tight fit around the tweeter and midrange, with a bevel leading into the drivers to replace the vinyl flap on the original grilles.

The final details of the design are yet to be determined. I will be making the model and drawing soon, and then I have to find someone capable of making them - hopefully at a reasonable price.

Here's my initial measurements of the grilles - I do need to go back and confirm some of the measurements that ended up at odd dimensions. They're definitely built to inch dimensions, which mostly made things easy. The final new grille dimensions on the drawings will not necessarily match all of those here, since I'll tweak those based on the vendor's process.

20201020_003233-X2.jpg


Please forgive me if this is the wrong forum for this, but I thought I should ask: Is anyone else in need of grilles for their Renaissance 90? It probably is minimal added cost to do more, as most of the cost will be in the setup for milling these out.

Regards,
Blackbeerd Ben
Thanks for the offer, Mine are fine.

They are according to the literature, important to the sound of the ren's, they are certainly heavy, being milled from mdf.

How did you restore the Emit/Emims? I've got to beleive that the foam listed in the breakdown schematic of both the emit and emim has to have broken down over time, and would love to replace it but ....
 
You should try and figure out the top caps too if you’ve got access to a CNC router. I‘d bet you’d sell a few because the 80 shares the same weakness as the 90 being a 2 piece part. Almost every pair I’ve seen owned suffered from shrinkage right down the center and warping, lifting around the back edges.
 
Thanks for the offer, Mine are fine.

They are according to the literature, important to the sound of the ren's, they are certainly heavy, being milled from mdf.

How did you restore the Emit/Emims? I've got to beleive that the foam listed in the breakdown schematic of both the emit and emim has to have broken down over time, and would love to replace it but ....

I haven't seen any breakdown of the drivers themselves - only the exploded view of the speakers. I thought the EMIT-HE was a sealed unit on its own. I wasn't aware of any foam in the drivers themselves.

For the EMIM-HE, at the suggestion of someone else here a few years ago, the back midrange foam under the plate was amazingly still available from Harman Germany. I had a pair shipped to the USA. That was at least 5 years ago though, and I'm not sure if it's still available. I did measure the foam and the plate, and it wouldn't be very hard to make your own or have some made.

The egg crate foam in the tunnel behind the midrange was crumbling at the touch, but not having any replacement foam at hand I decided to leave it as-is for now. I should replace that soon though. I do think any similar density foam, egg crate style or not, would work for this. Since they're just supposed to dampen all the rear sound from the EMIM and let it breathe, I don't think a small change in density will make much difference. I have read in the past that the lamb's wool piece directly behind the driver is much more critical.

Also, the paint on the magnets of both my planar magnetic drivers is flaking off, and sooner rather than later they'll need to be disassembled and re-painted. I understand that isn't for the faint of heart though. For now, I'm just carefully using non-magnetic tweezers or other tools to remove the flakes before they fall off.


You should try and figure out the top caps too if you’ve got access to a CNC router. I‘d bet you’d sell a few because the 80 shares the same weakness as the 90 being a 2 piece part. Almost every pair I’ve seen owned suffered from shrinkage right down the center and warping, lifting around the back edges.

That's an interesting request. My top caps show slight signs of cracking where the two pieces go together, but no major deformation yet. I'll have to check mine in detail - but I don't plan on taking mine apart if they're staying together for now. (This does make me think that I probably should figure out how to do a pressure test of the speaker, and find and seal any leaks in the cabinet.)

It would be relatively easy for me to measure and draw up a single piece top cap. I'm a pump engineer by trade nowadays, and I've got a lot of experience reverse engineering parts and making designs and drawings to fit.

My biggest concern would be if these speakers aren't consistent enough and the parts would need to be fitted together. I'm not a carpenter, so I don't know what problems may arise. From my measurements of the speakers so far though, their construction seems to be quite accurate.
 
jazzmans,

I did do a little more digging and I see from okeeteekid's old thread about disassembling and repairing his EMIM High Energy drivers, that there is indeed foam immediately behind the EMIM diaphragm:

https://audiokarma.org/forums/index.php?threads/ren-90-high-energy-emim-repair.460862/

I'll have to check that when I take those apart. He and slimpikkens do a pretty good job describing and showing the jig needed to safely take them apart.

I can only assume that the EMIT High Energy comes apart the same way. I'm sure they have foam behind them to dampen the backwave from the diaphragm.

This thread also describes some of the protective coatings tried for the EMIMs:

https://audiokarma.org/forums/index.php?threads/emim-magnet-nickel-plating-anyone-re-done-it.212738/

Of course doing any internal work on the drivers like this will make me nervous as heck, considering how hard it is to find replacements.
 
jazzmans,

I did do a little more digging and I see from okeeteekid's old thread about disassembling and repairing his EMIM High Energy drivers, that there is indeed foam immediately behind the EMIM diaphragm:

https://audiokarma.org/forums/index.php?threads/ren-90-high-energy-emim-repair.460862/

I'll have to check that when I take those apart. He and slimpikkens do a pretty good job describing and showing the jig needed to safely take them apart.

I can only assume that the EMIT High Energy comes apart the same way. I'm sure they have foam behind them to dampen the backwave from the diaphragm.

This thread also describes some of the protective coatings tried for the EMIMs:

https://audiokarma.org/forums/index.php?threads/emim-magnet-nickel-plating-anyone-re-done-it.212738/

Of course doing any internal work on the drivers like this will make me nervous as heck, considering how hard it is to find replacements.
Jazz Here is a video I made of me taking apart a HE-EMIM, you can see the foam in it, I replaced it with 3/8ths x 3/16 Open Cell Polyurethane insulation tape, don't remember the brand though as it's been years since I did it,
 
One thing to remember, if you pull the dampening material out of the tunnel while your working on the midrange is to pay close attention to it as you remove it, immediately behind the midrange it is a wool type stuffing then poly fill behind that. So you want to put it back the same way it came out.

That is if it’s original and nobody before you has messed with it.
 
Jazz Here is a video I made of me taking apart a HE-EMIM, you can see the foam in it, I replaced it with 3/8ths x 3/16 Open Cell Polyurethane insulation tape, don't remember the brand though as it's been years since I did it,

Thanks for the video and foam tape info, okeeteekid. That definitely helps.

One thing to remember, if you pull the dampening material out of the tunnel while your working on the midrange is to pay close attention to it as you remove it, immediately behind the midrange it is a wool type stuffing then poly fill behind that. So you want to put it back the same way it came out.

That is if it’s original and nobody before you has messed with it.

Is there actually any poly fill behind the wool, before the egg crate foam? I don't remember seeing any behind the egg crate foam when I went at it from the other side.


I've made tangible progress in the design now. The main model of the speaker is more or less done; ready for fitment comparison with the grille model when I complete that.

I didn't make the rear of the speaker as accurate as I can, nor have I added the top cap yet. But it's a good enough representation for now.

The mid-bass and woofer are simply represented as cylinders extruded to the height of the cap screws, for clearance analysis in the assembly with the grille.

Infinity%20Renaissance%2090%20Speaker%20Screenshot-X2.png
 
Okay, so I've made some nice progress. I have the speaker modeled a bit more realistically, and the original grille design completely modeled. I've yet to do the modifications to have a tight fit around the EMIT and EMIM as previously mentioned, but I'll be doing that next.

I pulled the little logo plaque out of one of my old grilles, but I'm not sure if I'm going to have a spot cut out for it in the grilles. The actual Infinity logo is a separate piece from the rectangular plastic holder - probably because the close fit around the logo would have been too expensive to mill out of the grille back when these were made. It would be neat to model the exact shape and cut that out of the grille instead - but I'm not sure if I can measure it accurately enough to look good.

Here's some screenshots of the progress:

Infinity%20Renaissance%2090%20Speaker%20Screenshot%202-X2.png


Infinity%20Renaissance%2090%20Speaker%20wth%20Grille%20Screenshot-X2.png


Infinity%20Renaissance%2090%20Grille%20Screenshot%20Front-X2.png


Infinity%20Renaissance%2090%20Grille%20Screenshot%20Rear-X2.png
 
Proud (2nd) owner of Ren 90's and luckily they are in mint condition.

Glad to see your project under way, I'd jump on board if I needed them.
 
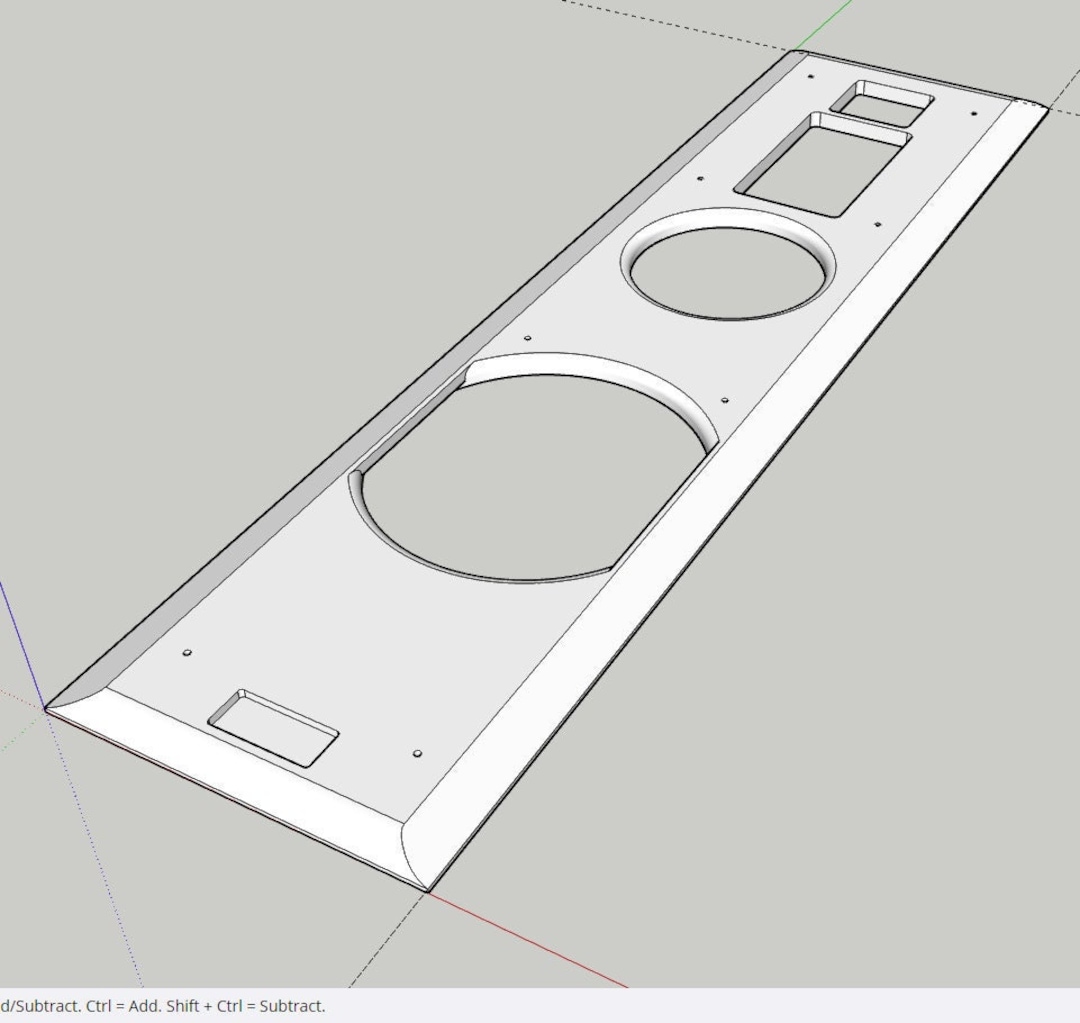
In SketchUp, my friend and I created a full-scale 3D model of a grille for Renaissance 90 speakers, which can be used to cut the grille on a CNC router, a large 3D printer, or by other means. If you manage to make the grille based on this model, please share the manufacturing process and the result. Thanks!

 
In SketchUp, my friend and I created a full-scale 3D model of a grille for Renaissance 90 speakers, which can be used to cut the grille on a CNC router, a large 3D printer, or by other means. If you manage to make the grille based on this model, please share the manufacturing process and the result. Thanks!


It'd be interesting to see how closely our models match. Mine is done in Solidworks, and is ready to go using the factory pegs and logos, though I might buy new pegs and adjust the grille to match.

I'd love to cut the Infinity logo into the grille directly instead of putting the factory plate in, too. I'm wary of trademark infringement though if it's sent out commercially.

Did you use my measurements or take your own?

For me the project has been on hold since I bought a house and haven't had the speakers set up. But I finally got new woofers, and I'm going to get some new amps to power them.

And a key new thing has happened - I have a friend who built his own CNC router that I'm hoping can help me with the project. I've reached out to him to see if he's willing. I'd rather do it with a friend than send it out to a third party.
 
Ok, some good news today:

1. My buddy thinks he can do this on his router table. I sent him the file and he's going to verify.

2. Burton Heaton of Iowa Audio Tags was able to send me some vector files of the Infinity logo, so I can have the logo cut in relief. The Renaissance 90 have a larger infinity sign relative to the text than the normal logo, so I'll try to scale it correctly. Now I just need to decide if I want it to be cut on the router, or laser etched.
 
Jazz Here is a video I made of me taking apart a HE-EMIM, you can see the foam in it, I replaced it with 3/8ths x 3/16 Open Cell Polyurethane insulation tape, don't remember the brand though as it's been years since I did it,
Is this video still available somehow?
 
Is this video still available somehow?
It's no longer available because youtube gave me copyright strikes on most of the videos on my channel for music being played through the speakers so It was either delete all the videos and start over which I didn't want to do so I made all the videos private and 6 months later I just deleted the whole channel because there was really nothing on it that I could make public
 
It's no longer available because youtube gave me copyright strikes on most of the videos on my channel for music being played through the speakers so It was either delete all the videos and start over which I didn't want to do so I made all the videos private and 6 months later I just deleted the whole channel because there was really nothing on it that I could make public
That's a shame. Any information at all would be helpful. Even just the same video but muted would be useful for many of us.

I plan to take my HE-EMITs and HE-EMIMs apart to coat the magnets with sealant to protect them from moisture.
 
That's a shame. Any information at all would be helpful. Even just the same video but muted would be useful for many of us.

I plan to take my HE-EMITs and HE-EMIMs apart to coat the magnets with sealant to protect them from moisture.
If they are the black epoxy coated magnets and they haven't peeled in all these years I'd leave them be, I have a few extra magnets and one that is broken in half and I use it for my aquariums and leave it on my basement sink where it gets wet all the time and it hasn't peeled and it's been there for over 10 years.
 
If they are the black epoxy coated magnets and they haven't peeled in all these years I'd leave them be, I have a few extra magnets and one that is broken in half and I use it for my aquariums and leave it on my basement sink where it gets wet all the time and it hasn't peeled and it's been there for over
Unfortunately, mine have started to peel.
 
Back
Top Bottom