


Bought some JBL 4313b speakers in a somewhat hasty purchase. I took my trusty paper towel tube and tested that all the drivers were working. I immediately saw a re-foam was needed but did not look closely at the bad messy job that had been done.

The wrong size surround had been used and the inner lip of the surround was on the front side of the cone instead of the back side . It was cut in 4 places to make it work and lots of Polyvinyl Acetate (Elmers) glue had been used. It looked like tacks had been used to hold the 4 surround pieces in place.
I posted my dilemma in another thread on how to remove this mess. The common fix was to soak with water a few hours until it loosens up. Tried that on a small area overnight with no success.

I had decided to re-foam incorrectly on the outside of the cone to hide the mess but found the amount of dried glue would make a bad job. On top of the excessive glue mess, the 4 slits that were cut and the tacks to make the incorrect surround fit had deformed the cone. It had 4 large dimples that would make re-foam impossible.

The cone edge was rigid with the excessive glue. I was thinking that heat would be the only way to soften the cone edge and got out my handy Scunci steamer and attacked the glue mess. Use only distilled water.
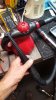
I was only going to heat up the dimples to reform the cone edge but immediately noticed the glue starting to drip off the cone. I was worried that the moisture would make the cone a mushy mess so I did a small area and let it dry. I was amazed the cone still had that crispy rigid sound so I finished the rest of the cone. It is critical to place the speaker on end so the moisture does not go near the voice coils. It would help to place a small fan blowing from the back magnet side to keep the steam away from the VC area.
One thing that helped the process go faster was to work at the 3:00 area and move the surround clockwise. The excess water would drip down and pre-moisten the 6:00 area.

The first speaker took approx 45 minutes but using the 3:00 method the second took only 25 minutes.

I finished the first speaker and let it dry overnight. I found the cone had a little "memory" of the 4 dimples so I moistened the surround with steam and placed an appropriate bowl in the cone. This is delicate and must fit into the opening just right. Only use a very light bowl to prevent collapsing/stretching the spider.
I let the cone dry overnight and was pleased to see a perfect round cone.
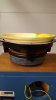
I installed the surrounds (purchased from AKer Rick Cobb) which fit perfectly. I plugged the tack holes from the backside of the cone with a little dab of glue.

I'm very happy with the results. I really thought these 4313b's would be parts fodder but they ended up very nice. Still have a little glue discoloration but overall they look really good. The cones are crisp and rigid and sound great. I have to get some new grill cloth and oil the cabinets and they will be ready for a permanent spot in the listening area.
Not sure if this method has been used before so I posted this procedure to help others who end up with this mess. It only works on Polyvinyl Acetate (PVA), Elmers glue, Woodworkers glue, etc. I tried it on some dried rubber cement type glue and did not work as well. It kind of softened the glue but did not steam off like the PVA which is water soluble. I purchased my steamer at the local goodwill for about 6 bucks.
The wrong size surround had been used and the inner lip of the surround was on the front side of the cone instead of the back side . It was cut in 4 places to make it work and lots of Polyvinyl Acetate (Elmers) glue had been used. It looked like tacks had been used to hold the 4 surround pieces in place.
I posted my dilemma in another thread on how to remove this mess. The common fix was to soak with water a few hours until it loosens up. Tried that on a small area overnight with no success.
I had decided to re-foam incorrectly on the outside of the cone to hide the mess but found the amount of dried glue would make a bad job. On top of the excessive glue mess, the 4 slits that were cut and the tacks to make the incorrect surround fit had deformed the cone. It had 4 large dimples that would make re-foam impossible.
The cone edge was rigid with the excessive glue. I was thinking that heat would be the only way to soften the cone edge and got out my handy Scunci steamer and attacked the glue mess. Use only distilled water.
I was only going to heat up the dimples to reform the cone edge but immediately noticed the glue starting to drip off the cone. I was worried that the moisture would make the cone a mushy mess so I did a small area and let it dry. I was amazed the cone still had that crispy rigid sound so I finished the rest of the cone. It is critical to place the speaker on end so the moisture does not go near the voice coils. It would help to place a small fan blowing from the back magnet side to keep the steam away from the VC area.
One thing that helped the process go faster was to work at the 3:00 area and move the surround clockwise. The excess water would drip down and pre-moisten the 6:00 area.
The first speaker took approx 45 minutes but using the 3:00 method the second took only 25 minutes.
I finished the first speaker and let it dry overnight. I found the cone had a little "memory" of the 4 dimples so I moistened the surround with steam and placed an appropriate bowl in the cone. This is delicate and must fit into the opening just right. Only use a very light bowl to prevent collapsing/stretching the spider.
I let the cone dry overnight and was pleased to see a perfect round cone.
I installed the surrounds (purchased from AKer Rick Cobb) which fit perfectly. I plugged the tack holes from the backside of the cone with a little dab of glue.
I'm very happy with the results. I really thought these 4313b's would be parts fodder but they ended up very nice. Still have a little glue discoloration but overall they look really good. The cones are crisp and rigid and sound great. I have to get some new grill cloth and oil the cabinets and they will be ready for a permanent spot in the listening area.
Not sure if this method has been used before so I posted this procedure to help others who end up with this mess. It only works on Polyvinyl Acetate (PVA), Elmers glue, Woodworkers glue, etc. I tried it on some dried rubber cement type glue and did not work as well. It kind of softened the glue but did not steam off like the PVA which is water soluble. I purchased my steamer at the local goodwill for about 6 bucks.


