• The move to the new server is done. There are some software and database maintenance updates in process. This has us passing the hat around to help out. We appreciate any donations. Seriously, even a dollar helps. The payment page may be found here - https://www.audiokarma.org/support.html

JVC Ql-A7 Restoration and Repair

synth80s

New Member
Hello all,

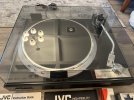
Been many years since I have been on the ole AK. Lost my old account but starting a new. For background I restore vintage synthesizers. Late to the vinyl game and of course everything is overpriced now, but I picked up a near mint condition JVC Ql-A7 for $100 as is, sporting the Victor TT-71 drive. I've learned in the trade it is often difficult or near impossible to restore the physical condition of many items, so I opt for those in excellent cosmetic shape with electronics issues. Those puzzles are more fun to solve anyways!

Now onto the issues! It is missing the cartridge but I have an AT125LC here I will install. The wires passed the continuity test so that is good.

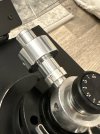
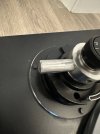
1) The tonearm bushing is completely missing. I have studied whatever photos I can and it seems the small flanged cylinder where the busing mounts is gone. The counter weight shaft seems to be directly fitted to the tone arm assembly. I assume the previous owner rigid mounted this to fix that issue, but from the photos on the web, the bushing stub is a SMALLER inner diameter than the tone arm shaft. I can't wrap my mind on how this counter weight larger diameter shaft is attached. I could try to take it apart to look, but it is firm and I don't want to open a can of worms. I was hoping the resident expert @BillWojo could chime in here. At the worst, the geometry of the weight is changed and I may get resonance introduced into the tone arm. I am not sure what I can do besides find a donor, so I may leave this for now.

2) There are 6 prices "dead" spots on the platter where the motor has no torque, and if the platter is at rest, it will not start. If you nudge it either CW or CCW to the next good spot, it will take off. It locks on both 33.5 and 45rpm speeds but there is jitter. I suspect an issue with a missing phase on one of the driver circuits. Hopefully it is not a bad winding in the 12 pole motor. Does anyone have personal experience with this issue?

The service manual is incredibly well written and my goal is to get the electronics 100% before looking at the tonearm. I will most likely spec some high quality Nichicon long life caps if any test out of spec. First steps are to check out the driver transistors and all of the test point wave forms in the manual. Also does the tone arm cover need to come off to unhook the wires underneath to remove the Victor drive assembly?

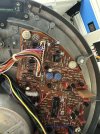
I attached some photos and linked a video to youtube to demonstrate a start from one of the "dead" spots.
Appreciate any insight before I tear this apart.
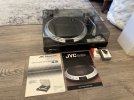
1.jpeg
2.jpeg
3.jpeg
4.jpeg
 
Register to hide this ad
I recall seeing a thread on replacing the tonearm bushing, search for Victor UA-7045 or Victor UA-5045. regarding the TT-71 motor, remove the platter and you will see the mounting screws. The unit should pull out once you take care of the power cord. The tonearm wiring should be separate. The access to the pcb is fairly easy, its not like the TT-81 where there are harnesses for the wiring going to the pcb that you can simply unplug, but I found you can lift the pcb enough to get to the capacitors with minimal problem. I had the dead spot issue on my TT-71, I recapped it and messed around with the Variable Resistors and I have no problem now. But I'm not sure which solved the problem. If it locks in consistently on 33 1/3 and 45, I would maybe slightly adjust the appropriate VR just to see if it impacts the startup. Also, if you do recap the motor pcb, check the values of the capacitors you are replacing, if I recall the service manual made a couple of mistakes on the values they listed.
You mentioned checking the wave forms using a scope, I wish I had that knowledge, I have 2 TT-81s that need that adjustment, but I have no clue on how to use a scope. Good luck
 
I recall seeing a thread on replacing the tonearm bushing, search for Victor UA-7045 or Victor UA-5045. regarding the TT-71 motor, remove the platter and you will see the mounting screws. The unit should pull out once you take care of the power cord. The tonearm wiring should be separate. The access to the pcb is fairly easy, its not like the TT-81 where there are harnesses for the wiring going to the pcb that you can simply unplug, but I found you can lift the pcb enough to get to the capacitors with minimal problem. I had the dead spot issue on my TT-71, I recapped it and messed around with the Variable Resistors and I have no problem now. But I'm not sure which solved the problem. If it locks in consistently on 33 1/3 and 45, I would maybe slightly adjust the appropriate VR just to see if it impacts the startup. Also, if you do recap the motor pcb, check the values of the capacitors you are replacing, if I recall the service manual made a couple of mistakes on the values they listed.
You mentioned checking the wave forms using a scope, I wish I had that knowledge, I have 2 TT-81s that need that adjustment, but I have no clue on how to use a scope. Good luck
Thanks for the info! I wasn't sure if I could remove the whole assembly out of there and get it on the workbench. I like to fully remove the boards if possible, but I'll get my eyes on it first. That is great to hear you resolved the dead spot issue with new caps and adjustments. Appreciate the heads up on value differences, I have seen that with synths as well and I always trust the board if they are factory and untouched. I've even seen the polarity incorrectly marked on the silkscreen before. The procedure to calibrate it is quite particular, and I would be very hesitant to touch those trimmers without a scope. That is something you can definitely learn, I recommend picking up a cheap Rigol or Siglent scope, read the manual and get your hands on it! It will pay for itself in a few jobs.

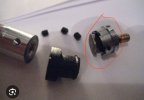
As far as the tone arm bushing goes, I am afraid it is not as simple as just replacing it. There seem to be 4 components (left to right): the short shaft for the counterweight, the bushing, the metal bushing flange it mounts on and slides into the tone arm body, and the brass carriage bolt type screw. I believe mine is missing that metal flange all together, and somehow they affixed the counterweight shaft directly into the tone arm body. Compare my photo in the first post to this photo I found on the web below:
1783708161816.jpeg

- Ron
 
Hello,

Good job! That is a nice unit.

Regarding the speed issue, I remember that I once had a similar fault. I have worked on many of these turntables, but I cannot remember exactly what the cause was... I remember that I managed to fix it, so the motor was not the problem.

I suggest checking for cold solder joints. I do not remember if that was the cause, or perhaps some transistor.

Regarding the counterweight shaft and the counterweight, I know this problem. Basically every QL-A7, QL-7, QL-5, and other similar models have this issue.

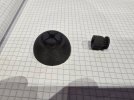
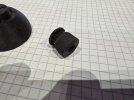
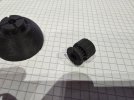
Some time ago I made cast rubber parts for this tonearm model. They are made of silicone rubber with a hardness of 60 Shore A. I once tried 40 Shore A, but it was too soft. I also made damping rubber parts for the feet of this turntable. They are also silicone, 60 Shore A.


20260711_002923.jpg
20260711_002934.jpg
20260711_002942.jpg
Good luck with the repair! If I remember what the rotation problem was, I will let you know.
 
Hello,

Good job! That is a nice unit.

Regarding the speed issue, I remember that I once had a similar fault. I have worked on many of these turntables, but I cannot remember exactly what the cause was... I remember that I managed to fix it, so the motor was not the problem.

I suggest checking for cold solder joints. I do not remember if that was the cause, or perhaps some transistor.

Regarding the counterweight shaft and the counterweight, I know this problem. Basically every QL-A7, QL-7, QL-5, and other similar models have this issue.

Some time ago I made cast rubber parts for this tonearm model. They are made of silicone rubber with a hardness of 60 Shore A. I once tried 40 Shore A, but it was too soft. I also made damping rubber parts for the feet of this turntable. They are also silicone, 60 Shore A.


View attachment 3798695
View attachment 3798696
View attachment 3798697
Good luck with the repair! If I remember what the rotation problem was, I will let you know.
Cześć!

Thank you for the info, I will definitely look at the electronics and most likely replace the trimmers. I often see trimmers go bad in synthesizers too, which attributes to pitch instabilities and difficulty calibrating.

You did an excellent job reproducing those parts. What a coincidence, I was going to try 3d printing them in TPU which is a shore of 95A, but I was going to experiment with infill percentage for rigidity. I planned to model the star shaped pattern as well, but I am still growing my skills in FreeCAD and was figuring out the best way to measure it.

Did you 3d print the molds and then cast in silicone? Is it possible in anyway for you to send the 3mf or STL files? I would love to try this back in the USA.

Thanks,
Ron
 
Update on the QL-A7. Found some vertical play in the tone arm vertical shaft. I also notice horizontal play when grabbing the tone arm tube and pull towards and away from me, I can hear the typical faint sounds of end play. Maybe only a few thou. I don't suspect the bearings are bad but rather the end play was not properly set after the last guy disassembled everything to rigid mount the counter weight. I found a service manual for the UA-7045 tone arm which is close to this one, but of course it doesn't give the procedure for setting end play.

I believe the locking collars and set screws on the sides are for vertical. I removed the antiskate knob and did not see any for the horizontal. Do you guys know if it is underneath the tone arm assembly? Do I need to remove the bottom panel to get to the adjustment? Would really appreciate the help.

The tone arm does balance and glides smoothly, passes the blow test. Attached another video for review:

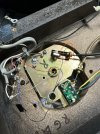
I also pulled the bottom cover off and didn't see anywhere to tighten up the bearings, so assume I need to loosen that brass nut, unsolder the tone arm wires, and remove the entire tone arm. I did continuity test all the wires but another bummer I found was this ground wire was ripped out. Where does this attach inside the tone arm? The cartridge is only 4 pins, so I assume it must solder inside of it somewhere? Someone else on the web had asked this but never got an answer.
IMG_7315_preview.jpeg
 
Last edited:
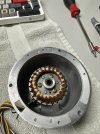
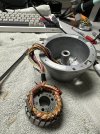
More bad news, started investigating the drive issue and it appears I am missing a phase from the platter motor. After diagnosing, 2 windings measure open. I disassembled the drive motor and inspected the stator. Several green dots of corrosion were found but otherwise everything looked cleaned. I carefully scraped away the enamel where the windings join the wires to the female header, added flux, and resoldered. Unfortunately the break seems to be in the middle of the windings somewhere. I will need to locate another motor which may not be an easy task.

IMG_7617.jpeg

IMG_7618.jpeg

IMG_7621.jpeg
IMG_7622.jpeg
 
Back
Top Bottom