

I recently made a modest overhaul of some Kef 104/2s. I've listed a couple of tips below that may be useful to others. Nothing new here, but maybe not as well known as they could be.
Removing old donut foam
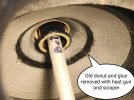
A couple of people online suggested the heat gun method as an alternative to cotton buds and solvent.
After rubbing away for a few minutes with IPA and getting nowhere I tried a heat gun on low with a scraper. It was really easy and fast - only a minute or two per woofer. It leaves a smooth residue of glue, but that's fine for re-gluing the new donuts.
Pic was taken after reassembly while waiting for new donuts.
Removing speaker baseplate
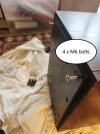
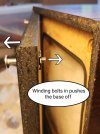
Once the feet are removed you can use the same holes to insert M6 bolts and use these as jack bolts.
Damage to cable from binding posts
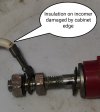
Mine were partly damaged by the sharp edged recess in the cabinet back, so I made some new cables.
The spade connector for PCB is a 4.8mm female. The old Kef spades are fatter than modern ones so you need to open up the connector a bit with a small screwdriver.
Spare pin at strip connector
This one threw me for a bit when reassembling. There are 9 pins on the PCB but only 8 sockets in the connector.
The connector has a peg at one end to help make sure you get it right when reconnecting. This is all shown in detail on the crossover info that someone has posted on Scribd.
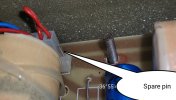
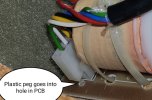
I think the spare pin was used for testing at the factory, as it is connected to the main +ve incomer.
Great speakers and fun to work on, though I was luckier than many as the cabinets were in pretty good shape.
Removing old donut foam
A couple of people online suggested the heat gun method as an alternative to cotton buds and solvent.
After rubbing away for a few minutes with IPA and getting nowhere I tried a heat gun on low with a scraper. It was really easy and fast - only a minute or two per woofer. It leaves a smooth residue of glue, but that's fine for re-gluing the new donuts.
Pic was taken after reassembly while waiting for new donuts.
Removing speaker baseplate
Once the feet are removed you can use the same holes to insert M6 bolts and use these as jack bolts.
Damage to cable from binding posts
Mine were partly damaged by the sharp edged recess in the cabinet back, so I made some new cables.
The spade connector for PCB is a 4.8mm female. The old Kef spades are fatter than modern ones so you need to open up the connector a bit with a small screwdriver.
Spare pin at strip connector
This one threw me for a bit when reassembling. There are 9 pins on the PCB but only 8 sockets in the connector.
The connector has a peg at one end to help make sure you get it right when reconnecting. This is all shown in detail on the crossover info that someone has posted on Scribd.
I think the spare pin was used for testing at the factory, as it is connected to the main +ve incomer.
Great speakers and fun to work on, though I was luckier than many as the cabinets were in pretty good shape.


