PartyCzar
New Member
Just sharing this for those who might be interested. I recently acquired a pair of KLH 23 speakers. They were in really nice condition, worked, and sounded good. So, of course, I decided to futz with them!
++TRIGGER WARNING: KLH AND/OR VINTAGE PURISTS MIGHT WANT TO SKIP THE NEXT PARAGRAPH.++
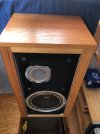
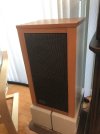
When I say “nice condition,” I mean they were clean, with no obvious signs of damage or abuse. The front panels looked original, almost like new, and included the iconic KLH badges. However, although undamaged, the original walnut cabinets were not unchanged. Apparently a previous owner (not the one I got them from) didn’t like the original look. My guess is the spouse wanted them to match their other décor. I don’t know. In any case, he added a half-inch thick solid oak frame around the front bezel and a three-quarter-inch thick solid oak top (they can now only be used in the standing orientation). He appears to have been a woodworker, as he did excellent work and they look good. The really questionable design choice, however, was to cover the walnut sides not with solid oak or oak veneer, but paint! Perhaps the sides weren’t visible in his setup. Anyway, it all works for me since I have oak hardwood floors!
++END OF WARNING++
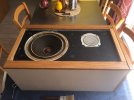
Aside from the modifications of the cabinet exteriors, the speakers appeared untouched and unopened. I decided to look inside, with an eye to recapping and resealing them.
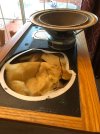
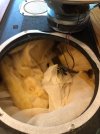
I worked on one speaker at a time. After removing the six hex-head screws holding the woofers they easily lifted out. Large foam washers had been used under the frames to form a seal. Disconnecting the wires was easy since KLH just used simple wire nuts to attach them. Next I carefully removed the cheesecloth and fiberglass insulation, revealing a confused bird nest of other wires. I untangled them, labeling all the connections as I went along so I would know how to put them back together. Finally, I inspected the crossover.
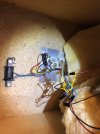
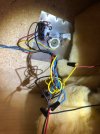
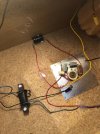
The Model 23 crossover is about as simple as they get. There’s the three-way switch (Decrease, Normal, Increase), three resisters, one capacitor, and an inductor. They all looked original and fine, but since they are 50+ years old (“73” was stamped in both cabinets, near the inductor), I planned to replace the original red-and-black Mexican 4uF electrolytic capacitor no matter what. I used new Solen PB 4mfd metalized polypropylene 400V caps. They weren’t expensive, about $6 each. Like Mr. Con E. Head, they’re from France. The resisters and inductors I decided to leave as is.
To make things a bit easier, using some copper wire I soldered in the new capacitor and hot-glued it to the inside of the enclosure. I sprayed the pots with electronic contact cleaner/lubricant, turning the knobs back-and-forth to work it in. Then I simply reconnected all the wires (generally stripping off fresh wire) and carefully replaced the batting, cheesecloth, and woofer. I reused the foam seals since they still seemed good.
The woofers both looked good, but due to age their cloth surrounds were very dry. Whatever sealant was originally used had mostly turned to dust, and you could look through the cloth like it was window screen. I ordered some of RoyC’s secret-sauce sealant (thanks, Roy!) and applied two light coats to the surrounds and the dust caps, waiting 24-hours between coats. This greatly improved the look and feel of the speakers and I could no longer see through them.
So, how do they sound? The short answer is, “Great!” They are just wonderful to listen to. I have them sitting about a foot off the floor on cinder blocks with foam pads between each layer (cheap but effective). Do they sound better than before? I think the answer is, “Yes!” but I don’t have any hard evidence. The truth is, they sounded really good to my old ears the day I got them. I think they now sound better, especially at higher volumes in the high and low end, but how much of that could be wishful thinking on my part I can’t say. I don’t have the ability to test the old caps to see if they were out-of-spec or not. But it was a fun project, cost very little, and if I think they sound better, that’s good enough for me!
I am including some photos for your edification and enjoyment.
And one more thing: I want to thank all the members and contributors of this forum, which was an indispensable help to me, as I’m sure it is to many others. I spent many hours perusing posts here before tackling this project. To one and all, thank you and good listening!


++TRIGGER WARNING: KLH AND/OR VINTAGE PURISTS MIGHT WANT TO SKIP THE NEXT PARAGRAPH.++
When I say “nice condition,” I mean they were clean, with no obvious signs of damage or abuse. The front panels looked original, almost like new, and included the iconic KLH badges. However, although undamaged, the original walnut cabinets were not unchanged. Apparently a previous owner (not the one I got them from) didn’t like the original look. My guess is the spouse wanted them to match their other décor. I don’t know. In any case, he added a half-inch thick solid oak frame around the front bezel and a three-quarter-inch thick solid oak top (they can now only be used in the standing orientation). He appears to have been a woodworker, as he did excellent work and they look good. The really questionable design choice, however, was to cover the walnut sides not with solid oak or oak veneer, but paint! Perhaps the sides weren’t visible in his setup. Anyway, it all works for me since I have oak hardwood floors!
++END OF WARNING++
Aside from the modifications of the cabinet exteriors, the speakers appeared untouched and unopened. I decided to look inside, with an eye to recapping and resealing them.
I worked on one speaker at a time. After removing the six hex-head screws holding the woofers they easily lifted out. Large foam washers had been used under the frames to form a seal. Disconnecting the wires was easy since KLH just used simple wire nuts to attach them. Next I carefully removed the cheesecloth and fiberglass insulation, revealing a confused bird nest of other wires. I untangled them, labeling all the connections as I went along so I would know how to put them back together. Finally, I inspected the crossover.
The Model 23 crossover is about as simple as they get. There’s the three-way switch (Decrease, Normal, Increase), three resisters, one capacitor, and an inductor. They all looked original and fine, but since they are 50+ years old (“73” was stamped in both cabinets, near the inductor), I planned to replace the original red-and-black Mexican 4uF electrolytic capacitor no matter what. I used new Solen PB 4mfd metalized polypropylene 400V caps. They weren’t expensive, about $6 each. Like Mr. Con E. Head, they’re from France. The resisters and inductors I decided to leave as is.
To make things a bit easier, using some copper wire I soldered in the new capacitor and hot-glued it to the inside of the enclosure. I sprayed the pots with electronic contact cleaner/lubricant, turning the knobs back-and-forth to work it in. Then I simply reconnected all the wires (generally stripping off fresh wire) and carefully replaced the batting, cheesecloth, and woofer. I reused the foam seals since they still seemed good.
The woofers both looked good, but due to age their cloth surrounds were very dry. Whatever sealant was originally used had mostly turned to dust, and you could look through the cloth like it was window screen. I ordered some of RoyC’s secret-sauce sealant (thanks, Roy!) and applied two light coats to the surrounds and the dust caps, waiting 24-hours between coats. This greatly improved the look and feel of the speakers and I could no longer see through them.
So, how do they sound? The short answer is, “Great!” They are just wonderful to listen to. I have them sitting about a foot off the floor on cinder blocks with foam pads between each layer (cheap but effective). Do they sound better than before? I think the answer is, “Yes!” but I don’t have any hard evidence. The truth is, they sounded really good to my old ears the day I got them. I think they now sound better, especially at higher volumes in the high and low end, but how much of that could be wishful thinking on my part I can’t say. I don’t have the ability to test the old caps to see if they were out-of-spec or not. But it was a fun project, cost very little, and if I think they sound better, that’s good enough for me!
I am including some photos for your edification and enjoyment.
And one more thing: I want to thank all the members and contributors of this forum, which was an indispensable help to me, as I’m sure it is to many others. I spent many hours perusing posts here before tackling this project. To one and all, thank you and good listening!
Last edited:

 . YAY! Another pair of KLHs risen from the dead!