• The move to the new server is done. There are some software and database maintenance updates in process. This has us passing the hat around to help out. We appreciate any donations. Seriously, even a dollar helps. The payment page may be found here - https://www.audiokarma.org/support.html

L-Series / 43XX-Series Baffle: Smooth Edge Banding?

Johnny_Law

o.O
Subscriber
Working on a pair of water-damaged 4301Bs. I've had to remove a bunch of rotted MDF around the bottom edges, and the front baffle didn't escape from the damage.

After sanding, I can tell that JBL used some kind of flat, thin edge banding around the perimeter of the front baffle. Parts of this banding is either damaged or missing.

If I just re-spray the baffles (eventually, after filling in the edges and re-veneering), it will look rough in the spots where there's no banding.

I'd like to remove all the edge banding and re-install whatever it is.

Anyone know what to use? Or should I just use body filler and sand flat? Thanks!

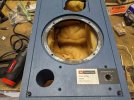
Pic of one corner as an example:

1707068766634.png
 
Register to hide this ad
If you have a Menards near you, they sell a variety of iron-on edgebanding in several wood species.

You could either stain or paint it.
Birch would be the best for painting.

An old clothes iron and a putty knife is helpful in removing old edgebanding.
 
Thanks - my question is, if it is edge banding that JBL used, what kind of edge banding is it specifically?

A wood veneer edge banding will have wood grain (naturally), and the edges of the JBL baffles are distinctly flat. So maybe it's a flat edge banding of some kind? Almost like a cardboard or thick paper?
 
Last edited:
Melamine edge banding? Right next to the wood edge banding at your local big box store. Not sure if it will wan to take paint well so birch may be better - minimal grain compared to oak.
 
Plus 1 on the melamine but paint won’t stick without a super primer of some sort.

Birch takes paint well, with proper priming.

I just completed making new birch kitchen cabinets with birch edgebanding, all painted.

With proper sanding, priming and a coat of paint (I did 2), seeing grain through the paint shouldn’t be an issue.

Important to sand with 200 or 300grit after priming because water-based primer raises the grain.
 
Hard to tell from your picture but from this one it would appear to be just a recess from the baffle board with no banding?

attachment.php
 
Here's a pic I snapped before sanding - the edges are flush (and the paint darker than those - perhaps those were refinished and the edge banding was removed before they were painted?)

1000020583.jpg

The birch edge banding sounds promising! Although I wish I knew exactly what they used at the factory...
 
Here's a pic I snapped before sanding - the edges are flush (and the paint darker than those - perhaps those were refinished and the edge banding was removed before they were painted?)

View attachment 3109267

The birch edge banding sounds promising! Although I wish I knew exactly what they used at the factory...
And maybe, like yours, there's no level-change and it's just an optical illusion in the photo. I can't tell because they're not mine!
 
Well here's what it looks like after being shaved off. It's like a thick construction paper. It looks to have been glued on, then painted at the same time as the baffle. When it comes off clean, you can see an obvious thick layer of glue underneath.

It mostly came off in slices, but a couple of them came off whole.

One of them (from the non-pictured speaker) pictured below:

1708298381999.png

1708298396156.png
 
Figured it out. JBL used drywall tape for the edge banding around the front baffle.

Left is a new stuff from home Depot, right are the strips that came off intact from the 4301b. I can't show this in a picture, but the composition / thickness / feel is identical.

1000021769.jpg
 
Figured it out. JBL used drywall tape for the edge banding around the front baffle.

Left is a new stuff from home Depot, right are the strips that came off intact from the 4301b. I can't show this in a picture, but the composition / thickness / feel is identical.
Very interesting. But, in the end, paint is paint!
 
Yep, this answers the question of how to get the paint to look identical across the whole front (edges & baffle), and now we know how to get the edges to sit flush with the baffle as they originally were.
 
Ok so update after living with them a little while, and going through a move ...

The edging is much more delicate than the original stuff. It's very easy to chip - because it's so thick. The stuff JBL used was thinner and didn't have layers that were easy to flake off. I unfortunately chipped a very small bit of paint off with a finger ...

1722379457232.png

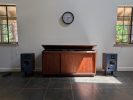
Still haven't redone the foilcals or built grilles, but in the meantime they fit the space well and sound great.

1722379518522.png
 
Back
Top Bottom