• The move to the new server is done. There are some software and database maintenance updates in process. This has us passing the hat around to help out. We appreciate any donations. Seriously, even a dollar helps. The payment page may be found here - https://www.audiokarma.org/support.html

Lipstick on a Pig

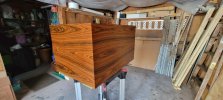
I've decided on amber dye with semi-gloss lacquer. Finished the day and tomorrow I'll spray the lacquer. On its own, the dye has a goldish color. It turns brown when the clear coat is applied.

And no comments on the cluttered garage! Had to move Lilly's car out so I could work.

Time to start on the second cab.

View attachment 3754822

View attachment 3754823
Great job in matching up the outside veneer! Not too shabby on the inside veneer either, placing matching rings on either side of the main driver.
 
Impressive. If you ever have enough time there are many much more ugly boxes out there that their owners would love an instruction manual on how to do the same. Enjoy.
 
Last edited:
I've decided on amber dye with semi-gloss lacquer. Finished the day and tomorrow I'll spray the lacquer. On its own, the dye has a goldish color. It turns brown when the clear coat is applied.

And no comments on the cluttered garage! Had to move Lilly's car out so I could work.

Time to start on the second cab.

View attachment 3754822

View attachment 3754823
Absolutely NO ONE is looking at the clutter! They are looking at those awesome cabs! Again, awesome work.
 
Impressive. If you ever have enough time there are many much more ugly boxes out there that their owners would love an instruction manual on how to do the same. Enjoy.

Veneering is actually much easier than it looks. Patience and some trial & error is all it takes. There are countless youtube videos that show how to do it. A "normal" speaker cab is fairly easy as it's all right angles and outside corners. If you use heat bonded PVA glue, as I did on this cab, you can always remove the veneer if there's a problem.
 
Back
Top Bottom