About a year ago I bought a sweet little HK730 receiver from a beloved HK'er in the Bay Area,
@sberger. After some routine cleaning and maintenance, which included upgrading the power supply and sub-rectifier capacitors, the unit sounded really sweet. It also looks quite spiffy:
View attachment 922239
The tuner pulls in signal like crazy and the 40-watt, dual-mono amplifier is crystal clear, with just a hint of that 70's era warmth that you hear so much about. My only complaint is that I am not wild about the phono stage, which seems dull and lifeless. After browsing the internets I was gratified to find at least one other person who loves the rest of the HK730 more than its phono preamp (
http://www.amcanaudio.com/?p=788).
Lately I have been running the turntable through an outboard ProJect phono stage and a Schiit passive preamp (on the shelf below the receiver in the photo below).
View attachment 922247
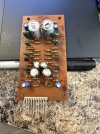
This is an okay solution but I wondered whether I could do something to improve my enjoyment of the HK730 preamp. I bought one on eBay from a seller who was parting out a dead HK730 (tragic!) so that I could play around with it. Here is a photo of the board (partially recapped).
View attachment 922251
I couldn't find any frequency response curves online so I used the schematic in the HK730 manual to construct a circuit model in a browser-based simulation package, called Partsim. If you are a nerd about these things, Partsim is basically a simple version of SPICE with a nice front end and a link to the Parts Express catalog. The program is free and I am happy to share the model with anyone else out there who wants to try their hand at modding this pre-amp. Here is the circuit:
View attachment 922255
The big capacitors, C721 and C722, were not actually on the schematic and their position came from looking at the board itself. It is clear that they are just there to filter out noise in B+ and B-, and so they don't do anything in this simulation. The transistors are standard, small-signal BJT models and the components are marked with the numbering scheme of the left channel, according to the HK730 manual. After a bit of debugging I got the circuit to do what it was supposed to do. Here, then, is the frequency response that the HK730 phono-preamp was designed to have:
View attachment 922271
In the above graph, the HK730 response curve (green) is plotted together with the original RIAA standard curve (dashed black line). They are pretty much dead on top of each other until you get down below 60 Hz, where the HK730 starts to roll off pretty quickly. This roll off reminded me of the modified RIAA curve that the Swiss introduced sometime in the 70's, which is usually called the IEC or RIAA/IEC response curve. I found data for that curve online too and included it in the plot:
View attachment 922276
My understanding (from reading nerdy blog posts) is that the IEC response curve was never very popular and was positively reviled by audiophiles (
http://www.stereophile.com/features/cut_and_thrust_riaa_lp_equalization/#7xH3ttVqkQoKm2iY.97). The recording industry did not modify its pre-emphasis to fit the new curve, so pre-amps that use it actually introduce low frequency distortion BY DESIGN. For some reason, it looks like HK designed this pre-amp using the IEC curve, and actually, if you look closely, the HK response curve rolls off a bit faster at low frequencies than the IEC standard curve.
The power of having a circuit model and a SPICE-based simulation program is that you can tweak parameters to your heart's content, so I started looking for a minimal tweak that I could make to the circuit that would push the response curve up toward the old RIAA standard. In the end, bumping up two capacitor values by a factor of 10 (C716 from 0.039 to 0.33 µF and C718 from 0.1 to 1.0 µF) pushed the up the low-frequency response to match the old RIAA standard almost exactly.
View attachment 922285
The other simple tweaks I decided to make were to: (1) increase the B+/B- filter capacitance from 220 to 470 µF and (2) replace the associated filter resistors (which set the rail voltage for the entire circuit) with precision, mil. spec., metal film resistors.
View attachment 922294
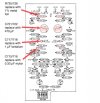
If you are interested in trying this out at home, here is a marked schematic that should make it easy-peasy.
View attachment 922295
Actually, before you run out and do this, maybe you should check back in a day or so, after I have popped the modified board into the unit and given it a listen.