Calrissian
Gambler, Smuggler, Playboy, Business Analyst
After a quick count I found that over the years I've taken in a total of 9 orphaned little Advent Mini speakers. Most I found abandoned and alone (albeit in pairs) at thrift stores. Recently I'd added a set of three (?) that was practically being given away on everyone's favorite auction site.
Since I'd recently decided to try and make a Dolby Atmos home theater system using vintage Advent speakers (that's another thread entirely) naturally I thought of these little guys for use as surround speakers.
It was time for some restoration work. It's pretty much a guarantee that any old Advent speaker is going to need a refoam. I also wanted to restore and darken the solid wood caps to match my existing woodwork. And some initial testing told me that I'd have to replace two tweeters as one sounded more or less blown and another sounded a bit off to me.
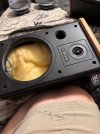
Unrestored Advent Mini pair

So the first thing I did was take them all apart. Just 6 screws (phillips type on most but allen headed on a few of the older pairs) hold the cases together. Once you get inside the case you can unscrew the wooden caps from the top and bottom. They're held on with three screws apiece.
Upon opening things up I found that one pair of mini's had square plastic tweeters instead of the round tweeters that all the other pairs used These plastic tweeters turned out to be the ones that I thought had inferior sound. They came from the cases having the highest set of serial numbers and they appeared to be original so I guess that towards the end of the run the Chinese company that had purchased Jensen (which itself had only purchased Advent a few years prior) started using some cheaper tweeters. In any case I replaced them with a pair from Parts Express. I was excited to find that the Parts Express replacement exactly matched the original version.
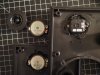
Advent Mini tweeters (round and square versions with matching PE replacement pair outside the cases)
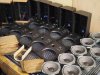
Then it was time to remove the nasty, gnarly, sticky, filthy, 30-year-old, goed-up surround material from all 9 baskets. Most of us know how much this process sucks so I won't say anything more about it here.
(Except this... Don't ever attempt it over a recently refinished hardwood floor. Without any type of cover whatsoever. And if you do just move out before your wife gets home.)
I refoamed all of the 5 1/4" woofers using Parts Express kits. The original dust caps on these woofers are somewhat unique. They're made of a screen type material that allows for some air escape. In my opinion the sound of the Mini's slightly bigger brother the "Baby Advent" is subtly (but noticeably) altered when you replace the cap with standard solid caps. I doubt the dust cap design is as critical with the mini given that these are ported speakers but I wanted to keep the sound as unmodified as possible so I did not remove the caps and thus did not shim the coils. Instead I relied on a hybrid method. I used the "AA Battery Method" to raise and hold the cone in place while I applied glue to the inner part of the surround and cone and also to lower the cone (wires reversed) as I glued the surround down to the cone. Then I used the "30 Hz Test Tone Alignment Method" as I glued the surround foam to the basket. (Past Audiokarma threads were great in helping me with these two processes.) I was a perfect 9 for 9 in getting proper voice coil alignment and great sound after the refoams! But then I probably shouldn't brag as I've heard that Advents are among the simpliest speakers to refoam.
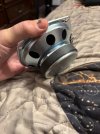
Refoamed 5.25" Woofers...

While the glue was drying on the refoams I got to work on some wood refinishing. I went with a 100, 120, 150, and finally 180 grit sandpaper process followed by a Minwax dark walnut stain and 5 coats of Minwax satin poly. I diluted the poly about 1:2 with mineral spirits essentially making it a rub-on poly. I sanded between coats with a 220 pad. This thinned out rub-on method is a great way to eliminate drips and bubbles and each coat dries quickly, but 4-5 coats is probably a minimum. I think the wood species on these endcaps is pecan but they match the oak woodwork of my home nicely once stained with a matching Dark Walnut. You'd want to use a considerably lighter stain to get a more original look.
Refinished Advent Mini end caps...

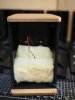
A piece of fiberglass type insulation is used to dampen the woofer. Note that it is folded in half leaving the upper area with the port and the tweeter uncovered.
Advent Mini inner case with dampening material
I labeled all of the parts with numbers on painters tape so that I could put them back into the properly paired cases. The caps all tested fine on my multimeter so the crossovers never left their cases. (And better yet, my solder gun never left it case!)
It's surprising how much time is spent simply dusting and cleaning everything up on a project like this. I mostly just use those blue shop paper towels and water in a spray bottle. Sometimes a bit of Endust is good if you want a little shine on the plastic. I use rubbing alcohol to good effect to remove any glue marks that aren't yet dry, and Goo Gone (to much less good effect but I still try) on the ones that are. I always apply a bit of Deoxit to electronic connections. Generally speaking I try to be a bit less anal than I know I am. Luckily none of the parts here were so scratched up that I had to resort to a can of spray paint or an air brush.
Refinished Advent Mini parts.
I decided I would be using only two pairs of the Minis in my home theater system with the other speakers being comprised of other models of Advents. The Minis will be mounted near the ceiling and serving as the Atmos speakers. So I only refinished two pairs to match the woodwork and style of my other speakers. The cloth I chose is an acoustic cloth ordered from Guilford of Maine. I chose the "Buff" color. I'm using it to refinish the other speakers intended for use in the system as well. I had just enough good (no-run) original black cloth grills to restore the other two pairs that I won't be using in the theater setup in a more original manner.
I super-glued the plastic Advent emblems to little metal pins with clasps designed for use as tie clips. The original design of these emblems allows for them to be turned 90 degrees when using the speaker on its side as I will be in my HT setup. And this will still be still be possible with the tie clip method I designed.
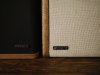
The last extra speaker ended up with dark walnut caps but a black grill. He's a loner. An outlier having no adjacent serial number and now to be used only in case of emergency. Still a bit of an orphan I guess...
Restored Advent Minis

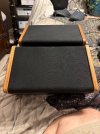
Advent Mini pair restored to match my decor
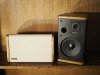
Advent Mini pair restored to its original design

All in all it was a pretty enjoyable and straightforward project. Folks may question why someone would spend this much time on speakers that are smallish and kind of midfi at best. Fair question. But I've always loved the sound of Advents and while I admit these are pretty far removed from the Old Large Advents of the seventies I find that there is still something quite charmingly Advent about their sound, warts, ports, plastic and all.
And what else is there to do these days anyway?
-Brando
Since I'd recently decided to try and make a Dolby Atmos home theater system using vintage Advent speakers (that's another thread entirely) naturally I thought of these little guys for use as surround speakers.
It was time for some restoration work. It's pretty much a guarantee that any old Advent speaker is going to need a refoam. I also wanted to restore and darken the solid wood caps to match my existing woodwork. And some initial testing told me that I'd have to replace two tweeters as one sounded more or less blown and another sounded a bit off to me.
Unrestored Advent Mini pair
So the first thing I did was take them all apart. Just 6 screws (phillips type on most but allen headed on a few of the older pairs) hold the cases together. Once you get inside the case you can unscrew the wooden caps from the top and bottom. They're held on with three screws apiece.
Upon opening things up I found that one pair of mini's had square plastic tweeters instead of the round tweeters that all the other pairs used These plastic tweeters turned out to be the ones that I thought had inferior sound. They came from the cases having the highest set of serial numbers and they appeared to be original so I guess that towards the end of the run the Chinese company that had purchased Jensen (which itself had only purchased Advent a few years prior) started using some cheaper tweeters. In any case I replaced them with a pair from Parts Express. I was excited to find that the Parts Express replacement exactly matched the original version.
Advent Mini tweeters (round and square versions with matching PE replacement pair outside the cases)
Then it was time to remove the nasty, gnarly, sticky, filthy, 30-year-old, goed-up surround material from all 9 baskets. Most of us know how much this process sucks so I won't say anything more about it here.
(Except this... Don't ever attempt it over a recently refinished hardwood floor. Without any type of cover whatsoever. And if you do just move out before your wife gets home.)
I refoamed all of the 5 1/4" woofers using Parts Express kits. The original dust caps on these woofers are somewhat unique. They're made of a screen type material that allows for some air escape. In my opinion the sound of the Mini's slightly bigger brother the "Baby Advent" is subtly (but noticeably) altered when you replace the cap with standard solid caps. I doubt the dust cap design is as critical with the mini given that these are ported speakers but I wanted to keep the sound as unmodified as possible so I did not remove the caps and thus did not shim the coils. Instead I relied on a hybrid method. I used the "AA Battery Method" to raise and hold the cone in place while I applied glue to the inner part of the surround and cone and also to lower the cone (wires reversed) as I glued the surround down to the cone. Then I used the "30 Hz Test Tone Alignment Method" as I glued the surround foam to the basket. (Past Audiokarma threads were great in helping me with these two processes.) I was a perfect 9 for 9 in getting proper voice coil alignment and great sound after the refoams! But then I probably shouldn't brag as I've heard that Advents are among the simpliest speakers to refoam.
Refoamed 5.25" Woofers...
While the glue was drying on the refoams I got to work on some wood refinishing. I went with a 100, 120, 150, and finally 180 grit sandpaper process followed by a Minwax dark walnut stain and 5 coats of Minwax satin poly. I diluted the poly about 1:2 with mineral spirits essentially making it a rub-on poly. I sanded between coats with a 220 pad. This thinned out rub-on method is a great way to eliminate drips and bubbles and each coat dries quickly, but 4-5 coats is probably a minimum. I think the wood species on these endcaps is pecan but they match the oak woodwork of my home nicely once stained with a matching Dark Walnut. You'd want to use a considerably lighter stain to get a more original look.
Refinished Advent Mini end caps...
A piece of fiberglass type insulation is used to dampen the woofer. Note that it is folded in half leaving the upper area with the port and the tweeter uncovered.
Advent Mini inner case with dampening material
I labeled all of the parts with numbers on painters tape so that I could put them back into the properly paired cases. The caps all tested fine on my multimeter so the crossovers never left their cases. (And better yet, my solder gun never left it case!)
It's surprising how much time is spent simply dusting and cleaning everything up on a project like this. I mostly just use those blue shop paper towels and water in a spray bottle. Sometimes a bit of Endust is good if you want a little shine on the plastic. I use rubbing alcohol to good effect to remove any glue marks that aren't yet dry, and Goo Gone (to much less good effect but I still try) on the ones that are. I always apply a bit of Deoxit to electronic connections. Generally speaking I try to be a bit less anal than I know I am. Luckily none of the parts here were so scratched up that I had to resort to a can of spray paint or an air brush.
Refinished Advent Mini parts.
I decided I would be using only two pairs of the Minis in my home theater system with the other speakers being comprised of other models of Advents. The Minis will be mounted near the ceiling and serving as the Atmos speakers. So I only refinished two pairs to match the woodwork and style of my other speakers. The cloth I chose is an acoustic cloth ordered from Guilford of Maine. I chose the "Buff" color. I'm using it to refinish the other speakers intended for use in the system as well. I had just enough good (no-run) original black cloth grills to restore the other two pairs that I won't be using in the theater setup in a more original manner.
I super-glued the plastic Advent emblems to little metal pins with clasps designed for use as tie clips. The original design of these emblems allows for them to be turned 90 degrees when using the speaker on its side as I will be in my HT setup. And this will still be still be possible with the tie clip method I designed.
The last extra speaker ended up with dark walnut caps but a black grill. He's a loner. An outlier having no adjacent serial number and now to be used only in case of emergency. Still a bit of an orphan I guess...
Restored Advent Minis
Advent Mini pair restored to match my decor
Advent Mini pair restored to its original design
All in all it was a pretty enjoyable and straightforward project. Folks may question why someone would spend this much time on speakers that are smallish and kind of midfi at best. Fair question. But I've always loved the sound of Advents and while I admit these are pretty far removed from the Old Large Advents of the seventies I find that there is still something quite charmingly Advent about their sound, warts, ports, plastic and all.
And what else is there to do these days anyway?
-Brando