• The move to the new server is done. There are some software and database maintenance updates in process. This has us passing the hat around to help out. We appreciate any donations. Seriously, even a dollar helps. The payment page may be found here - https://www.audiokarma.org/support.html

Musical Fidelity M5si disassembly question

Mat86

Active Member
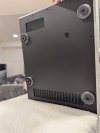
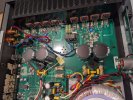
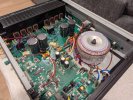
Just wondering before screws start popping out, but on a model like this to access the bottom of the pcb for rework, I'd have to remove the rear I/O screws, board riser screws, 8 transistors from the heatsink, and disconnect the transformer to lift the board out of the chassis, right? No bottom servicing access or something obvious I'm not cluing into?

Anyone have experience with MF generally? (easy or a pain?)

PXL_20250527_150840014.jpg
 

Attachments

  • PXL_20250527_151033488.jpg
    PXL_20250527_151033488.jpg
    54.4 KB · Views: 23
  • PXL_20250527_145820773.jpg
    PXL_20250527_145820773.jpg
    172.1 KB · Views: 23
Register to hide this ad
No experience with "those MF'ers" but judging from your pics I'd say a major Pain--not impossible but needing lots of time and careful skill. Good to have detailed photos for reassembly, plus new thermal paste on transistors. I can't tell whether or not the bottom panel comes off the box frame sides but in any case, removed or in place, you'll have to separate the PCB to access its underside.
Reminds me of the old auto mechanic joke "Designed with the service man in mind", where you have to pull the entire engine to change a spark plug.
Correct me if I'm wrong but ~ It appears that all of the disconnects are plugs or push-on connectors, which is much preferable to de-soldering. So you might not need to remove the I/O screws if you can instead just pull the wires off their posts on the PCB.
Good luck & have fun! (And as always, cross your fingers when you power it back up.)
 
The rear I/O is attached to the board and like other units is screwed to the rear panel for support (and speaker terminals on o-rings), I'm thinking now what I described is the default way to go

alternative would be removing the transformer from the bottom panel, and riser screws, I'd have direct access but then the board might be stressing all weight on those transistors and 2 screws, and the transformer would still be an annoying anchor

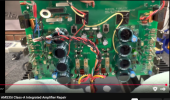
Saw a guy on youtube working on a different, larger model, but the premise looks the same. Disconnected everything other than the soldered transformer wires, and put a towel on the chassis to hold it up and folded it over awkwardly.
 

Attachments

  • Screenshot 2025-05-29 102420.png
    Screenshot 2025-05-29 102420.png
    642.1 KB · Views: 11
The rear I/O is attached to the board and like other units is screwed to the rear panel for support (and speaker terminals on o-rings), I'm thinking now what I described is the default way to go

alternative would be removing the transformer from the bottom panel, and riser screws, I'd have direct access but then the board might be stressing all weight on those transistors and 2 screws, and the transformer would still be an annoying anchor

Saw a guy on youtube working on a different, larger model, but the premise looks the same. Disconnected everything other than the soldered transformer wires, and put a towel on the chassis to hold it up and folded it over awkwardly.
Excellent. Yeah, I get the towel technique--in effect an improvised fixture--so long as it provides adequate clearance and holds the workpiece (your PCB) sturdily enough to do your rework on the bottom side.
 
How old is your unit? I had a problem with my m5si, contacted mobile fidelity and learned mine had a five year warranty. Sent mine to one of their service centers in Texas.
 
I'm back on this unit trying finish what I wanted, but totally stuck right now on disassembly

[edit: figured it out, this disassembly is a real b****]
 
Last edited:
Back
Top Bottom