• The move to the new server is done. There are some software and database maintenance updates in process. This has us passing the hat around to help out. We appreciate any donations. Seriously, even a dollar helps. The payment page may be found here - https://www.audiokarma.org/support.html

My DIY 12in Carbon Fiber Audio-Technica AT-1100 tonearm project

Bootbox

Active Member
I've been watching eBay for years for a good deal on a tonearm I've always been drawn to, the Audio-Technica AT-1100. One finally popped up for a great price from London. The seller was awesome and he got it to me in TX, safe and sound in record time.

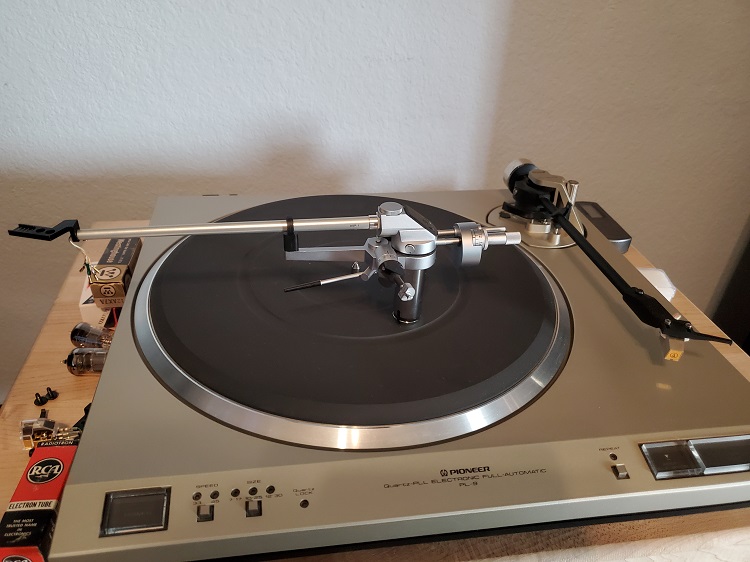
When it first got here, sitting on my old table, a Pioneer PL-9
arm.jpg


I love the precision look of it, the underslung, micrometer style counterweight. I also love the fact that it uses a swappable arm tube system with a small contact board on a terminal block at the rear of the arm tube.

DEhuqCa.png


I have a few cartridges that are a good match for this arm, compliance-wise. The Audio-Technica AT-ML170/OCC, a Denon 301MKII, and an Audio-Technica OC9XSL. Spare arm pipes are not super easy to come by though, and aren't cheap when you can find them.
 
Register to hide this ad
One day I was looking at the back of my arm tube and started wondering if I could design and 3D print the necessary parts to make my own spare arm tubes with carbon fiber tubing.

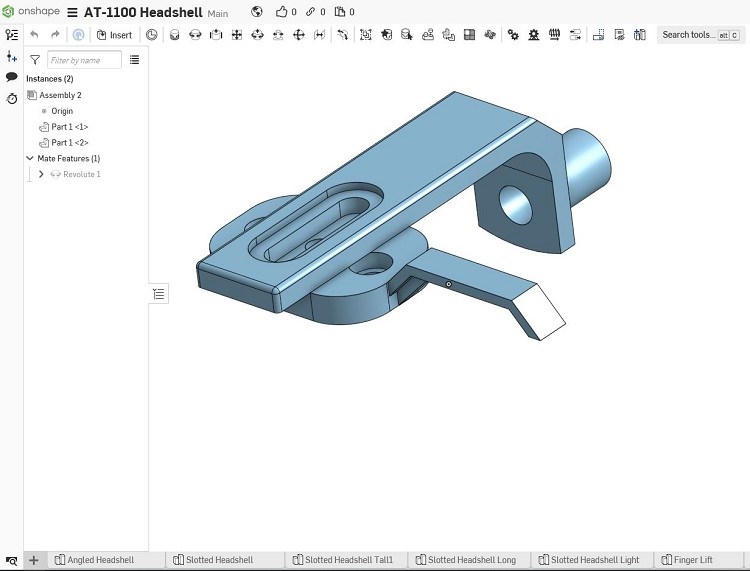
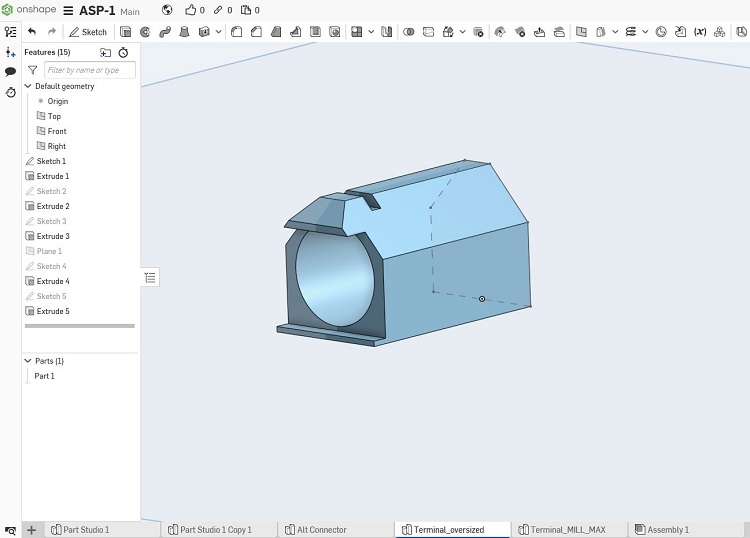
The design of the terminal and headshell went a lot easier than I thought it would. I've been trying to learn Fusion360 for a while with no luck really getting my head around it. I switched to Onshape and with a few YouTube tutorials to get the lay of the land, I quickly had models for the terminal block that holds the contact board at the rear of the arm pipe, and a headshell design that would allow for overhang and offset angle adjustment.

Capture1.jpg


Capture2.jpg
 
The prints came out great and the carbon fiber tubing I picked up from Amazon was a perfect force fit. I cut the CF tube to the right length for a 300mm effective length (12in) and glued the tubing into the terminal block at the rear. I left the headshell as a force fit for two reasons: Easy azimuth adjustment if needed and, the 3D printed headshell is not permanent. I will eventually have the headshell CNC cut in 6061 aluminum by PCBWay (who made my custom terminal block circuit boards, more on that in the next post).

Here is the prototype 3D printed terminal block using a contact board I pulled off a spare arm tube I bought damaged on eBay, along with a rewire using Cardas 33AWG wire (the original wires in the spare arm tube are not long enough):

20210707-182023.jpg


My Denon 301MKII mounted on the 3D printed headshell with the 12in carbon fiber tube:

12in-301-MKII-2.jpg


The soldering is not the best but I have developed a method to do a much neater job on future boards. For now, this one works great and sounds fantastic. I was floored the first time I played something with this arm. Crazy wide soundstage, intense separation, huge bass slam, and zero tracking issues. It's honestly a way bigger difference than I could have ever expected.
 
Last edited:
At this point the only thing holding me back from a cheap supply of swappable carbon fiber arm tubes in any length I like was the contact boards to make the cartridge wire to tonearm base connection point. I had the spare I pulled from the damaged arm tube for my prototype 12in arm, but I'd like to have 5 or 6 carbon arm tubes with cartridges mounted eventually, and finding that many spare tubes for a 40 year old tonearm was not going to be easy.

I began researching custom circuit board design and manufacturing. After all, the contact board is just a 0.6mm thick piece of PCB with some solder pads on it, in a custom shape to fit the terminal block at the back of the arm tube.

It turns out there are plenty of PCB makers that will make a small batch of PCBs if you supply them with the files. The problem was that the file format they wanted (something called a Gerber file) was a multi-layered file that required some pretty heavy knowledge to create properly. The software to create Gerber files was not easy to learn and I started thinking about how I could get the files I needed without cramming a college course in circuit board design.

Then I remembered Fiverr. It's a website that people use to get logos or drawings made by graphic designers for a $5 or so. Just quick, one-off files for a little money. Nothing you'd use to rebrand a huge corporation but helpful if you were making your own website and didn't have any logo creation skills. I wondered if anyone on there could create Gerber files for my simple PCB I needed. Sure enough, there was an Electrical Engineer on there offering his services for Gerber file creation. He was super friendly, interested in my project, and had my files ready in a couple of hours.

I sent the files off to PCBWay and had a quote ($60 for 25 boards with Immersion Gold coating on the solder pads) and had my boards in my hands a week later.

20210720-114645.jpg


I soldered one into my 'parts' unit spare arm tube and mounted my AT OC9XSL to it and I'm happy to report the custom contact boards work great. They fit into the terminal block and line up just like stock with the spring loaded contacts inside the tonearm base. I'm now good to go for as many DIY arm tubes as I could ever need. :banana:
 
Another picture showing the 3D printed headshell and finger lift a little better. I designed the finger lift to countersink the cartridge screws so that the screw heads would not block the finger lift rotation by contacting the sides of the headshell.

12in-301-MKII.jpg


As I mentioned above the goal is to have the headshell CNC cut from 6061 aluminum using the file I created for the 3D printing. The aluminum, while light, is not nearly as light as plastic and along with the extra leverage created by the much longer arm tube, the weight at cartridge end will no longer be able to be balanced by the stock counterweight at the rear. Thankfully, Audio-Technica also made an S-shaped tonearm tube for this arm, which came with a much larger, heavier counterweight.

at-1100-heavy.jpg


I've managed to find and buy an AT-1100 with the S-shaped arm and heavier counterweight on Yahoo Auctions Japan just this week. It should be here sometime next week. I'm very excited to get the heavy counterweight and aluminum version of my headshell in place.
 
Very nice, Id have the Counter weight for the S arm CNC machined as well.

Athanasios

Thank you. I had considered making a heavier counterweight somehow but luckily found an AT-1100 with the S-shaped arm and heavier counterweight at a great price from Yahoo auctions Japan. It should be here sometime next week.

Those AT tonearms are so cool looking! :thumbsup: Looks like they have dampening feature from the cap on the top of the arm?

They do have a damping feature but it's not the cap on the top (that cap is a set screw that holds the interchangeable arm tube firmly in place). The oil damping is done a lot like the SME system, with an oil trough and a paddle that dips into the oil. There's a dust cover over the oil trough so it's kind of hard to make out in the pictures. You can see it pretty well in this picture I found on Google image search though, without the dust cover in place. You can also just barely make out the paddle as well.

RicyfiY.png


Awesome effort! Ingenious resourcefulness!

Thank you! I really appreciate the kind words. This has been one of the more rewarding DIY projects I've worked on. I'm really glad to have access to these types of resources, it's amazing what's possible these days.
 
Thank you. I had considered making a heavier counterweight somehow but luckily found an AT-1100 with the S-shaped arm and heavier counterweight at a great price from Yahoo auctions Japan. It should be here sometime next week.


They do have a damping feature but it's not the cap on the top (that cap is a set screw that holds the interchangeable arm tube firmly in place). The oil damping is done a lot like the SME system, with an oil trough and a paddle that dips into the oil. There's a dust cover over the oil trough so it's kind of hard to make out in the pictures. You can see it pretty well in this picture I found on Google image search though, without the dust cover in place. You can also just barely make out the paddle as well.

RicyfiY.png


Thank you! I really appreciate the kind words. This has been one of the more rewarding DIY projects I've worked on. I'm really glad to have access to these types of resources, it's amazing what's possible these days.

Yes, have a SME 3009 Improved arm with that kind of add-on dampening system (paddles & trough) works great! My new Jelco TS-550S MKII tonearm has the dampening on top of the arm with a cover screw cap. Use it also with this arm. The dampening really makes the cartridge sound better!
 
very much liked this topic ,love the at1100 have a spare but have lost the set screw for tightening the armwand ,can anyone point me in the direction of spares or 3d print any
 
The prints came out great and the carbon fiber tubing I picked up from Amazon was a perfect force fit. I cut the CF tube to the right length for a 300mm effective length (12in) and glued the tubing into the terminal block at the rear. I left the headshell as a force fit for two reasons: Easy azimuth adjustment if needed and, the 3D printed headshell is not permanent. I will eventually have the headshell CNC cut in 6061 aluminum by PCBWay (who made my custom terminal block circuit boards, more on that in the next post).

Here is the prototype 3D printed terminal block using a contact board I pulled off a spare arm tube I bought damaged on eBay, along with a rewire using Cardas 33AWG wire (the original wires in the spare arm tube are not long enough):

20210707-182023.jpg


My Denon 301MKII mounted on the 3D printed headshell with the 12in carbon fiber tube:

12in-301-MKII-2.jpg


The soldering is not the best but I have developed a method to do a much neater job on future boards. For now, this one works great and sounds fantastic. I was floored the first time I played something with this arm. Crazy wide soundstage, intense separation, huge bass slam, and zero tracking issues. It's honestly a way bigger difference than I could have ever expected.
 
Very nice job. I'm in the midst of the same type of project. I'm using the Cardas wire in a teflon tube. However, I keep seeing posts and comments that there HAS to be some type of damping applied within the tube. Did you use any type of damping material inside the CF tube. Suggestions have been long slinder slivers of Magic Eraser, Long strands made from twisting Poly Pillow Stuffing or strands of cotton string. Are you using any internal damping? There has also been many posts the arm is very sensitive in the total mass at the end of the tonearm and do NOT recommend any type of metal headshell. I'm curious about your custom printed headshell: How does the cross piece with the cartridge mounting holes attach to the part of the shell that mounts to the arm? Looks like a great job. And you don't really need to have an adjustable headshell as you can make these changes at the pivot point with the proper Protractor printed out.
Yes, have a SME 3009 Improved arm with that kind of add-on dampening system (paddles & trough) works great! My new Jelco TS-550S MKII tonearm has the dampening on top of the arm with a cover screw cap. Use it also with this arm. The dampening really makes the cartridge sound better!
One thing that I have found out myself and verified through AT is that the referred fluid is:

50,000 cSt (centistokes) pure silicone oil is the ideal specification for the damping trough on the Audio-Technica AT-1100 / Signet XK-50 tonearm family.
  • Primary Recommendation (Sweet Spot): 50,000 cSt provides the ideal balance of dampening low-frequency arm/cartridge resonance and taming mechanical vibrations without inducing excessive drag on the tonearm.
  • Lighter Alternative: 20,000 to 30,000 cSt can be used if you prefer a lighter damping effect, particularly with very high-compliance moving magnet setups.
  • What to Avoid: Heavy cueing/lift oils rated at 100,000 cSt or higher should be avoided, as they create too much resistance and cause sluggish tracking.
  • Application Guidelines​

    • Fill Level: Fill the reservoir trough only 1/3 to 1/2 full.
    • Paddle Clearance: Do not fully submerge the paddle pin or overfill the reservoir, as capillary action can cause the high-viscosity fluid to wick up the pillar or overflow into the bearing assembly. No more than the lower third of the paddle breaking the service of the oil.
Using the Conrad Hoffman protractor generator:
  • Select Custom Mode / Fixed Geometry: In the Custom Arc Template Generator, instead of letting the software calculate a standard Baerwald or Stevenson overhang for a fixed pivot-to-spindle, set it to calculate the required pivot-to-spindle distance based on your arm's fixed effective length and linear offset.
 
The prints came out great and the carbon fiber tubing I picked up from Amazon was a perfect force fit. I cut the CF tube to the right length for a 300mm effective length (12in) and glued the tubing into the terminal block at the rear. I left the headshell as a force fit for two reasons: Easy azimuth adjustment if needed and, the 3D printed headshell is not permanent. I will eventually have the headshell CNC cut in 6061 aluminum by PCBWay (who made my custom terminal block circuit boards, more on that in the next post).

Here is the prototype 3D printed terminal block using a contact board I pulled off a spare arm tube I bought damaged on eBay, along with a rewire using Cardas 33AWG wire (the original wires in the spare arm tube are not long enough):

20210707-182023.jpg


My Denon 301MKII mounted on the 3D printed headshell with the 12in carbon fiber tube:

12in-301-MKII-2.jpg


The soldering is not the best but I have developed a method to do a much neater job on future boards. For now, this one works great and sounds fantastic. I was floored the first time I played something with this arm. Crazy wide soundstage, intense separation, huge bass slam, and zero tracking issues. It's honestly a way bigger difference than I could have ever expected.
According to all the sources I can find, the AT ART9 (original model) is pretty close to being the perfect match for the characteristics of the AT-1100 with 12" carbon fiber mod.
 
Back
Top Bottom