• The move to the new server is done. There are some software and database maintenance updates in process. This has us passing the hat around to help out. We appreciate any donations. Seriously, even a dollar helps. The payment page may be found here - https://www.audiokarma.org/support.html

Nikko Alpha 230s - burnt out 8V Panel Illumination Bulb and ...

Fred DuBuron

Active Member
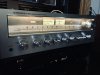
Recently picked up a second Niko Alpha 230 (1987 model) and it has a burnt-out Panel illumination bulb (8V 0.3Amp). The power LEDs work fine but the edge lighting is out. I have heard this bulb may not be available in its original configuration and was looking for advice on the best way to proceed.

My other issue is my original Alpha 230 (1983 model) has a calibration voltage issue with the Power LEDs... Idles with the first two LEDs lit. I currently do not have access to a sig generator to feed into the unit to adjust the power settings for the LEDs. What options do I have?... It performs well and sounds fine as is.
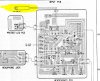
Nikko 8Volt 0.3Amp T10 bulb.JPG
 
Register to hide this ad
Nikko Alpha 230 Panel lighting

So here is where we are in this project...
You need to remove both the top and bottom covers
Then carefully remove the front panel (6 screws) Three on each side panel
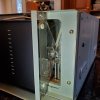
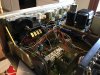
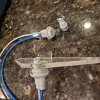
See picture #1 - Locate the blue and white wires as shown in picture #1. This is the power feeds for the panel illumination bulb
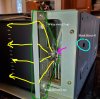
See picture #2 - This is the view with the front panel dropped down The two white rivets secure a clear Lexan triangular piece that also has the molded bulb retainer.
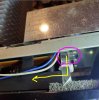
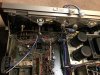
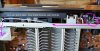
See Pictures 3-5 - This how the light makes it to the front panel. The Lexan acts like a Light Transmission Path (being denser than air). The joint (between the triangular Lexan piece holding the bulb and the second rectangular piece that is the front panel) allows the light to make the right-angle turn to "wash" the front panel with illumination.
We need to loosen Lexan triangular bulb holder piece the using a small jeweler's flat-blade screwdriver... locate the two white plastic rivets (refer to pictures) carefully push the rivet peg slightly out until the rivet head is slightly raised off the Lexan surface. Repeat with the lower rivet. The rivet locking pins should now have the tension released so the panel can be pulled loose from the bracket. Carefully leave the panel loose for now
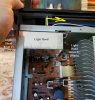
Now locate the two black plastic rivets holding the metal hood light hood (See pictures). Using a flat blade jewlers screwdriver, very carefully, with patience, pry andwork the rivet heads slightly loose to allow the metal Light hood cover to be removed. Make sure that all loose rivet pieces are accounted for!!
Now the fun part...
Based on Blue Shadow's recommendation (message above), I contacted David Wojnarowski <dwojo69@msn.com> and conferred with him on my panel lighting solution. His WEB page is really cool if you love panel lighting (dgwojo.com).
He recommended the following options
See next post
 

Attachments

  • Panel Light wiring.jpg
    Panel Light wiring.jpg
    104.1 KB · Views: 38
  • 20200912_104548.jpg
    20200912_104548.jpg
    105.1 KB · Views: 36
  • Lightpath-4.jpg
    Lightpath-4.jpg
    575.6 KB · Views: 36
  • Lightpath-3.jpg
    Lightpath-3.jpg
    620.9 KB · Views: 36
  • Lightpath-2.jpg
    Lightpath-2.jpg
    436.4 KB · Views: 36
This what he recommended...
See the first three pictures below...
Here his response (edited)
"...
Hi Fred,
I've been helping people out for over 20 years, hopefully you too. Is it possible to send a picture of the existing lamp? I suspect it's similar to the unavailable Pioneer lamps. Usually obsolete 8v/300ma lamps can be replaced with 8v wedge base lamps or LED's, the lamps are $1.50 each, LED's $2 each, these can be soldered in or I offer new sockets that eliminate soldering directly to a lamp or LED, a picture of what you have will help determine if this is possible. S&H is $5 in the United States, my PayPal ID is my email address. Attached are images of an {Pioneer} SX-650 with obsolete 8v/300ma lamps, I replaced the old sockets and installed white LED's, please check them out. I offer the LED's in white, cool white, blue, deep blue, dim amber, purple, and green, with the new socket, it's a 10 second job to swap lamps or LED's,
Dave..".


So this is a cool solution so here is the breakdown. I am going to try both the bulbs and LEDs to compare the effects. If I like it... I am going to do both amps the same.

The order is:
Item 1 - two wired sockets -.......$2.50 x 2 = $5.00
Item 2 - two cool white *LEDs -..$2.00 x 2 = $4.00
Item 3 - two *bulbs -...................$1.50 x 2 = $3.00
.......................................S&H........................$5.00
........................................TOTAL.................$17.00

Package should be here today or tomorrow
MORE TO COME>>>


thumbnail
thumbnail
 

Attachments

  • Pioneer_SX-650_White_LEDs_01.jpg
    Pioneer_SX-650_White_LEDs_01.jpg
    135.7 KB · Views: 24
  • Pioneer_SX-650_White_LEDs_03.jpg
    Pioneer_SX-650_White_LEDs_03.jpg
    143.9 KB · Views: 22
  • Pioneer_SX-650_White_LEDs_02.jpg
    Pioneer_SX-650_White_LEDs_02.jpg
    142.1 KB · Views: 24
How did you figure out I was in the FiS?
The two sites are a great way to keep connected
 

Attachments

  • 57 Fighter interceptor Sq.JPG
    57 Fighter interceptor Sq.JPG
    103.4 KB · Views: 10
  • 57 FIS.JPG
    57 FIS.JPG
    108.4 KB · Views: 10
Ahhh that's a story over some beers...
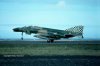
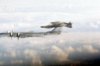
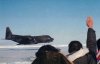
Let's just say it's really far far up North, an open ramp, a harness with a video camera, 250knots, and an altitude of...under 30ft(?) and over 300 Navy guys on the slippery stuff...

(UNCLASSIFIED)
DW- LC-130H makes another pass - Darin Weaver 3.jpg
 
So the light upgrade is installed... The picture shows the new sockets one with the LED installed and to other the standard bulb.
For now, I am using the LED as it runs cooler.
The next picture shows the modification to the light hood where I was forced to cut a small window to allow the socket base and wires to exit the hood. Works fine and the light bleed through is not a problem.
The last picture shows the one amp with factory lighting and the bottom amp running the new LED. I guess I am going to have to modify the other amp soon.


20200921_161756.jpg Nikko Light hood mod.JPG
20200921_210036.jpg
 
Last edited:
Let's just say it's really far far up North, an open ramp, a harness with a video camera, 250knots, and an altitude of...under 30ft(?) and over 300 Navy guys on the slippery stuff...
That had to be pretty frick'n cold.:D
 
Looks good. First time I have seen the new being more vintage looking than the old. The white scale in the original, lower amp in the pic seems too bright and I like the color of the one that isn't so bright.
 
Looks good. First time I have seen the new being more vintage looking than the old. The white scale in the original, lower amp in the pic seems too bright and I like the color of the one that isn't so bright.

I tend to agree...
(by the way, the lower amp is the one we fixed. The top amp with more yellow illumination is factory)
Dave has a Dim Amber LED we might try... I also just got in some yellow gels that I might slip in between the two Lexan panels to see how that looks.

He is helping me reconfigure my Pioneer SX-1010 lighting too
 
I thought I had that wrong. LEDs are getting better all the time. Soon we'll be able to order the color we want for many things like individual LEDs but not lamps, multiple LEDs in a fixture, has to be a big enough demand.
 
Back
Top Bottom