• The move to the new server is done. There are some software and database maintenance updates in process. This has us passing the hat around to help out. We appreciate any donations. Seriously, even a dollar helps. The payment page may be found here - https://www.audiokarma.org/support.html

Pioneer SX-1050/1250 Volume Control Pot (ACV-169)

EpicGamerGuy

New Member
Hello,

I have a very specific problem and I don't know where to turn anymore, so I'll try you.

I own a Pioneer SX-1050 vintage amp and the previous owner drilled 3 holes in the volume potentiometer to clean it, he drilled through the loudness connection (Track that connectsloudness to the potentiometer) and so the loudness doesn't work for me. I tried to find a replacement VOLUME potentiometer which is called ACV-169 but it is not available. Is there any way to fix it?

They say that if you bridge it from the outside, it messes up the sound.. If it could at least be fixed so that the loudness would be on forever I wouldn't be mad either..

Are you able to help me with this please?

I'm attaching a photo.

Thank you
 

Attachments
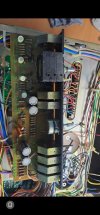
  • Média (4).jpg
    Média (4).jpg
    85.4 KB · Views: 57
Last edited by a moderator:
Register to hide this ad
Please help me to find at least replacement for it, something what has 40% loudness tap and 50K ohm and will work with my model. Thank you very much!
 
Last edited by a moderator:
So you're not sure the pot is damaged. I would think drilling into it would have destroyed it completely, and the connections are on the bottom. You did checked the wire leads against the schematic? I would carefully but a small piece of wire down those holes to feel what it hits (unit turn off of course). These volume pots are very hard to get and are expensive if you find one. I would double check the loudness, are you expecting too much from it? The loudness is for low level listening, I never use mine. If indeed the drill did damage just the loudness tap on the pot it might be repairable.
 
Hi Calman, thank you for your answer. I had my Pioneer SX-1050 for full service (I have paid 400 USD) and this is what service man told me :( I live in a flat house so I need to listen on low volume because one of my neighbor is id*ot and hear everything. But I believe without loudness sound is not enough for me. Really thank you for your help
 
I've taken that apart, but it is something that I would do if there was dead spots or such because the result would either fix it or I would STILL have to source another one. Most people peel the sticker off the back to clean and lube it. You'd need to be careful desoldering and clearing the pins, too much heat in an area for too long and you could lift a trace from the board. If I had to do it again and had an assistant, I'd use a solder gun and the other hands could use the sucker and carefully straighten the legs.
 
I've taken that apart, but it is something that I would do if there was dead spots or such because the result would either fix it or I would STILL have to source another one. Most people peel the sticker off the back to clean and lube it. You'd need to be careful desoldering and clearing the pins, too much heat in an area for too long and you could lift a trace from the board. If I had to do it again and had an assistant, I'd use a solder gun and the other hands could use the sucker and carefully straighten the legs.
Hi ToyDoctor, alright, I think I will try to take it to another service guy on 10/03/2025. Will keep you posted with results. But yes, there is definitely dead spot so this will need to be connected. I believe there is interrupted connection on the potentiometer for loudness so hopefully service guy will be able to connect it on the potentiometer board to work loudness again
 
You might as well try to clean it (Deoxit) through the holes he drilled. It's worth a shot and wouldn't hurt it. If after 20-50 rotations it begins to work, play it for a while to celebrate. THEN wait a day or 2 and use FaderLube to keep it from oxidizing right back up again.
 
Last edited:
You can (carefully) take the pot off the board and pull the screws that hold on the rear cover and sandwich it together. This will allow you to gently pry the sections apart just enough see what is going on inside of it. IIRC, the stack itself is held together by a 2mm push nut, which you pretty much have to destroy in order to remove. New push nuts are available from the usual scumbags...in packs of 100 pieces.
ETA, the 1050/1250 volume controls are special. They aren't traditional pots. They are printed film stepped attenuators. Pretty sophisticated for the time, and quite precise.
 
He was going to take it to his service guy, so hopefully the guy is good at getting the control out safely. I exhaustively tested the individual positions while comparing the channels before reassembly cause nobody wants to go back there for awhile.
 
On my sx1050 I first tried to clean it with Deoxit but that made the minor problem info a complete failure. I couldn't tell if it was printed film or carbon trace but what I do know is that the deoxit completely dissolved most of it. Now I have two sx 1250 receivers and I used CRC electronics cleaner on those with great results. I've been looking for an ACV 169 volume pot for 4 years for my sx 1050.
 
It would seem that the only reason to get the actual pot is for the sake of the loudness control. The pots they used were problematic since day one, with the detents akways causing less than ideal contact even when new. There is more than enough eq otherwise in those receivers to imitate the effect of the loudness curve... it seems to be just a convenience. I personally would be looking for another pot, same value and same taper, which is certainly available out there. Scrub the loudness controls in favor of a working unit, and possibly even more accurate eq! I have one coming in for a repair this week and I'm going to recommend just that. As I've already rebuilt it once. Comes a time when you need to just quit trying the same things over and over, or aka, the definition of insanity. Lol.
 
Using the correct Deoxit product won't harm the printed stepped attenuator in the least. Use DN5 rather than D5, and follow it with F100. Did that with the volume control on my 1250 probably a decade ago. Still clear and perfect.
 
On my sx1050 I first tried to clean it with Deoxit but that made the minor problem info a complete failure. I couldn't tell if it was printed film or carbon trace but what I do know is that the deoxit completely dissolved most of it. Now I have two sx 1250 receivers and I used CRC electronics cleaner on those with great results. I've been looking for an ACV 169 volume pot for 4 years for my sx 1050.
I have one in good shape if you still need one. Let me know.
 
One method I tried with this pot, from a guy I sold this unit to many years ago, was to carefully drill a hole in the plastic housing and use a bottle of deoxit fader lube. Just the lube, or any of the thicker dielectric lube that they sell... and drill yourself a tiny hole, just big enough for the hypodermic they have on those and put enough in there to supplant whatever is left of the original stuff, if any, and when done, just tape over the little hole and exercise the knob completely, especially in the areas of common use, and between the common and the areas that get no use... so there are no terraced places, and that worked great. Just remember to get the most benign stuff that you can get. You don't really even need to clean these so much it's just get that dielectric in there and get that other stuff pushed off to the side, or supplanted.
 
No need to drill holes. As mentioned in post #11 it can be pulled from the unit, then the screws can be loosened or removed to gain access to each section.

When I did this one for a 1250 I just loosened the screws but watched the nuts so they didn't come off. This gave enough room to access each section.

Peeling the sticker off the back to clean it will not work. Waste of time and cleaner since attempting this doesn't get near the surfaces in each section.

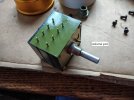
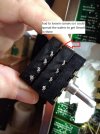
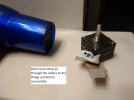
IMG_20211127_110016272.jpgIMG_20211127_110327071.jpgIMG_20211127_111727983.jpg
 
No need to drill holes. As mentioned in post #11 it can be pulled from the unit, then the screws can be loosened or removed to gain access to each section.

When I did this one for a 1250 I just loosened the screws but watched the nuts so they didn't come off. This gave enough room to access each section.

Peeling the sticker off the back to clean it will not work. Waste of time and cleaner since attempting this doesn't get near the surfaces in each section.

View attachment 3650977View attachment 3650978View attachment 3650979
This is the preferred method.
 
Back
Top Bottom