Hi, I picked up a nice looking Pioneer UKE 3100 Car Cassette deck stereo. It powers up but I don't get any sound when I connect speakers. I tested with 1971 Ford original speakers, so I am going to try newer speakers and see if that changes anything. Does anyone have or know where I can find a service manual to check out the wiring diagrams? Thanks!


You are using an out of date browser. It may not display this or other websites correctly.
You should upgrade or use an alternative browser.
You should upgrade or use an alternative browser.
Pioneer UKE 3100 Car Cassette Deck
- Thread starter chigl68
- Start date
Register to hide this ad

It doesn’t look like free ones exist.
On those car units, I usually live off the land.
Once their opened up, you can see what’s what for the circuits. The chips will guide the troubleshooting.
No power, might mean a visual clue is all that’s needed.
If you decide to open it up, post images so we can see what’s going on.
There is a car audio forum here in Audiokarma but I never posted to it.
On those car units, I usually live off the land.
Once their opened up, you can see what’s what for the circuits. The chips will guide the troubleshooting.
No power, might mean a visual clue is all that’s needed.
If you decide to open it up, post images so we can see what’s going on.
There is a car audio forum here in Audiokarma but I never posted to it.
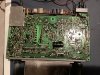
- Thanks I cracked open the case. In the first picture I discovered the area on the right had fried. I checked for continuity and the outside circuit is the blue wire that controls the power antenna. The circuit next to it is the red power wire and has continuity along the path that is exposed. The speaker wires all have co tuition to the board. I have not opened it up enough to see the bottom of the board in the current picture. The second picture is the entire circuit board.
- Main issue is no sound from speakers after powering unit up. The tuner works and indicates stereo when the signal is strong enough. The volume control does nothing when turned up or down.

This cool vintage car accessory is going to need some serious work.
I would say the power supply is good.
If there is corrosion - that could doom the unit.
Belts can be found for the transport.
It’s going to take watchmaker like work to get the transport to function properly.
Could you get it apart enough to wet finger the signal in to the amp? If that was operating it help you decide if it’s worthy.
Maybe running your finger across the solder connections on the exposed board.
Got a signal tracer?
I would say the power supply is good.
If there is corrosion - that could doom the unit.
Belts can be found for the transport.
It’s going to take watchmaker like work to get the transport to function properly.
Could you get it apart enough to wet finger the signal in to the amp? If that was operating it help you decide if it’s worthy.
Maybe running your finger across the solder connections on the exposed board.
Got a signal tracer?
What does "wet finger the signal in to the amp mean"? I have it opened up pretty far. I was able to loosen the volume and tone control knobs and lift them out a bit. I am unable to get the front FF and RR buttons off the front. Do they just pry off? If I can get those off, I think the front metal part will free up allowing me to see how the cassette mechanism attaches. I have a multimeter that allows me to check continuity from point to point.
Touching the circuit that connects the amp by using your finger, will cause a hum in the speakers. You need some volume selected. Your body is the antenna conducting the frequencies surrounding you. The amp, if it working will amplify those signals.
I’m not sure about the buttons. Probably pull off.
I’m not sure about the buttons. Probably pull off.

dr*audio
Fish fingers and custard!
Oh, this brings back unhappy memories of having to repair car decks. Here is my input:
1. The trace is probably burned because the output IC is blown. Very common. If you follow what is left of the trace, to the South in the picture, you will see a Single Inline Package IC, possibly mounted to a heat sink. Look at the part number on the IC and Google it. Select "Shopping." See if any are available. If not, give up, because you will never get this working. If you see some available, next look for a data sheet and print it out. Identify the power pin and output pin. Measure the resistance between the power pin and ground, the power pin and the output pin and the output pin and ground. If you get a low resistance reading on anything, the IC is blown. You will need to replace it and repair or jumper the blown trace.
2. The knobs are glued on with a rubber cement or contact cement. You can try heating them up a bit to aid in removing them.
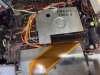
3. Look at where the mechanism is and where it attaches, and remove whatever is in the way. You may have to remove the main board. If the unit has an LCD display, there will be a flat flex ribbon connected to it. Be very careful not to tear it, or game over.
4. Often you can remove the plastic front (called the nose) and it will allow you to get to the innards.
Good luck!
1. The trace is probably burned because the output IC is blown. Very common. If you follow what is left of the trace, to the South in the picture, you will see a Single Inline Package IC, possibly mounted to a heat sink. Look at the part number on the IC and Google it. Select "Shopping." See if any are available. If not, give up, because you will never get this working. If you see some available, next look for a data sheet and print it out. Identify the power pin and output pin. Measure the resistance between the power pin and ground, the power pin and the output pin and the output pin and ground. If you get a low resistance reading on anything, the IC is blown. You will need to replace it and repair or jumper the blown trace.
2. The knobs are glued on with a rubber cement or contact cement. You can try heating them up a bit to aid in removing them.
3. Look at where the mechanism is and where it attaches, and remove whatever is in the way. You may have to remove the main board. If the unit has an LCD display, there will be a flat flex ribbon connected to it. Be very careful not to tear it, or game over.
4. Often you can remove the plastic front (called the nose) and it will allow you to get to the innards.
Good luck!
Thanks Zebulon and Dr*Audio.
1. I will take a closer look when I get home. I had to google what IC is as I am new to this type of troubleshooting.
2. Thanks for the tip. I'll try a hair dryer to heat them.
3. The unit has an LCD display for the radio stations. If I am able to remove the FF/RW buttons I will be very careful with the flex ribbon.
4. If I am able to solve 3, the front cover should come off easily. I have everything loose already.
Thanks!
1. I will take a closer look when I get home. I had to google what IC is as I am new to this type of troubleshooting.
2. Thanks for the tip. I'll try a hair dryer to heat them.
3. The unit has an LCD display for the radio stations. If I am able to remove the FF/RW buttons I will be very careful with the flex ribbon.
4. If I am able to solve 3, the front cover should come off easily. I have everything loose already.
Thanks!
I'd just blow it out with air for now.
Also, your pretty lucky having "Dr*a" post. Good deal on that account.

Thanks! Ok, Dr*Audio's tip to use heat to remove the FF/RW buttons worked extremely well. I set my heat gun at 200 degrees and slowly heated up the buttons and was able to work them off with out damaging them.
I then removed the screws holding in the tape deck and flipped it over since it is still wired to the main unit. When I flipped it over, I noticed "ribbons or strips" of black grease in pieces around the gears. I suspect these may have been rubber?? I was able to pick pieces out and it is a very thick black grease. I was not able to separate the section that houses the gears that turn the cassette. If I can separate it, I could clean and relubricate. Is that necessary?
I also traced out the blown power antenna circuit and it has good continuity past the burn out through at least 7 solder points.
I ordered a service manual to aid in the trouble shooting. It should arrive in a week or so. I am not sure where the amp is to wet finger test it.
I took some pics, but did not have time to post them before work. I will do that later today.
dr*audio
Fish fingers and custard!
It is just possible that the burnt trace got burnt up by a short in the power antenna wiring, but unlikely. It's a 12V supply line, could go to the power antenna only but it probably goes to the output IC. When you get the service manual if you can post a high res. scan of the schematic, it would help.

Thanks Dr*A! Good to know. The service manual will not arrive until late next week. I will post a scan of the schematic then. Here is a picture of the bottom of the tape deck. I think the black pieces next to and under the gears are old grease from the main dark wheel. I was going to clean it up with isopropyl alcohol. Should I relube with lithium grease? The second picture shows the LCD ribbon for the display. How do I remove that safely?
I use product called “Super Lube”
https://www.amazon.com/Super-Lube-S...ocphy=9030812&hvtargid=pla-365401693643&psc=1
https://www.amazon.com/Super-Lube-S...ocphy=9030812&hvtargid=pla-365401693643&psc=1
dr*audio
Fish fingers and custard!
The black gooey pieces of stuff are the remains of the belt. Clean them off with alcohol until nothing comes off. Clean the flywheel and any pulleys with a groove for the belt. You will have to get a belt. You can wrap a string where the belt is supposed to go and then measure the circumference of the string to get the size, buying a belt that is 20% smaller. www.vintage-electronics.net is a good source. You will be buying a square cut belt.
If you can take a picture from the edge of the unit showing the Southeast corner, I can confirm if that is where the output IC is.
If you can take a picture from the edge of the unit showing the Southeast corner, I can confirm if that is where the output IC is.