• The move to the new server is done. There are some software and database maintenance updates in process. This has us passing the hat around to help out. We appreciate any donations. Seriously, even a dollar helps. The payment page may be found here - https://www.audiokarma.org/support.html

Restoring a Pioneer PL-630 Turntable

Status
Not open for further replies.
In my opinion, the PL-630 is the nicest consumer turntable Pioneer ever produced, having the same specs as their TOTL PL-C590 with its PA-5000 tonearm, with the addition of full automatic operation (and it's prettier too). This table is truly elegant in design, and for the purists who fear that the automatic functionality and mechanism will detract from the sonic performance, unless an automatic function is active, no additional mechanism is in contact with the tonearm in ANY way (the mechanism is fully retracted from the tonearm). The suspension for this table is so good, you can put it right on top of your speakers, and run up the volume...there will be no feedback or howling. My main rig will never be without a couple of these beauties.

This thread is for those who have had a PL-630 since they bought it new, or discovered Dad's PL-630 in the closet, and want it to perform up to, or exceeding, original factory specs. After almost 30 years all of these will need some restoration operations performed on them, even if they appear to 'work'. They may work, but you will never know what they can 'do' until you bring them back up to full steam.

Here is an overall list of operations I perform on these units, before offering them for sale (in my opinion, none are optional):

  1. Rebuild the tonearm drive mechanism (most of these units have very sluggish tonearm drives at this age, if they function at all).

  2. Supplement the rubber of the suspension boots (most are pretty dry and cracked).

  3. Replace all electrolytic capacitors (they have only a 20-30 year lifespan)

  4. Refresh all circuit board solder joints (flow-soldered joints also have only about a 30 year lifespan)

  5. Verify the power supply voltages and filtering.

  6. Clean and deoxidize all user controls (most units have dirty controls, which don't show up audibly, but in table speed instability).

  7. Perform a complete platter drive and speed meter calibration/adjustment

  8. Optimize the tonearm settings for the cartridge (VTA (vertical tracking angle), lifter height, rest height are all adjustable)

  9. Optimize the stylus drop point (where the stylus sets down on the LP)

  10. Perform a complete cosmetic detailing, including polishing out the dustcover (there are a couple of tricks and gotchas, even for this operation)
The Pioneer PL-630 has 6 circuit boards, with 24 caps, and the parts cost for the caps alone is approximately $12.00. The labor for the complete restoration, for a good tech, will likely be 15 to 20 hours.

The unit you will see belongs to a fellow AKr. If he decides to chime in, you will be able to get his opinion as to value and changes in performance. Here is what the unit looked like when it was all done...

View attachment 33476

Note: Don't attempt this job without a service manual. You'll be sorry if you do.

Rich P

Hi Rich ,

Great tutorial!
 
I agree, this is one beautiful turntable. I'm a Technics TT guy by tradition. My everyday machine is a simple SL-D202. But I have a PL-630 vacuum sealed and boxed up in storage. I don't have the room for it now. Someday. I'm also a bit intimidated by it compared to my other TTs. Just seems more complex than my Technics semi-automatics (and I know how to fix them should I screw something up). So I treat with all the respect it deserves.

I love the fact that is either fully automatic or manual. Great aesthetics. So many turntables look alike, but nothing else looks like this. I paid a good amount for mine, and I was able to buy the original manuals, original headshell, extra mat, and even an extra dustcover. I go a bit overboard with getting the original stuff that came with it. If I can I get magazine ads or sales brochures too. It was fully operational when I bought it and only needed a little tonearm descent adjustment... the PL-630 just doesn't ship well from my experience, but I was pleased that's the only adjustment it needed. I also cleaned and DeoxIT'd it thoroughly.

When I finally get around to using it I'm not sure what receiver or int amp I'll use. I have three: Technics SA-700, Technics SA-800, and an old Sansui AU-999. Maybe I should get a Pioneer to match, that's a good excuse to buy something I've always wanted anyway.
 
Hi Rich! First of all i´d like to thank you for your work, it helped me a lot so far. Sorry if my english is not good but i´m from Argentina (we speak spanish). I´ll try to explain my problem as good as i can to see if i can get any help.
With the help of your guide i've succesfully repaired many things that were wrong with my unit. However i couldnt get to work properly the REPEAT MODE. Let me explain myself:
1- when in press the start button, the tone arm lifts up and moves to the exact position it is supposed to (after some calibration of course, including all the steps in your tutorial). The record starts and plays ok until the end.
2- when the records ends, the auto return function works ok an it returns to the rest position without any problem.
3- if i press the stop button at any time, it will always work ok, leading the arm to its rest position an stopping the spinning of the platter.
4- WHEN THE REPEAT BUTTON IS ON, the records stars playing ok until the end. The auto return works again ok , BUT when the arm moves towards the begining of the record to start again (to repeat), IT FAILS THE PLACE WHERE IT DROPS THE STYLUS, an it drops it about 1,5cm out of the record, outside the platter!!!

I've checked a few things:
- the pickup plate clears the bottom and edge of the optical sensor. I've read the service manual but i cant find any reason why it is working this way.
- I thought that it might be in relationship whith the slits in the plate and the optical sensor, but i dont understand why it ONLY FAILS in the REPEAT mode.
- Could the gear/plate "A"and the microswitches be involved?

I'd really apreciate Rick and everyone else opinions about this. I love this turntable, and i dont trust anyone else to touch it, so i'm looking foward your help! Thank you very much in advance.
Rodrigo

Hello again Rich. I just wanted to tell you that i am happy to say i have SOLVED the problem with the REPEAT function in my unit. (I told you about it a few months ago)

I had previously told You that i followed your guide, but in fact, there were some steps i could not perform due to lack of time or phisical resources. I must confess i did not use rubber rejuvenator because i could not find it in my area of residence.
After reading carefully the service manual (100 times aprox!) i realised i was chasing the wrong answer to the problem. The answer that worked for me was this one:
- the drive contact roller is made of rubber.
- This roller is in contact with the driver edge from the tone arm (and makes the arm motion possible)
- As you state in your excelent description, i should have used rubber rejuvenator in that piece of rubber (but i didnt had it at that time!!!). The rollers rubber integrity is crucial to assure an optimal contact between these two parts (roller and driver edge).
- Moreover, the rubber from the arm lifter (the one that its in direct contact with the arm) was too slippery (it had grease and dust). So i cleaned it up with a soft wiper. This action helped to remove that grease and to make it act as a "brake" for the arm while it was (now) efficiently pulled by an adecuate contact between the the drive rubber roller and the driver edge of the tonearm assy.

I hope this solution helps someone else. It worked for me at least.
Be aware that this is not the final solution for all the REPEAT problems in ALL the units out there. This mechanisms are too complex and many parts are involved But i think if you follow meticulously ALL STEPS IN RICH's GUIDE, you may learn a lot, and have a lot of fun and satisfactions too!

RICH, THANK YOU VERY MUCH AGAIN !!!
YOU CANT IMAGINE HOW grateful iam!!
thanks to YOUR GUIDE AND YOUR HUGE HELP there is another fully operational pl630 working out there!!!

Pd: now, next step is recapping! (It will be very hard to found those caps in my country, but i ll do my best!)

Regards
Rodrigo
 
Rich P,

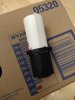
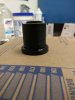
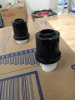
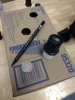
I would like to thank you for documenting this process so thoroughly and informatively. You're very skilled sir. I'm not an electrical savvy person at all. However I have worked in skilled trades for 35 years but my talent is not in the field of electrical components. Your tip for making the forms for the rubber boots is extremely helpful and worked perfectly. I was able to restore these boots off one turntable I own out of two PL-630's I have. I may have been a bit too generous with the super glue so next attempt I'll do better. One thing that helped me was to cut holes in a box to hold the forms and the boots while working on but more specifically while drying. I used a US Quarter 25 cents and the diameter was perfect to securely hold the forms with the rubber boots on them. I've included a few photos here and maybe this will be helpful for another member in the future. I'm a new member here, so excuse me if I've posted this out of place or violated some edict or rule.

Mark P.
Pioneer PL-630 Boots 1.jpg Pioneer PL-630 Boots 2.jpg Pioneer PL-630 Boots 3.jpg Pioneer PL-630 Boots 4.jpg
 
Before long I will be thoroughly familiarizing myself with the procedures listed here - I just posted some information regarding the PL 630 I decided to rescue from becoming another parts donor ( I hope ). I did contact pustelnikir about some of the speed control issues via a pm and am aware that this might prove foolhardy though due to that pesky IC issue that could prove a real challenge there is still hope that this unit just needs to be overhauled due to age related problems, the fact that it worked until stored for two years might be an indicator, hope none of the caps decided to short......
 
Status
Not open for further replies.
Back
Top Bottom