• The move to the new server is done. There are some software and database maintenance updates in process. This has us passing the hat around to help out. We appreciate any donations. Seriously, even a dollar helps. The payment page may be found here - https://www.audiokarma.org/support.html

Restuff the vintage capacitor cans or...??

angelaudio

Super Member
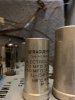
A5A5F98C-0061-4E75-BD03-520293E365C5.jpeg CE9DC8DB-3506-4165-83D2-B46984F65F21.jpeg Greeting fellow AK’ers!

I’m restoring a vintage Clairtone tube amp (chassis pull) but I’m not sure what to do when it comes to replacing the filter caps.

I watched a video online (D Lab in YouTube) where the guy takes three regular Electrolytic caps of the pertinent values and then just connects those together and wraps them in heatshrink but that doesn’t look good to me, I want to keep the original look of the amp.

Is there any good videos or tutorials online that would be able to help me possibly “restuff” the cans? If not then I guess I could settle for the heatshrink method without the original can covering them if restuffing isn’t possible.

Any help is greatly appreciated.

Thanks in advance:beerchug:
 
Register to hide this ad
You can restuff the original filter cans which is a bunch of work or if there is room under the chassis, the original can can be left in place and the new caps can be mounted to terminal strips underneath. The third way is to contact Hayseed Hamfest and have them make up a new can capacitor for you or Antique Electric Supply should have a replacement can cap already made up. I've used all of those solutions in the past when doing a restoration. The choice you make depends on how mush money you want to spend and how much time you have to do a can restuff.
 
You can restuff the original filter cans which is a bunch of work or if there is room under the chassis, the original can can be left in place and the new caps can be mounted to terminal strips underneath. The third way is to contact Hayseed Hamfest and have them make up a new can capacitor for you or Antique Electric Supply should have a replacement can cap already made up. I've used all of those solutions in the past when doing a restoration. The choice you make depends on how mush money you want to spend and how much time you have to do a can restuff.

There is room underneath. I’m going for the most cost effective option so putting new capacitors underneath seems to be my best bet. If there are any good videos or written tutorials that detail the process, please share. Thanks Big Harry
 
Maybe something here would drop in???
https://www.studioelectronics.biz/sunshop/index.php?l=product_list&c=129
And it sounds like you know this stuff already but there is this also.:
https://antiqueradio.org/recap.htm

Sooner or later I'm gonna have to dig into my tube gear so I'm gonna but this thread on watch. So good luck and keep us posted. :)

This amp is actually my first try at tube restoration but the great people here at AK have helped me with a few links so far, so I’m catching on to the lingo. Are you new to tube repair as well?
 
This amp is actually my first try at tube restoration but the great people here at AK have helped me with a few links so far, so I’m catching on to the lingo. Are you new to tube repair as well?
Ugh ... sigh, well I'll say you are already doing much better than me with my first attempt at tube amp repair!

It's a long story but to make it brief, I did correctly diagnose, the "Original" issue with my Heathkit AA 40 tube amp. It had a bad surgisitor, so I sent it all the way cross country on a pallet in a wooden crate filled with inst-pack. You could have dropped it off a truck and it would have been fine. That guy/company were tools, they wanted to do some mickey mouse, add a switch by drilling holes in the front. So I said screw that sent it back!! And I got it back dented, somehow!?? Not bad but still ... annoying!

Fine then ... I'll fix it myself, well in my defense this was pre internet as it is today, so late 90's?? I went with the "Blind Monkey with a screwdriver approach???" (not recommend!) I must have, flipped it over, on the bench on a stand to hold it above the tubes, jumpered the surgistor, powered it up ... and then proceeded to poke around on the inside with a screwdriver!! Yeah ... that "Did Not" work out so well!!

There was a loud bang, a bright flash, smoke and then nothing ... and my next thought ... after finding myself, still alive and unharmed ... was well that could not have been good??? After that I uh bought the manual! I'm pretty sure before that all it needed was caps and a CL 90 to replace the surgistor. Now it most likely needs new transformers ... also??

But hey you know ... live and learn (Hopefully) if your lucky! So you know, I sucked at Tube Amp repair but my "Plan B," kicked into gear, if your gonna do stupid crap ... it's better to be lucky than good." :)

But hey you know there is also uh ..."learn from others!" Most likely that is a much better, safer and uh less expensive option! And I do have an all original tube amp in my Maggie Console ... that I have not uh screwed with! A dim bulb tester and a bit more common sense this time, will be my first steps!

So yes ... your doing much better than I did already by far. :)

 
View attachment 1471410 View attachment 1471411 Greeting fellow AK’ers!

I’m restoring a vintage Clairtone tube amp (chassis pull) but I’m not sure what to do when it comes to replacing the filter caps.

I watched a video online (D Lab in YouTube) where the guy takes three regular Electrolytic caps of the pertinent values and then just connects those together and wraps them in heatshrink but that doesn’t look good to me, I want to keep the original look of the amp.

Is there any good videos or tutorials online that would be able to help me possibly “restuff” the cans? If not then I guess I could settle for the heatshrink method without the original can covering them if restuffing isn’t possible.

Any help is greatly appreciated.

Thanks in advance:beerchug:
Like similar rebuilds in other hobbies, it is helpful to approach it with cost vs benefit analysis. If you spent a lot of money on a pristine almost museum quality vintage tube amplifier, it might not be a good idea to learn tube amp restoration techniques on that particular piece. But, if you were given an intact unit which is only a "4" on the Bo Derek scale then what have you got to lose? So, weigh your ability vs the end result of making a less than satisfactory rebuild. But, in the end it is your piece to do with as you please.
 
Please keep in mind that when dealing with tube electronics, there are LETHAL VOLTAGES in many places underneath the chassis. You can do the repairs, but having at least the schematic diagram for the unit is a must. You can go to the HI Fi Engine website, they may have the service information you need for free if you don't already have it. If you go with using discreet parts underneath the chassis, be sure to remove all of the wires connected to the original cap. Take pictures of the wire location on the caps you want to replace, mount an appropriate terminal strip somewhere close to the original cap, mount the new caps on the terminal strip, all of the cap negatives can be connected together and start moving the wires from one section at a time to the positive of the new caps. There will most likely be resistors connected between the different sections of the original cap, so they will have to be moved or preferably be replaced with new resistors of the correct resistance and current rating. You can do it, just take your time and be careful.
 
Ugh ... sigh, well I'll say you are already doing much better than me with my first attempt at tube amp repair!

It's a long story but to make it brief, I did correctly diagnose, the "Original" issue with my Heathkit AA 40 tube amp. It had a bad surgisitor, so I sent it all the way cross country on a pallet in a wooden crate filled with inst-pack. You could have dropped it off a truck and it would have been fine. That guy/company were tools, they wanted to do some mickey mouse, add a switch by drilling holes in the front. So I said screw that sent it back!! And I got it back dented, somehow!?? Not bad but still ... annoying!

Fine then ... I'll fix it myself, well in my defense this was pre internet as it is today, so late 90's?? I went with the "Blind Monkey with a screwdriver approach???" (not recommend!) I must have, flipped it over, on the bench on a stand to hold it above the tubes, jumpered the surgistor, powered it up ... and then proceeded to poke around on the inside with a screwdriver!! Yeah ... that "Did Not" work out so well!!

There was a loud bang, a bright flash, smoke and then nothing ... and my next thought ... after finding myself, still alive and unharmed ... was well that could not have been good??? After that I uh bought the manual! I'm pretty sure before that all it needed was caps and a CL 90 to replace the surgistor. Now it most likely needs new transformers ... also??

But hey you know ... live and learn (Hopefully) if your lucky! So you know, I sucked at Tube Amp repair but my "Plan B," kicked into gear, if your gonna do stupid crap ... it's better to be lucky than good." :)

But hey you know there is also uh ..."learn from others!" Most likely that is a much better, safer and uh less expensive option! And I do have an all original tube amp in my Maggie Console ... that I have not uh screwed with! A dim bulb tester and a bit more common sense this time, will be my first steps!

So yes ... your doing much better than I did already by far. :)
Holy cow! Although I’m sure it was no fun to see your amp die before your very eyes, the good thing is you’re still alive!!

And thanks for the compliment. This is my first tube amp and I fell in love with it as soon as I heard the warm and detailed sound. I want to get it up and running so I’m trying my best to learn all I can to make it happen(:
 
Please keep in mind that when dealing with tube electronics, there are LETHAL VOLTAGES in many places underneath the chassis. You can do the repairs, but having at least the schematic diagram for the unit is a must. You can go to the HI Fi Engine website, they may have the service information you need for free if you don't already have it. If you go with using discreet parts underneath the chassis, be sure to remove all of the wires connected to the original cap. Take pictures of the wire location on the caps you want to replace, mount an appropriate terminal strip somewhere close to the original cap, mount the new caps on the terminal strip, all of the cap negatives can be connected together and start moving the wires from one section at a time to the positive of the new caps. There will most likely be resistors connected between the different sections of the original cap, so they will have to be moved or preferably be replaced with new resistors of the correct resistance and current rating. You can do it, just take your time and be careful.
Thanks for the pointers. I definitely am putting safety first when it comes to this restoration. And I was afraid I’d have to replace resistors too...good thing I’m not in a rush. I’ll check each one and make sure it’s holding its resistance.
 
Thanks for the pointers. I definitely am putting safety first when it comes to this restoration. And I was afraid I’d have to replace resistors too...good thing I’m not in a rush. I’ll check each one and make sure it’s holding its resistance.
You will likely find numerous resistors that are out of spec depending on the type of resistor. Wirewound resistors, which in console amps are typically encased in a cement-like substance, will usually still be OK. Many (maybe even all) of the brown bodied resistors, known as Carbon Composite, will be out of spec. They absorb moisture and tend to drift higher in value. They can be replaced with Carbon Comps, Carbon Film or Metal Film type resistors. I usually use carbon films. Metal films are a bit quieter and carbon film is a bit warmer sounding.

Do you know the model number of either the amp itself or the console model it was pulled from?

As for cap replacement, the other factor not mentioned earlier is that not only are individual caps much less expensive but you can also choose better quality caps. I'd suggest using caps rated at 105 degrees for 10,000 hours. Can caps are generally rated at only 85 degrees and sometimes less.

For example, a CE 50/50/50/50 350v replacement can from AES is rated at 85 degrees with no spec on hours. It costs $40.90 plus shipping. Hayseed Hamfest sells cans with higher quality caps inside but I believe the cost is even higher.

You can get individual Nichicon 47uf 350v caps, rated at 105 degrees for 10,000 hours and with tighter tolerance, for $1.42 each. https://www.digikey.com/product-detail/en/nichicon/UCS2V470MHD/493-14944-ND/4991891

Shipping costs for small orders can get expensive. Here's how you can get free shipping:
http://www.audiokarma.org/forums/in...hipping-on-parts-orders.739513/#post-10018562
 
Last edited:
Restuffing cans is actually pretty easy. I did so on a Scott 233 and wouldn't hesitate to do it again. Get a nice steel file and remove bottom lip by slowly working your way around. Insides pull out and you may have to remove some glue. Remove old components, solder new (liberal use of Heat Shrink Tubing to avoid shorts if components move around) and reattach bottom by slowly rolling over another lip with a small hammer. Doesnt look perfect but much better that zip tying caps all over the place....
 
@chip18sw, "Now it most likely needs new transformers ... also??"

Not to hijack this thread, but most likely not. Some resistance measurements while powered off will check this. And thanks for the good laugh from your post and some of the other replies here.

On with normal service--I think stuffing is quite easy, but messy.
 
@chip18sw, "Now it most likely needs new transformers ... also??"

Not to hijack this thread, but most likely not. Some resistance measurements while powered off will check this. And thanks for the good laugh from your post and some of the other replies here.

On with normal service--I think stuffing is quite easy, but messy.
Well there is always hope! And yes take measurements (for tyrannies with power off! :)
 
Many of us have had early bang, flash, smoke experiences with tube amps. (Maybe start a new diagnostic thread, with some pics? You did check the fuse?)
 
Many of us have had early bang, flash, smoke experiences with tube amps. (Maybe start a new diagnostic thread, with some pics? You did check the fuse?)
After it blew up??? Hell No, I felt lucky to be alive. If the fuse blew?? It didn't blow fast enough?? :)

I'll star a thread when I dig it out, of hiding. And I'll build a DBT before it ever see's power again! But briefly?? To test the OPT and PT would I need to take them out of the circuit ie unsold-er, them?? But yeah I will start a thread when I am ready to dig into it again. It would be great to actually be able to heard it. IT's been a boat anchor for the last 20 some odd years. :)
 
You can check for continuity in-circuit.
OK cool! I was motivated enough to go find it! It's in the garage in a cabinet, under some other stuff. So I gotta move that and an arrange a spot to check it out! And uh ... I'll just duct tape the power cord ... as a reminder, you know to not do stupid stuff! I'll start a thread when I get it out ... I'll need a couple of days.

So with that much out of the way, how is the OP doing with there project ... cuz I have a Maggie Tube amp ... that I have not screwed with. And don't disappear, cuz I'm gonna help! But hey it's not as bad as, what's a DVOM??? :)
 
Back
Top Bottom