• The move to the new server is done. There are some software and database maintenance updates in process. This has us passing the hat around to help out. We appreciate any donations. Seriously, even a dollar helps. The payment page may be found here - https://www.audiokarma.org/support.html

Revox B790 phono cable upgrade

Vinyl-love

New Member
I am refurbishing a B790 turntable I bought in 1980. I've replaced the caps and trim pots and I thought it would be good to upgrade the phono cable while I'm in there.

The original cable is about 66" in length and measures about 190pF capacitance. I am using an Adcom High Output Moving Coil cartridge which I may replace with a high-compliance, moving magnet cartridge.

I think there could be two options for the cable upgrade:

1. Cut off one end of a new phono cable and splice it into the old circuit board connector (or ideally replace with a new connector).
2. Use a new phono cable and two isolated RCA phono jacks. Drill and mount the jacks to the case. Cut the old phono cable and solder it to the RCA jacks.

I prefer the latter option as I can more easily remove the turntable for service.

Has anyone added RCA jacks to a B790 and if so, how did it work out?

VL
 
Register to hide this ad
I still run my original cables and replaced the RCA connections on them on my B795. But I don't see why not. If you go down that road let us know what you think.
 
i have a Harmon Kardon st7 table that i replaced the phono cable with rca
jacks and am glad i did, the few times i move the table it makes the move
much easier one less cable to get in the way.
and it makes it easier to tweek the capacitance for different carts.
 
I finished upgrading the turntable and added phono jacks to the back along with a panel mount C8 AC plug. The sound is still excellent. I used headphones for my tests. There is no discernable hum between tracks even at a high listening level.

I cut the original phono cable down to be soldered to the RCA jacks. This adds around 20pF to the overall capacitance. The new higher end phono cables are 220pF, for a total of 240pF, a little higher than the 190pF of the original cables. However, since I use a high output moving coil, it is not an issue. If needed, the cable length could be shorter than the 5' I used to reduce the capacitance if using a moving magnet cartridge.

The approach was as follows:

1. Disassembly chassis. Since I was refinishing it this was already done. Also had the circuit boards out for replacing caps and trim pots.
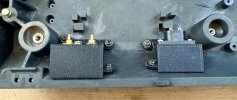
2. Design and 3D print chassis panel mounts in PETG. The panel mounts are necessary due to the 45-degree slope on the back.
3. Drill 4 holes in the back chassis for the corners of each panel mount.
4. Use a Dremel tool with mini cutoff blade to roughly cut out the square holes. I did also have to cut off some of the original cable routing posts in the bottom chassis.
5. Use a file to smooth out the edges and corners, retain the 45-degree slope for tops and bottoms.
6. Drill mounting holes, 3 for each panel mount
7. Repaint, re-assemble and solder the cutoff ends of the phono cable and AC power cord to the jacks.

Here's how it turned out, a bit rough around the edges, but it is in the back out of view.

IMG_4422.jpg
Back view

IMG_4421.jpg
Top View (before soldering on the internal cables)

VL
 
Back
Top Bottom