seablade
New Member
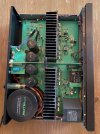
This is intended to be a build thread for my project of preserving my Rotel RB-980BX power amplifier for the future. For anyone that wants to follow, I kindly ask for your patience as this project will move slowly and when time allows.
I recently bought the Rotel RB-980BX power amplifier second hand, with the information was that one channel wasn't working. That turned out to be a fuse, and after replacing the fuse it has been in daily use without further problems, so 1-0 so far.
Before I commissioned it in my living room I measured the DC offset to -40 mV (left), -23 mV (right), with no signal or load connected (amplifier warm).
My plan of attack from here:
1. Take any measurements that can be relevant for before/after comparison. Input on this much appreciated. DC offset (already done), bias voltage reading/adjustment as per the SM - the value may not be relevant as I will be replacing components, but if the potentiometers VR601, VR602 are bad I suppose it is better to find out now rather than later... anything else?
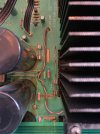
2. de-assemble and investigate closer the visual conditions of components and PCBs. From a first glimpse there seems to be glue residue especially around the larger power supply capacitors. Give it a full detail and measure the physical dimensions of capacitors to be replaced.
3. Make a BOM and aquire parts. To me, this is the tricky bit where I need to identify components and understand what they do in the circuit, so that I can judge if they shall be replaced, or kept. And if replaced, replaced by what...? I have read multiple threads on similar projects and those with better knowledge of electronics than me, can tell where to be precise, where to go higher, or take the nearest available value - I don't have that knowledge.
I don't like getting into deeper waters than what I can get myself out of, but I am hoping that I will get some input on this when I get here.
4. Get hands of: de-solder components, any cleaning or preservation to be done to PCBs, solder new components. Re-assemble.
5. Compare measurements, document the work done and hopefully enjoy the unit for years to come.
This is my first real step into the realm of diy audio and electronics and I am greatful for any input, guidance and advice. I don't have a budget on time or money, but I want to avoid irreversible damage to the amplifier, speakers or the house.
I recently bought the Rotel RB-980BX power amplifier second hand, with the information was that one channel wasn't working. That turned out to be a fuse, and after replacing the fuse it has been in daily use without further problems, so 1-0 so far.
Before I commissioned it in my living room I measured the DC offset to -40 mV (left), -23 mV (right), with no signal or load connected (amplifier warm).
My plan of attack from here:
1. Take any measurements that can be relevant for before/after comparison. Input on this much appreciated. DC offset (already done), bias voltage reading/adjustment as per the SM - the value may not be relevant as I will be replacing components, but if the potentiometers VR601, VR602 are bad I suppose it is better to find out now rather than later... anything else?
2. de-assemble and investigate closer the visual conditions of components and PCBs. From a first glimpse there seems to be glue residue especially around the larger power supply capacitors. Give it a full detail and measure the physical dimensions of capacitors to be replaced.
3. Make a BOM and aquire parts. To me, this is the tricky bit where I need to identify components and understand what they do in the circuit, so that I can judge if they shall be replaced, or kept. And if replaced, replaced by what...? I have read multiple threads on similar projects and those with better knowledge of electronics than me, can tell where to be precise, where to go higher, or take the nearest available value - I don't have that knowledge.
I don't like getting into deeper waters than what I can get myself out of, but I am hoping that I will get some input on this when I get here.
4. Get hands of: de-solder components, any cleaning or preservation to be done to PCBs, solder new components. Re-assemble.
5. Compare measurements, document the work done and hopefully enjoy the unit for years to come.
This is my first real step into the realm of diy audio and electronics and I am greatful for any input, guidance and advice. I don't have a budget on time or money, but I want to avoid irreversible damage to the amplifier, speakers or the house.