

You are using an out of date browser. It may not display this or other websites correctly.
You should upgrade or use an alternative browser.
You should upgrade or use an alternative browser.
RSIIb Outboard Crossover Update
- Thread starter Maxamillion
- Start date

Maxamillion
Super Member
That's $50 per two single opamps, premounted on the adapter. You can buy the OPA827s for about $10 each at Digikey and the adapters for about $2.39 each from Cimarron and solder it yourself, but those surface mount opamps are tiny - you'll need a steady hand. Most of that $50 is the labor for them to do the soldering.
In any case, they sound phenomenal. Crystal clear, impactful, and very musical, with excellent tone - brass sounds like brass, drum hits are sharp and well-defined. I think that part of the improvement is the chip itself, using their new silicon germanium semiconductor technology, and part is the use of two single chips instead of a dual chip (less crosstalk and interference between channels). The improvement was well worth the money to me. I can really hear the effect of all my other mods much better now, I think.
I'll put the OPA2107s in my basement CD player, I think.
.
In any case, they sound phenomenal. Crystal clear, impactful, and very musical, with excellent tone - brass sounds like brass, drum hits are sharp and well-defined. I think that part of the improvement is the chip itself, using their new silicon germanium semiconductor technology, and part is the use of two single chips instead of a dual chip (less crosstalk and interference between channels). The improvement was well worth the money to me. I can really hear the effect of all my other mods much better now, I think.
I'll put the OPA2107s in my basement CD player, I think.
.
Last edited:

I can really hear the effect of all my other mods much better now, I think.
that logic is a little fuzzy unless you take your other mods back out and do an ABX.
i just ordered some OPA827 samples from TI, enough to make 2.5 DIP setups. that's not much, but i'll find a good place for them eventually :yes:
Maxamillion
Super Member
That didn't come out exactly the way I meant it, I guess. What I'm saying is that I think the opamps were limiting the amount of improvement from the other mods. No, I'm not going to take them all out and see, though. In fact, I'll be replacing the remaining 4 polyester caps with PP and popping in 8 more TX2575 resistors in the next couple of weeks. Then I should be done :yes:.
Maxamillion
Super Member
So, I replaced the 4 remaining 0.039uF green polyester caps (393J100V) with Vishay/BC MKP416 2% metallized polypropylene caps of the same value from Digikey, and I replaced the remaining 8 signal path resistors with TX2575. The LF equalizer signal path now contains only the TX2575 resistors, and no caps other than polypropylene (PP) and polystyrene (PS). Nice and clear and smooth, with lots of dynamics. To me it seems the MKPs removed a very slight grain in the mids, but that is only my subjective observation. As it all burns in I am noticing an increase in warmth that is very appealing - I like how the 0.33uF Mundorf Silver/oil caps added to the outputs smooth the sound just enough compared to the standard Mundorf Supreme caps alone.
Note: the schematic from Infinityclassics.de incorrectly lists the 4 polyester caps as 0.39uF, they are actually 0.039uF. Be sure to measure what you take out.
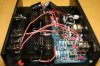
The picture below shows how it looks now. The little blue box caps on the left of the board are the Vishay/BC MKP416, the larger silvery caps on the right (next to the Bass Gain pot) are the 0.033uF PS caps that replaced the green 0.033uF polyester caps on the inputs, and the flat square brown objects are the TX2575 foil resistors. As I stated earlier, those PS caps were originally the bypasses on the output of the equalizer - I just re-purposed them after I went with the Mundorfs on the output. You can also see the OPA827 single opamps on their Browndog adapters - highly recommended!
Note: the schematic from Infinityclassics.de incorrectly lists the 4 polyester caps as 0.39uF, they are actually 0.039uF. Be sure to measure what you take out.
The picture below shows how it looks now. The little blue box caps on the left of the board are the Vishay/BC MKP416, the larger silvery caps on the right (next to the Bass Gain pot) are the 0.033uF PS caps that replaced the green 0.033uF polyester caps on the inputs, and the flat square brown objects are the TX2575 foil resistors. As I stated earlier, those PS caps were originally the bypasses on the output of the equalizer - I just re-purposed them after I went with the Mundorfs on the output. You can also see the OPA827 single opamps on their Browndog adapters - highly recommended!
Attachments
Last edited:
Maxamillion
Super Member
Since I've done about all I can do with the equalizer, I'm now back to the speakers. The 10" woofers used in the RSIIb have stamped steel baskets that ring for 1-2 seconds when flicked with a fingernail, which is not a good thing. Ideally the baskets should make no sound of their own, just provide support. In order to remedy this I have treated the baskets with Mortite rope caulk (see picture). Mortite is a heavy caulk found in Home Dept and other home stores, and is known to not dry out over time. I used it on the baskets of another set of speakers about 5 years ago and it is still soft and compliant today.
I first applied the Mortite to the back of the basket near the magnet, which greatly reduced the ringing. I then added a strip of Mortite down the legs of the basket, which completely stopped the ringing. A flick of the basket now produces only a dull thud, exactly what I was looking for.
I also added a little something extra to make sure the Mortite never comes loose. I brushed on a coating of Aleene's Tacky Glue over the Mortite and basket. It has dried to a clear coating and has sealed the Mortite onto the baskets. I've never had it come off wherever I've used it, but just to be sure...
I have also decided to run all of the wires from the external crossover box directly to the EMIMs and EMITs, with only the woofer wires passing into the speaker cabinet. This should allow me the minimum number of connections and the most direct signal path. I have ordered a Neutrik Speakon connector for the back of the speakers as the connection for the woofer wires.
I first applied the Mortite to the back of the basket near the magnet, which greatly reduced the ringing. I then added a strip of Mortite down the legs of the basket, which completely stopped the ringing. A flick of the basket now produces only a dull thud, exactly what I was looking for.
I also added a little something extra to make sure the Mortite never comes loose. I brushed on a coating of Aleene's Tacky Glue over the Mortite and basket. It has dried to a clear coating and has sealed the Mortite onto the baskets. I've never had it come off wherever I've used it, but just to be sure...
I have also decided to run all of the wires from the external crossover box directly to the EMIMs and EMITs, with only the woofer wires passing into the speaker cabinet. This should allow me the minimum number of connections and the most direct signal path. I have ordered a Neutrik Speakon connector for the back of the speakers as the connection for the woofer wires.
Attachments

Last edited:
Maxamillion
Super Member
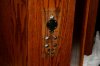
As I mentioned above, the only wires that will be running into the bass cabinet are the woofer wires. I connected a Neutrik Speakon connector to the back of the box through one of the driver rheostat holes, bored out slightly to 15/16" for the connector (picture 1). All the holes on the back were sealed from inside the box by gluing a piece of 3/8" plywood over the cutout for the controls. You can see some of the white contruction adhesive used to secure the board in the holes in picture 1. I will eventually fill in all the unused holes with dowels and cover them with veneer. I filled in the hole on top of the box where the EMIM and EMIT wires used to exit with an oak dowel and covered that with a piece of oak veneer, matched to the grain as well as I could get it (picture 2). Finally, I re-stuffed the speakers with the original stuffing which I had saved and installed all the woofers (picture 3). The deluxe T-nuts from Parts Express really work well for this and hold the woofers very tightly. I used a bead of mortite around each woofer hole to seal them in place.
One tip: the fabric that had been used to cover the stuffing in the speakers was badly yellowed and crumbling, so I replaced it with low-loft polyfill batting (less than 1/4" thick). It has enough strength to hold the stuffing in place, is pure white in color, and offers virtually no resistance to airflow (it is see-through and very loosely woven).
One tip: the fabric that had been used to cover the stuffing in the speakers was badly yellowed and crumbling, so I replaced it with low-loft polyfill batting (less than 1/4" thick). It has enough strength to hold the stuffing in place, is pure white in color, and offers virtually no resistance to airflow (it is see-through and very loosely woven).
Attachments


Maxamillion
Super Member
Now that the new Graz Diaphragms are on their way to me, I am wiring the external crossovers to the speakers in preparation. I am using Cardas Copper Litz wire for all of the connections, 11.5 gauge on the woofers, 15.5 gauge on the mids, and 17.5 gauge on the tweeters. The EMIMs for the left speaker will be left with the stock diaphragms so that I can compare them to the Graz diaphragms, which will be in the right speaker.
The litz wire can be a real pain to work with as each strand needs to be stripped of its enamel coating before the wires can be soldered - each strand of the dozens in each wire is individually insulated. There are many suggestions as to how to do the enamel removal, including use of a solder pot, high temperature iron, lots of flux, torching it off, etc. I have found a very simple solution that seems to work well - using a dremel high-speed rotary tool with a stainless steel wire brush. First I remove the teflon insulation, then carefully untwist the many individual strands of enameled wires. Set to about 1/2 of max speed, the dremel brush removes the enamel easily, allowing me to then twist the wires together and tin them as with any stranded wire. Just be careful to ALWAYS brush toward the ends of the wires and stop when the enamel is removed - further brushing can wear the strands away to nothing if you get carried away; clean is clean enough!
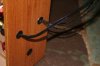
I have attached some pictures of the work in progress. The first three pictures show the back of the left speaker. I have chosen to separate the wires for the eight drivers per speaker into three bundles: the woofer wires, the midrange wires(low and high mid) and the tweeter wires(low, high and rear tweeter). In the first two pictures, you can see the three sets of tweeter wires (+ and - for each tweeter are twisted together to minimize pickup of interferences) not yet wrapped in Techflex braiding. The mid wires are to the right of the tweeter wires and are already in a Techflex braiding wrap. I have chosen to keep the tweeter and midrange wires completely separate, so the mid wires run up the right side of the back, and the tweeter wires run up the left side.
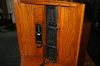
The fourth picture shows where the wires enter the external crossover box. The mid wires are on the left in the Techflex braiding, the tweeter wires are on the right and have not yet been wrapped in Techflex. The lower hole in the box is for the woofer wires, which will go to the speakon connector on back of the speaker (see previous post for details). I have left enough extra wire length to move the crossover box back about one foot from the speaker for cleaning, etc.
The litz wire can be a real pain to work with as each strand needs to be stripped of its enamel coating before the wires can be soldered - each strand of the dozens in each wire is individually insulated. There are many suggestions as to how to do the enamel removal, including use of a solder pot, high temperature iron, lots of flux, torching it off, etc. I have found a very simple solution that seems to work well - using a dremel high-speed rotary tool with a stainless steel wire brush. First I remove the teflon insulation, then carefully untwist the many individual strands of enameled wires. Set to about 1/2 of max speed, the dremel brush removes the enamel easily, allowing me to then twist the wires together and tin them as with any stranded wire. Just be careful to ALWAYS brush toward the ends of the wires and stop when the enamel is removed - further brushing can wear the strands away to nothing if you get carried away; clean is clean enough!
I have attached some pictures of the work in progress. The first three pictures show the back of the left speaker. I have chosen to separate the wires for the eight drivers per speaker into three bundles: the woofer wires, the midrange wires(low and high mid) and the tweeter wires(low, high and rear tweeter). In the first two pictures, you can see the three sets of tweeter wires (+ and - for each tweeter are twisted together to minimize pickup of interferences) not yet wrapped in Techflex braiding. The mid wires are to the right of the tweeter wires and are already in a Techflex braiding wrap. I have chosen to keep the tweeter and midrange wires completely separate, so the mid wires run up the right side of the back, and the tweeter wires run up the left side.
The fourth picture shows where the wires enter the external crossover box. The mid wires are on the left in the Techflex braiding, the tweeter wires are on the right and have not yet been wrapped in Techflex. The lower hole in the box is for the woofer wires, which will go to the speakon connector on back of the speaker (see previous post for details). I have left enough extra wire length to move the crossover box back about one foot from the speaker for cleaning, etc.
Attachments


Maxamillion
Super Member
The left speaker is now complete! I finished wiring it up last night, then swapped it into my main system, replacing one of the Snell Type C/i speakers I've been using during the rebuild. The Snells are very nice speakers, but the modded RSIIb just sounds incredible!
The bass is extremely tight and very detailed without being boomy - I credit that to the cabinet bracing, sealing the cabinet tight with construction adhesive, using T-nuts instead of wood screws, the 12 gauge Northcreek air core inductor and the 200uF Solen PP film cap instead of the old electrolytic. Acoustic bass lines are wonderful, and I can hear details that I never heard before.
The mids are beautifully, stunningly clear, with sax and trumpet seeming like they are in the room. The highs are also crystal clear, and cymbals have just the right amount of decay and shimmer. I was mesmerized!
I have to say I am extremely happy with the sound of this speaker. There is simply no comparison to the Snell, it is better in every way imaginable, and the crossover hasn't even had a chance to break in at all!
Now to get to work on the right speaker. Hopefully the Graz diaphragms will arrive in the next few days and I will be able to do a direct comparison with the stock diaphragms.
Stay tuned.
The bass is extremely tight and very detailed without being boomy - I credit that to the cabinet bracing, sealing the cabinet tight with construction adhesive, using T-nuts instead of wood screws, the 12 gauge Northcreek air core inductor and the 200uF Solen PP film cap instead of the old electrolytic. Acoustic bass lines are wonderful, and I can hear details that I never heard before.
The mids are beautifully, stunningly clear, with sax and trumpet seeming like they are in the room. The highs are also crystal clear, and cymbals have just the right amount of decay and shimmer. I was mesmerized!
I have to say I am extremely happy with the sound of this speaker. There is simply no comparison to the Snell, it is better in every way imaginable, and the crossover hasn't even had a chance to break in at all!
Now to get to work on the right speaker. Hopefully the Graz diaphragms will arrive in the next few days and I will be able to do a direct comparison with the stock diaphragms.
Stay tuned.
i've been trying to decide how much real benefit there is to subbing the Solen in for the electrolytic since that cap is just a shunt. after all, it's a ~$100 difference if you compare with relatively standard new 'lytics. in the bigger Quantums and RS, the big cap IS in the path and acts as a HPF, so it's more clear there. however, when i rebuilt my QLS1 XOs, i even used 'lytics for that and i've got to say there wasn't anything to complain about. i would hazard a guess that the air core inductor probably has much more to do with the improvement in your case. now i know that any shortcomings of that capacitor can feed back into the rest of the circuit, but the question is whether any of that would be audible in the range that the woofers play.
does anyone, max or otherwise, have a good response to this?
does anyone, max or otherwise, have a good response to this?
Maxamillion
Super Member
I'd agree that the inductor probably makes the most difference, but I have a phobia re: electrolytics in speakers. I will remove them whenever I have the chance. An added benefit is that film caps will last forever, electrolytics won't, although they have gotten better in recent years.
Maxamillion
Super Member
Thanks!
The crossover follows the stock topology, just with better parts, isolation, etc. The top and bottom EMIM handle 150-800Hz, the middle one handles 800-4000Hz, just like stock.
The crossover follows the stock topology, just with better parts, isolation, etc. The top and bottom EMIM handle 150-800Hz, the middle one handles 800-4000Hz, just like stock.
Maxamillion
Super Member
To cap off this thread, here is a picture of the completed RSIIb speakers, where they now live. It was a long process but well worth it - these things sound fantastic now, especially with the new Graz EMIM diaphragms in there.
Just for completeness sake, I also replaced the RCA jacks on the LF equalizer with DH Labs Gold over copper jacks from PCX. I had to make an adapter plate of sheet aluminum for them to screw into since the stock jacks are a non-standard molded contraption. Can't say I noticed a big difference in sound, but that's one less thing to obsess about now!
Just for completeness sake, I also replaced the RCA jacks on the LF equalizer with DH Labs Gold over copper jacks from PCX. I had to make an adapter plate of sheet aluminum for them to screw into since the stock jacks are a non-standard molded contraption. Can't say I noticed a big difference in sound, but that's one less thing to obsess about now!
Attachments

GannonAlex
Active Member
I'm turning a nice shade of green right now. I would give LOOOOOOVE to hear these with your upgrades especially now I'm embarking on my own RSIIb Journey. Thanks for the inspiration!
Maxamillion
Super Member
I'm turning a nice shade of green right now. I would give LOOOOOOVE to hear these with your upgrades especially now I'm embarking on my own RSIIb Journey. Thanks for the inspiration!
If you're ever in central NJ you can stop by, just let me know when.
Good luck with your journey! Maybe by the time you're done we will have Graz EMITs, too!
GannonAlex
Active Member
Sweet thanks! I may be passing through NYC on my motorcycle this summer... how far are you from the city?
Maxamillion
Super Member
About 35 miles west of NYC.