infullview
Super Member
So phase one of the restoration on my R75S is done. I should have taken a "before picture" so you could see how bad it looked when I brought it home. The tinted plexiglass piece was unglued and floating around. There were NO dial lights working, The wooden sides looked like they had survived a war. The front and top were filthy, and had tape and tape gum stuck on it in random locations. Some of the push button switches were pushed in and frozen.
What was done:
1) I disassembled the face plate and washed it. After cleaning it up as well as I could, I gave it a sealer coat of semi gloss lacquer to ensure the durability of the finish and lettering.
2) Cleaned and re-glued the plexiglass dial face.
3) The finish on the top was stripped off completely, then cleaned and re-coated with semi gloss lacquer. You will notice there is a slight color difference from the face.
4) Sides were removed and refinished. The left side had most of its original veneer so I just touched up with some custom colored wood putty to fill the small chipped areas. The right side panel was a mess as it was missing veneer on top and front. I pulled out my bag of veneer scraps and found a suitable walnut to use to re-veneer the missing parts. After sanding, I gave both sides three coats of Minwax Tung oil.
5) All switches and pots were cleaned with DeOxit D5 then lubricated with CRC 2-26 dry electrical lubricant.
6) Dial lamps replaced with new bulbs.
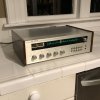
And this is what it looks like now...
What was done:
1) I disassembled the face plate and washed it. After cleaning it up as well as I could, I gave it a sealer coat of semi gloss lacquer to ensure the durability of the finish and lettering.
2) Cleaned and re-glued the plexiglass dial face.
3) The finish on the top was stripped off completely, then cleaned and re-coated with semi gloss lacquer. You will notice there is a slight color difference from the face.
4) Sides were removed and refinished. The left side had most of its original veneer so I just touched up with some custom colored wood putty to fill the small chipped areas. The right side panel was a mess as it was missing veneer on top and front. I pulled out my bag of veneer scraps and found a suitable walnut to use to re-veneer the missing parts. After sanding, I gave both sides three coats of Minwax Tung oil.
5) All switches and pots were cleaned with DeOxit D5 then lubricated with CRC 2-26 dry electrical lubricant.
6) Dial lamps replaced with new bulbs.
And this is what it looks like now...
Last edited: