• The move to the new server is done. There are some software and database maintenance updates in process. This has us passing the hat around to help out. We appreciate any donations. Seriously, even a dollar helps. The payment page may be found here - https://www.audiokarma.org/support.html

Sherwood S-8900 Humming

jpreza

Active Member
Happy Friday everyone,

Hooked up an old Sherwood S-8900 receiver (NOT the 'A' model) that I bought a few years ago. This unit is now over 50+ years old and noticed that when I first turn it on, I get a small humming (I'd call it more of a buzzing sound) through the speakers or headphones.

I've done a partial restoration on most of the boards by replacing old transistors and caps.

From everything I've been reading, it's my understanding that I should replace the caps coming out of the transformer to get rid of humming. Does anyone have any idea which ones are the biggest culprits here? Hopefully there's a Sherwood expert that can guide me.

TIA...JP
 
Register to hide this ad
Sorry, I forgot that you are a noob at this. It is the power supply capacitors that cause the hum that need to be replaced. Not all the capacitors in the entire unit, just the power supply capacitors.

Give us a pic of the entire top side circuit board and I or someone else here will show you which one's they are.
 
should be the biggest caps in the unit. If this is cap-coupled you'll probably have 2 sets of big caps, one for the power supply, one for the speaker outputs. Frankly if its old enough to have lost the power supply caps, the output caps are due for a change too.
 
Sorry, I forgot that you are a noob at this. It is the power supply capacitors that cause the hum that need to be replaced. Not all the capacitors in the entire unit, just the power supply capacitors.

Give us a pic of the entire top side circuit board and I or someone else here will show you which one's they are.
Thanks again for your help. I replaced a bunch of transistors and ceramic caps. I also replaced 2x500uF caps near the power supply.

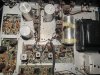
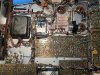
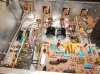
Here are the pictures from top and bottom 73C25846-139A-4453-89D0-C1D0234704AF.jpeg7EFC0E7D-232D-4590-9A9E-66628F94E27F.jpeg
 
On the top side, the cylindrical can laying sideways right next to the big black power transformer needs to be replaced. The other 3 cans on the top side should also probably be replaced.

On the bottom side, if that one with the black electrical tape is new, it cannot be connected to the old one. The old one needs to be taken out of the equation completely.
 
On the top side, the cylindrical can laying sideways right next to the big black power transformer needs to be replaced. The other 3 cans on the top side should also probably be replaced.

On the bottom side, if that one with the black electrical tape is new, it cannot be connected to the old one. The old one needs to be taken out of the equation completely.
Thanks! On the top side, I was thinking that all the big caps need to be replaced. I need to head over to mouser but the last time I checked they were out, so my next option is parts express.

On the bottom, the one with the black tape is brand new - just replaced it. Took the old one out completely. I taped it because even though they were the same capacitance, the new one was larger - not sure why. I taped it so that it stays in place.

TIA....JP
 
Just so you know, those silver can capacitors have more than one capacitor inside them and can be replaced with individual capacitors. People here including me do this all the time. All my tube amps have individual capacitors underneath replacing the original can capacitors.

Depending on space constraints, a company (can't remember the name off hand) sells replacement can capacitors that take the place of the old existing one's but these are usually more expensive and you have to play the waiting game when ordering as they are made to your spec original capacitor. Some companies like Mouser sell multi can capacitors but they are usually a generic as a lot of amps use the same type.
 
used to be a company called adapt-a-cap that sold a little PCB that would go in place of the old wafer insulators and give you a spot to mount modern caps. They seem to have folded and I don't know who might make such a thing now. Anyway if you can find them, that would be a nice solution to the two speaker output coupling caps. Those are the single section jobs next to the driver boards.

The other one you can either find a cap that fits the clamps, or just remove the clamps and mount a terminal strip with modern caps in it's place. I really don't care for free-floating parts or flying leads, its just asking for trouble IMO. I'm also not particularly hung up on original style caps in something with a cover where they will never be seen.

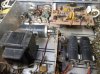
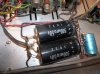
just as an example, here is a before and after on my S-9500a. The caps in the clamps were chosen specifically so they fit the clamps. Much shorter but it saved me from having to modify anything on the chassis. The others are attached to original terminal strips but you can see the size difference.
 

Attachments

  • 100_0672.JPG
    100_0672.JPG
    141.5 KB · Views: 24
  • 100_0677.JPG
    100_0677.JPG
    134 KB · Views: 22
  • 100_0683.JPG
    100_0683.JPG
    171.5 KB · Views: 22
  • 100_0685.JPG
    100_0685.JPG
    129.5 KB · Views: 22
used to be a company called adapt-a-cap that sold a little PCB that would go in place of the old wafer insulators and give you a spot to mount modern caps. They seem to have folded and I don't know who might make such a thing now. Anyway if you can find them, that would be a nice solution to the two speaker output coupling caps. Those are the single section jobs next to the driver boards.

The other one you can either find a cap that fits the clamps, or just remove the clamps and mount a terminal strip with modern caps in it's place. I really don't care for free-floating parts or flying leads, its just asking for trouble IMO. I'm also not particularly hung up on original style caps in something with a cover where they will never be seen.

just as an example, here is a before and after on my S-9500a. The caps in the clamps were chosen specifically so they fit the clamps. Much shorter but it saved me from having to modify anything on the chassis. The others are attached to original terminal strips but you can see the size difference.
That is a nice setup what you did! It's really hard to find radial caps these days but at the same time, I'd like to keep it as original as possible too, and reusing the existing brackets.
 
yeah there isn't a lot of options for axial and they cost a fair bit more than a more common radial cap does. I have done radial caps subbing for axial but it looks weird. This one is actually my shop amp, so it really didn't justify extreme effort but I hate opening things and my first thought is "ick", even worse when it was me that did it.
 
Back
Top Bottom