

Having finished my 1970s Sanyo speaker upgrade project to add bluetooth and battery power - details here - time to get on with upgrading a set of Sony SS-210s. As before, I'm very much an amateur enthusiast, so learning as I go.
I call this a resto-mod, which is very popular in the classic car world these days - the idea being the best of both worlds (the look of the past with the technology/performance of the present). I totally get that it might not be for everyone (and acoustic engineers may be horrified by what I've done), but I enjoyed it and it's saved another set of 1970s speakers from the landfill...
This time the plan was to take a pair of SS-210s and change out the internals with modern equivalents to handle the power from my STR-7065. I chose SS-210s for three reasons: I really dig the looks (matches my 7065 really well), the size is perfect for my use, and I picked up a good condition pair for cheap on eBay.
I love the fact this era of Sony speaker is solid wood and they disassemble really easily. It was also clear when doing this project that a lot of the measurements were different across the two speakers, so I'd guess they were made by hand in the early '70s in Japan.
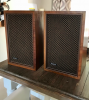
This model also has a neat feature where the Sony badge on the front can be rotated to allow them to be used in portrait or landscape style.
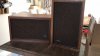
Originally rated at 18w full power, they are fitted with 3w drivers and 3w tweeters with crossovers. Interestingly, unlike the similar era/size Sanyo from my earlier project (which were veneer and fitted with 10w drivers), these had speaker stuffing stapled around the box and on the back panel and generally seemed higher quality (albeit very much a budget speaker).
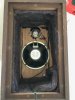
You'll spot the first challenge, below - driver and tweeter rear mounted to the front panel. I naively thought I would simply be able to swap out with modern equivalents... but, no. After a lot of digging it turns out these 6.5" woofers are an odd (small) size and very few replacements would fit. This was due to the relatively small size of the baffle cut out. I had the option of buying some expensive drivers that might just fit, or using an adaptor and dropping the size down to 5"... I did not want to try to re-cut the baffle at all, for fear of ruining the material glued and stapled to it.
I didn't like these options at all. Although I didn't intend to make major mods to the cabinets, it made more sense to create a new baffle and mount it behind the old fixing points. I could then use the original baffles as simple speaker covers (keeping the original look) once the old parts were removed.
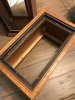
Disassembled with front baffles removed, below - you can see the original inside mount was stained black and the different size holes for the various pins that secured the original baffle.
Big step forward, below - new front baffle added inside (18mm Walnut veneer MDF).
I made things slightly harder for myself due to my donor speaker selection. I bought a second-hand pair of Monitor Audio Bronze 2 that had scruffy Black Ash cabinets but all the components were in perfect condition. I bought these as 1) I'd been super impressed with my other Monitor Audio speakers I'd been using with my 7065, 2) I liked the design, 3) the cabinet volume is roughly the same, and 4) they were much cheaper than buying new similar quality components. This is a project on a tight budget.
The only downside was the fact that MA Bronze drivers are bolt mounted - this is a very clean look, but it would have been a lot easier if I could have just screwed the driver to the baffle. On the upside, I could use all of the components straight out of the boxes, no need to even change the speaker wires. I did have to buy new plugs for the rear panels, which I converted to single wire from the MA's original bi-wire setup.
You'll notice the new baffle doesn't fit all the way to the edges internally, which would have been better for rigidity - this is because the front & rear of the cabinet is smaller than the inside diameter, so it had to be cut down to get it in the box!
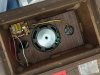
Probably sacrilege to speaker designers, but I also lined the cabinets with sound deadening material (the adhesive bitumen usually used in in-car audio) to reduce flex as although the cabinets are real wood, it's only 15mm plywood.
First speaker done:

I used boiled linseed oil on the walnut veneer, re-stained the original black inner mount and used brass screws in the original mounting holes. Mounting the new baffle behind the original black mount meant I would still be able to use the original front screens and leave enough space for cone movement.
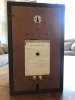
Rear shot shows the original rear panel still in use, with new speaker plugs fitted and the woofer bolt. I have since also plugged the bottom hole where the original wire came out.
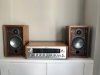
Both done and in place with the 7065 - now you can see why the size was so important.
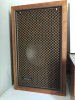
With the original screen back in place - I had to figure out a way of being able to remove the screens as they are a tight fit and not originally designed to be removed. I adapted a couple of small brass picture hooks as pullers, which don't spoil the overall look too much. You can see the shine from the new driver through the mesh, but this is much less noticeable in real life.
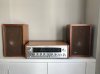
Done, and done. And they sound great!
Hope you enjoyed this project run-down.
I call this a resto-mod, which is very popular in the classic car world these days - the idea being the best of both worlds (the look of the past with the technology/performance of the present). I totally get that it might not be for everyone (and acoustic engineers may be horrified by what I've done), but I enjoyed it and it's saved another set of 1970s speakers from the landfill...
This time the plan was to take a pair of SS-210s and change out the internals with modern equivalents to handle the power from my STR-7065. I chose SS-210s for three reasons: I really dig the looks (matches my 7065 really well), the size is perfect for my use, and I picked up a good condition pair for cheap on eBay.
I love the fact this era of Sony speaker is solid wood and they disassemble really easily. It was also clear when doing this project that a lot of the measurements were different across the two speakers, so I'd guess they were made by hand in the early '70s in Japan.
This model also has a neat feature where the Sony badge on the front can be rotated to allow them to be used in portrait or landscape style.
Originally rated at 18w full power, they are fitted with 3w drivers and 3w tweeters with crossovers. Interestingly, unlike the similar era/size Sanyo from my earlier project (which were veneer and fitted with 10w drivers), these had speaker stuffing stapled around the box and on the back panel and generally seemed higher quality (albeit very much a budget speaker).
You'll spot the first challenge, below - driver and tweeter rear mounted to the front panel. I naively thought I would simply be able to swap out with modern equivalents... but, no. After a lot of digging it turns out these 6.5" woofers are an odd (small) size and very few replacements would fit. This was due to the relatively small size of the baffle cut out. I had the option of buying some expensive drivers that might just fit, or using an adaptor and dropping the size down to 5"... I did not want to try to re-cut the baffle at all, for fear of ruining the material glued and stapled to it.
I didn't like these options at all. Although I didn't intend to make major mods to the cabinets, it made more sense to create a new baffle and mount it behind the old fixing points. I could then use the original baffles as simple speaker covers (keeping the original look) once the old parts were removed.
Disassembled with front baffles removed, below - you can see the original inside mount was stained black and the different size holes for the various pins that secured the original baffle.
Big step forward, below - new front baffle added inside (18mm Walnut veneer MDF).
I made things slightly harder for myself due to my donor speaker selection. I bought a second-hand pair of Monitor Audio Bronze 2 that had scruffy Black Ash cabinets but all the components were in perfect condition. I bought these as 1) I'd been super impressed with my other Monitor Audio speakers I'd been using with my 7065, 2) I liked the design, 3) the cabinet volume is roughly the same, and 4) they were much cheaper than buying new similar quality components. This is a project on a tight budget.
The only downside was the fact that MA Bronze drivers are bolt mounted - this is a very clean look, but it would have been a lot easier if I could have just screwed the driver to the baffle. On the upside, I could use all of the components straight out of the boxes, no need to even change the speaker wires. I did have to buy new plugs for the rear panels, which I converted to single wire from the MA's original bi-wire setup.
You'll notice the new baffle doesn't fit all the way to the edges internally, which would have been better for rigidity - this is because the front & rear of the cabinet is smaller than the inside diameter, so it had to be cut down to get it in the box!
Probably sacrilege to speaker designers, but I also lined the cabinets with sound deadening material (the adhesive bitumen usually used in in-car audio) to reduce flex as although the cabinets are real wood, it's only 15mm plywood.
First speaker done:
I used boiled linseed oil on the walnut veneer, re-stained the original black inner mount and used brass screws in the original mounting holes. Mounting the new baffle behind the original black mount meant I would still be able to use the original front screens and leave enough space for cone movement.
Rear shot shows the original rear panel still in use, with new speaker plugs fitted and the woofer bolt. I have since also plugged the bottom hole where the original wire came out.
Both done and in place with the 7065 - now you can see why the size was so important.
With the original screen back in place - I had to figure out a way of being able to remove the screens as they are a tight fit and not originally designed to be removed. I adapted a couple of small brass picture hooks as pullers, which don't spoil the overall look too much. You can see the shine from the new driver through the mesh, but this is much less noticeable in real life.
Done, and done. And they sound great!
Hope you enjoyed this project run-down.
Last edited:


