beatcomber
AK Member
Started making a plinth for my Rek-O-Kut Rondine Jr. L-34
My woodworking skills are fairly rudimentary, but after reviewing various plinth building threads on AK and elsewhere, I decided to attempt making one for the Rek-O-Kut Rondine Jr. L-34 that I am restoring (for mono duty).
It arrived with a fairly attractive plinth, probably handmade, in a hollow plywood box veneered with mahogany. As with most idler-drive tables with powerful motors, it's begging for a high-mass plinth, to tame rumble and tighten the bass.

------------
I bought a sheet of 4' x 8' birch 3/4" plywood at Home Depot for about $50. They cut the wood into 20" square boards for me at no additional cost. There will be enough room on the plinth to accommodate a second tonearm down the road.
Tracing the main cut-out was easy; I just flipped over the old plinth and traced it with a pencil. I first drilled the rounded part of the cut-outs with an electric drill and cut the rest with an electric saw. I then used the first cut layer to trace the cut-outs on the remaining layers.
It was not necessary to be super-precise with the cut-outs; the top plate of the ROK covers it up. There just needs to be enough clearance for the parts to move freely without interference.

------------
Checking that everything fits... it does!
You can see where I marked the placement of the tonearm. I measured 11" from the center of the main bearing well, per Rek-O-Kut's spec for the Model 160 tonearm.


------------
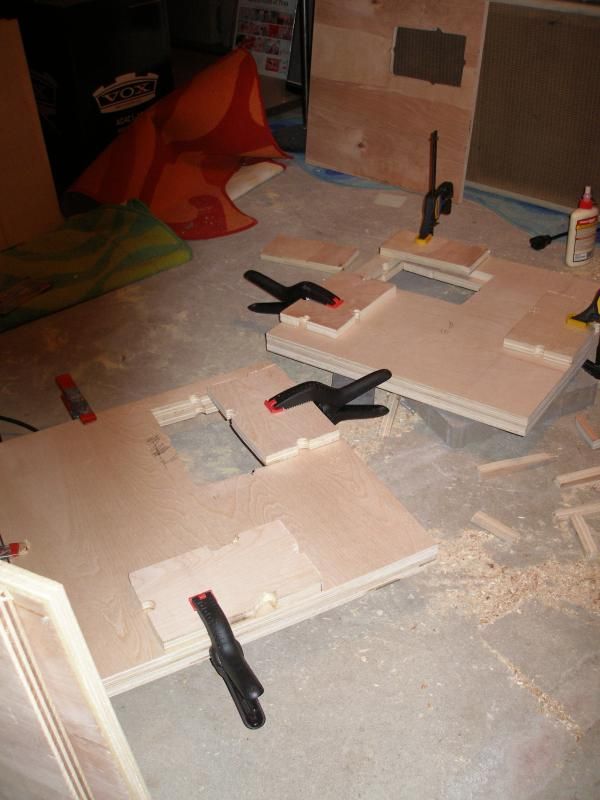
The next step is gluing. Using Titebond, I glued and clamped layers 2 & 3 and 4 & 5, and will let it set until tonight (24 hours). (The top layer is visible in the background, leaning against my guitar amp.)
------------
More to follow...
My woodworking skills are fairly rudimentary, but after reviewing various plinth building threads on AK and elsewhere, I decided to attempt making one for the Rek-O-Kut Rondine Jr. L-34 that I am restoring (for mono duty).
It arrived with a fairly attractive plinth, probably handmade, in a hollow plywood box veneered with mahogany. As with most idler-drive tables with powerful motors, it's begging for a high-mass plinth, to tame rumble and tighten the bass.

------------
I bought a sheet of 4' x 8' birch 3/4" plywood at Home Depot for about $50. They cut the wood into 20" square boards for me at no additional cost. There will be enough room on the plinth to accommodate a second tonearm down the road.
Tracing the main cut-out was easy; I just flipped over the old plinth and traced it with a pencil. I first drilled the rounded part of the cut-outs with an electric drill and cut the rest with an electric saw. I then used the first cut layer to trace the cut-outs on the remaining layers.
It was not necessary to be super-precise with the cut-outs; the top plate of the ROK covers it up. There just needs to be enough clearance for the parts to move freely without interference.

------------
Checking that everything fits... it does!
You can see where I marked the placement of the tonearm. I measured 11" from the center of the main bearing well, per Rek-O-Kut's spec for the Model 160 tonearm.


------------
The next step is gluing. Using Titebond, I glued and clamped layers 2 & 3 and 4 & 5, and will let it set until tonight (24 hours). (The top layer is visible in the background, leaning against my guitar amp.)

------------
More to follow...
Last edited: