80sKid,
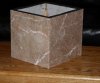
I used 5-minute Epoxy glue. The wood braces in the corners are 3/4" quarter round molding. The joints are simple butt joints; the end plated glued to the side plates, so it is not a perfect square.
Believe it or not I did this in my kitchen on top of my microwave (just a convenient surface to work on).
First I polished the edges that were going to show with an electric sander, then finished with hand sanding with very fine sandpaper. Finally, i polished the edges with rubbing compound and a buffing wheel mounted on my drill. Then wiped everything down with alcohol to make sure there was no residue to prevent the glue from sticking. (by the way, I did the sanding outside)
Sounds like a lot of work but it's just the edge and it went quickly.
Keep mind you only want to polish edges that are going to show. The edges you are going to glue, you want rough.
I laid down a layer of wax paper so I didn't glue the whole thing to the top of my microwave.
I placed glue on one of the pieces to be glue and the wood brace. Use the glue sparingly or it will ooze out of the edges and make a mess. Pressed them together and quickly wiped any excess glue with alcohol and/or mineral spirits. Though the proper solvent for Epoxy is acetone. While it is still wet, any common solvent works.
I place the corner of the two pieces against a framing square and taped it to made sure it didn't separate while drying. Keep in mind this is 5 minute epoxy, so it dries pretty quickly.
Then I did the diagonally opposite two corners. When dry, I fitted those two right angles into the final square.
I covered the edge that will contact the speaker with some thin peel-and-stick craft foam from the local hobby shop.
These are absolutely rock solid. Once that epoxy dries, it is like rock. Several times I have picked these up by one side.
If you are worried about resonance, you could cap the ends with MDF and fill the inside with dense fiberglass insulation. In addition to this, if you cap the ends with MDF, you could put plastic bags filled with sand in the bottom to add additional mass to the stand.
Right now our local Home Depot has grey granite, rose/tan marble, and something resembling sandstone for less than $2 per square; less if you buy a whole box. The Rose/Tan marble is alway cheap, either there is a lot of it available, or nobody wants it.
If you are willing to pay $5 per square, you can have a much wider selection of stone.
Also, most home stores will cut the stone for a small fee. For example, if you wanted your stands 18" high, you could have four of the tiles cut precisely in half then stack half tiles with full tiles. Or if you want a perfect 12" square, you could have them trim (about) 3/4" off the side pieces. It it was a prefect 12" square, you could them cap the top with another 12" marble tile. But you are at the mercy of the clerk at Home Depot to determine the accuracy of the cuts. His idea of 'precise' and yours, could be noticeably different.
Sounds like a lot of work, but it went very quickly. In fact, I had to rush to stay ahead of the 5 minute epoxy. Probably an hour and half from beginning to end.
steve/bluewizard





 I still call them cinder blocks. :yes: In fact I went out and bought more "cinder blocks" to temporarily hold up some shelving for my new (new to me) acquisitions.

 ara:
ara:
