• The move to the new server is done. There are some software and database maintenance updates in process. This has us passing the hat around to help out. We appreciate any donations. Seriously, even a dollar helps. The payment page may be found here - https://www.audiokarma.org/support.html

SUPER HIGH dc offset SX-1280. Full restoration - final straw !

xalara76

Active Member
This has been a wild restoration. From no power at all to a full blown restoration. Original output were blown, PS resistors and thermal fuse blown.
It’s all been recapped, cleaned, most known faulty transistors replaced…

I’m on the final straw of setting the DC offset and it seems to be another issue at hand. I installed new output transistors new filter capacitors the entire power supply and protection. Board has been restored as well as the tone controls flat board and phono section. Basically a complete Restoration.

I am unable to adjust DC offset on both channels the left channel giving me 68 V and the right channel giving me 4.8 V. This is not only high, but dangerous.

Where should I check first?. Obviously protection is cycling on and off.
 
Last edited:
Register to hide this ad
I had suspicion of the pre drivers. They’re known to go faulty and this silly kit doesn’t include them. So now I have a few questions. If these are faulty, could they really cause such high voltage 68.6 volts to show up as DC on pin 14 ?

Also, I have a 2SD669A / 2SB649A in stock. Are these suitable replacements for those pre drivers ? Thanks ..! This unit is turning out beautiful and I just can’t wait to hear some music !
 
Of course they can, did you test them using diode test on DMM?
Those 2SD669A / 2SB649A should work if required, although I have never used them.
You changed the outputs? To what?
 
Will have to pull and test individually. Was told “ they aren’t known to go bad, so they aren’t included in the kit..”

Outputs have been changed to MJL3281A / MJL1302A.

Swapped out the 2SA979 for double backed KSA992. Everything else is standard procedure. Filter caps upgraded. Again, I don’t know if this was an underlying issue due to the fact of its previous state which really had a domino effect on so many other components here.
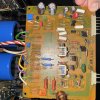
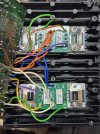
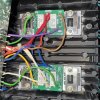
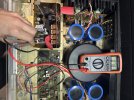
IMG_0167.jpegIMG_0093.jpeg
 
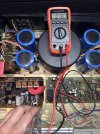
D8 diode on Power supply readings seem low. .078 volts and it’s in both directions of probes being swapped.image.jpgimage.jpg
 
I do not have the ps schematic in front of me to know what D8 does. I do know that they used zener diodes for +/-32V so if that not correct then they need attention. Obviously the first thing to check is all the power supply voltages, if they are not correct, then focus on that first.
 
D8 diode on Power supply readings seem low. .078 volts and it’s in both directions of probes being swapped.
You should apply heat shrink to your meter probes ends so you don't accidentally touch the wrong thing when testing and create a short circuit. All but the pointed ends of the meter probes should be covered.
 
4.5v off on the second amp?
Which way is it off with the black probe to chassis?
Check every resistor for value and connection to the traces.
Check your work.
 
Last edited:
I do not have the ps schematic in front of me to know what D8 does. I do know that they used zener diodes for +/-32V so if that not correct then they need attention. Obviously the first thing to check is all the power supply voltages, if they are not correct, then focus on that first.
Replaced D8. Blows open on startup. So now I need to replace again after taking voltages of PS.
I should note left meter spikes to like 50 watts and protection engages from the DC current.

Voltages are as follows with unit off.
Pin 1 .0L
Pin 2 .0L
Pin 3 .0L
Pin 4 .000V
Pin 5 .000V
Pin 6 .003V
Pin 7 .003V
Pin 8 1.951V
Pin 9 .000V
Pin 10 .000V
Pin 11 1.951V
Pin 12 1.955V
Pin 13 1.957V
Pin 14 1.172V
Pin 15 1.172V
Pin 16 .093V
Pin 17 .092V
Pin 18 0.92V
Pin 19 .000V
Pin 20 .694V
Pin 21 .697V
Pin 22 .698V
Pin 23 .000V
Pin 24 .000V
Pin 25 .999V
 
992's are ECB. The "B" is marked on the board.

Use a DBT on power up.
Fix the PS first.
D8 is a 32v zener.
A transistor is in backwards in the -32,-68 volt side of the PS. Q4?
Unplug the amps while you figure out the PS.
Regulated voltages are extremely important to the DC Balance.
Work through one amp at a time after you sort out the PS.
Buy some mini grabber test leads.
 
992's are ECB. The "B" is marked on the board.

Use a DBT on power up.
Fix the PS first.
D8 is a 32v zener.
A transistor is in backwards in the -32,-68 volt side of the PS. Q4?
Unplug the amps while you figure out the PS.
Regulated voltages are extremely important to the DC Balance.
Work through one amp at a time after you sort out the PS.
Buy some mini grabber test leads.
I’m on it. Can’t believe I mixed up the 992’s. Will get those sorted after I fix the PS. Checking over my work now. I really appreciate your help
 
992's are ECB. The "B" is marked on the board.

Use a DBT on power up.
Fix the PS first.
D8 is a 32v zener.
A transistor is in backwards in the -32,-68 volt side of the PS. Q4?
Unplug the amps while you figure out the PS.
Regulated voltages are extremely important to the DC Balance.
Work through one amp at a time after you sort out the PS.
Buy some mini grabber test leads.
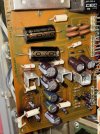
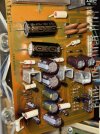
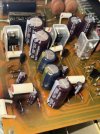
Some pics of PS
 

Attachments

  • IMG_0178.jpeg
    IMG_0178.jpeg
    147.4 KB · Views: 11
  • IMG_0176.jpeg
    IMG_0176.jpeg
    141.6 KB · Views: 10
  • IMG_0179.jpeg
    IMG_0179.jpeg
    142.7 KB · Views: 11
Flipped 992’s to proper orientation. Tried right channel first… we have sound !

Dc offset bouncing ever so slightly but will monitor that through burn in period. (Sits at +/- 2mv) ..! On to the troublesome 68volt left channel..!
 
Hah ! Well I’ll be damned. Everything was perfect besides the backwards pins on the 992’s ! Silly mistake on my part. Thank you for rescuing this one !
992's are ECB. The "B" is marked on the board.

Use a DBT on power up.
Fix the PS first.
D8 is a 32v zener.
A transistor is in backwards in the -32,-68 volt side of the PS. Q4?
Unplug the amps while you figure out the PS.
Regulated voltages are extremely important to the DC Balance.
Work through one amp at a time after you sort out the PS.
Buy some mini grabber test leads.
 
Back
Top Bottom