• The move to the new server is done. There are some software and database maintenance updates in process. This has us passing the hat around to help out. We appreciate any donations. Seriously, even a dollar helps. The payment page may be found here - https://www.audiokarma.org/support.html

Thorens TP 95 HeadShell wiring ..

Register to hide this ad
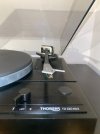
For example, the first headshell (TP 95) has is attached to the fitting capsule but without the leads in any way attached to it. The second, same model, is fitted with the plug that has lead cables attached to it on the other side. Inside of it, actually. But how does this "plug" get attached, is there something that needs to be pushed/pulled for it to come out?

thanks in advance,
original.jpg
original.jpg
 
Sorry this is 3 years later. Did you ever find a solution of information regarding this? I just got a TD320 Mk ii with a TP90 on it, and noticed that the headshell leads have seen better days.
You might ask Per Sørensen with VintageAudio.dk <aps0907@mvb.net> as he deals with TP90s a lot. I believe there is a stake pin that you drive out to remove the connector inside the shell, but beyond that, I don't know.
 
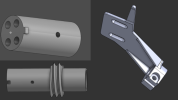
How hard did you push on the pin? I didn't have the courage to push on it. I have both the 'connector tube' and the headshell drawn up. I already have a prototype of the headshell made, but I don't feel like throwing away €60 on milling the 'connector tube' when I haven't selected the socket connectors yet.
Not really hard. There was no glue. Pushed it by something hard (e.g screwdriver) into the tube, then pulled the other end which stuck out by pliers. Using just fingers and not much power.
 
Not really hard. There was no glue. Pushed it by something hard (e.g screwdriver) into the tube, then pulled the other end which stuck out by pliers. Using just fingers and not much power.
I’ve already got it disassembled. Grew a pair of balls and couldn't wait for you to reply :-D It’s 100x easier to map out like this instead of sticking a caliper inside and guessing. It'll also be easier to pick the right pins, but I was roughly on point. By the way, I'm from Slovakia—I assume you're from the Czech Republic :-D If I can keep the manufacturing under €100, it’s going to be awesome.
 
An interesting project - keep us posted!
I have quite a few phono cartridges, and I also have custom bodies milled for them—like for the DL-103R. I really love swapping cartridges, but it's always a lengthy setup process. That's why I got into this. Just today, I bought a second-hand headshell from Italy for €130 including shipping, so I simply had to jump on it. But the Swiss guy doesn't know what to ask for anymore—I think he wants 290 francs.I still need to make a few small changes, order the sockets, and decide whether to get it resin-printed or mess around with UV gel in a mold at home. If I go with printing, I'll either reduce the hole dimensions by a tenth [of a millimeter] and sand them down to size, or I'll take the risk and print them with exact dimensions—though I know there's a tolerance of up to 0.2 mm either way. We'll see. I'll definitely let you know once I make some progress.
 

Attachments

  • TP95 headshell.png
    TP95 headshell.png
    160 KB · Views: 6
So, we have an update regarding manufacturing:When it comes to single-piece prototype production, the price is insane—one piece would cost €158 + €5 for sockets (not counting shipping, because for small parts it's €25 from DigiKey; we’d need to place a larger order) + headshell lead wires (some Analogis ones), including shipping, around €9–12. Totaling €175.

The socket insert body would be CNC machined from polycarbonate. The main body holding the insert would be CNC machined from aluminum like the original, and the headshell itself bead-blasted and anodized aluminum.

We could save about €15 on the socket insert if we resin 3D print it instead. However, resin 3D printing has a tolerance variation of +/- 0.2 mm, which means I’d either have to sand it down by hand, or if it comes out undersized, I'm out of luck and have to throw it away. With turning, the inner diameter is 6.80 mm, and I designed the insert with a diameter of 6.75 mm.

Where it starts getting interesting is with an order of around 15–20 pieces. There, I can get the price per unit down to about €80 + shipping. Within Slovakia and the Czech Republic, shipping is a negligible amount, but somewhere like Germany is €17, and the US is €26.

So, now we just need to find about 15 crazy enthusiasts who’d want a TP95 headshell :-D

 
So, we have an update regarding manufacturing:When it comes to single-piece prototype production, the price is insane—one piece would cost €158 + €5 for sockets (not counting shipping, because for small parts it's €25 from DigiKey; we’d need to place a larger order) + headshell lead wires (some Analogis ones), including shipping, around €9–12. Totaling €175.

The socket insert body would be CNC machined from polycarbonate. The main body holding the insert would be CNC machined from aluminum like the original, and the headshell itself bead-blasted and anodized aluminum.

We could save about €15 on the socket insert if we resin 3D print it instead. However, resin 3D printing has a tolerance variation of +/- 0.2 mm, which means I’d either have to sand it down by hand, or if it comes out undersized, I'm out of luck and have to throw it away. With turning, the inner diameter is 6.80 mm, and I designed the insert with a diameter of 6.75 mm.

Where it starts getting interesting is with an order of around 15–20 pieces. There, I can get the price per unit down to about €80 + shipping. Within Slovakia and the Czech Republic, shipping is a negligible amount, but somewhere like Germany is €17, and the US is €26.

So, now we just need to find about 15 crazy enthusiasts who’d want a TP95 headshell :-D
Hi D,

Count me in as someone looking for a TP 95 head shell. Maybe 2!

thanx,

Geoff
 
Hi D,

Count me in as someone looking for a TP 95 head shell. Maybe 2!

thanx,

Geoff
I'll be thinking of you :-) but at first I'll probably order it just for myself. I'll check how everything fits together. It's one thing how it looks on the monitor and another in reality when it's actually made :-D I already have 9 different printed insert pieces on the way, and I was warned that the wall thickness is only 0.65 mm, which could lead to cracking. So I'll have to test whether I'll fix the pins using a 'press fit' or look for some other options. Or find some thinner ones and glue them in with UV gel. Also, I got a quote from Mouser where a single pin costs €6.50 :-D But I'll definitely try to see it through to the end because I really like changing phono cartridges and I'm getting sick of setting up the turntable every single time :-D
 
thanx D,

please keep us up to speed as this exciting possibility comes together.

ratdogheads
I'll definitely let you know. Little sneak peek, this is already the final version of this part. The dimensions fit. The part is bead-blasted and silver-anodized, but you can choose other colors like black, blue, dark green, etc. The silver one probably wasn't the best choice, but I wanted something different from black just to see how it would look :-D And the new part is 0.2g heavier than the original.
 

Attachments

  • 2026_05_28_22_36_IMG_1074.jpg
    2026_05_28_22_36_IMG_1074.jpg
    152.3 KB · Views: 12
  • 2026_05_29_00_17_IMG_1078.jpg
    2026_05_29_00_17_IMG_1078.jpg
    99.9 KB · Views: 10
  • 2026_05_29_00_17_IMG_1080.jpg
    2026_05_29_00_17_IMG_1080.jpg
    106.8 KB · Views: 11
  • IMG_2102.jpeg
    IMG_2102.jpeg
    177.3 KB · Views: 6
  • IMG_2103.jpeg
    IMG_2103.jpeg
    190.1 KB · Views: 5
Last edited:
Back
Top Bottom