• The move to the new server is done. There are some software and database maintenance updates in process. This has us passing the hat around to help out. We appreciate any donations. Seriously, even a dollar helps. The payment page may be found here - https://www.audiokarma.org/support.html

Tricky solder job really could use tips please

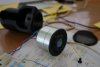
I would tend to agree with you but for the way that these are set up. Here are shots of the good one. The tweeter wires pass through several chambers inside the body that are not in line and were not easy to fish through. Actually I used 26ga wire to fish through the chambers and then soldered it to the stock wires and waxed them so that I could pull the regular wires through. Shame I clipped them off after or I'd be ready to go now:sigh: The stock look is clean and I hope to keep it. The wires end at the connector which plugs into the top of the cabinet. Because I would like to keep the external wiring looking stock I want to solder the 26ga onto the original wire before I trim it to an inch or more and and solder it to the original wire. If I run into trouble I will at lease have the solder joint done to the diaphragm and I can run the 26 to the connector. Sorry to be difficult about it but I want to try to keep the original look if I can.I will get an extra connector just in case. I got the flux yesterday and am going to get the connectors today. I'll have a bo at it as soon as I can get free from work and let you know how I make out. I think that you folks have given me the information I need to do a good gob ans I appreciate it. I'm not holding my breath but I can't wait to hear these running. Hope the neighborhood likes the music:D
 

Attachments

  • DSC04872.jpg
    DSC04872.jpg
    41.8 KB · Views: 47
  • DSC04873.jpg
    DSC04873.jpg
    46.1 KB · Views: 40
Hi
Since so many have tried to help so much I feel I owe you a situation report at least.
I used very thin solid wires and soldered them on to the lug. The lug on the Diaphragm itself is probably 12 gauge so it still required some heat. I set everything up in the 3rd annd and barely touched it. I added flux and used the solder that tinned the iron rather than adding solder. I almost did it without quite touching the pieces I was so careful. I got a joint,then soldered the solid wire to the harness and shrink tubed it for insulation and support. I whipped out the meter and....OL... Forensics reveal that the heat in the lug melted the cheap, low melt point plastic of the diaphragm frame ans allowed the lug to shift. The coil wires that were glued to the frame before going to the lug broke on both sides. I have a reading between the broken coil wires across the coil but no reading on the harness. There is no slack in the coil wires. The plastic melts easily even if there was room to solder to the molded in lugs.I tried to make the connection with conductive polymer (which I have done on other coil wires) and it worked untill I tried to slide the assembly into the tweeter. The lugs are slightly loose in the plastic and the polymer cracks when anything is moved. I have set it aside for now. I'll have to think about it another day.
Happy Easter all!!
 
Hi
I am happy to say that the tweeters are installed on top of the speakers and are working fine. I think I would up using a bit of the advice from each and every AKer who was kind enough to give advice so this is a real combined effort (and the guidance folks said I was not a team player!)
Just in case anyone reading this is nuts enough to try this here is how it happened. I have to say that I got it to where I had a resistance reading at least five times only to have things go bad while trying to assemble it. The way this is built makes the assembly a high effort process. The worst part to deal with is that the coil wire is soldered to a large bright plated pin which is molded into the diaphragm housing. It takes a lot of heat to solder the wire to this pin no matter how thin your wire. When the pin gets hot enough for the solder to flow its mounting point melts and it becomes loose and breaks the coil wire. If you can get it soldered without breaking the wire then the wire will break due to movement of the pin during diaphragm installation where wires need to be pushed through tight passages in the the tweeter magnet assembly. You can get everything working and then after assembly no matter how careful there will be an open circuit. AAArrrggghhh!!!
Without the support of the pins there is no chance of soldering to the coil wires with another wire and not tearing it loose in assembly. Now the coil wires were too short to reach the pin anyway.

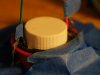
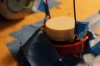
In the end here is how it was done. See the first attached photo. I had to hold the diaphragm in the container lid with tale and then tape the lid to a board. Then the pins which were loose in their holes had to be cleaned of old solder and glued into the holes using black vinyl (liquid electrical tape, I love it).After 3 hours another coat was added. Since the mounting surface is where the pins are and the mount and the tweeter body fit tightly with o tolerance the area where the pins are glued then needs to be cleaned,carved and reformed to fit perfectly. I took 2 pieces of about 26 ga stranded wire and striped it back nearly an inch then cut away all of the strands but one so that I had a similar sized wire to the coil wire. I then used shrink tubing to attach the wire insulation to the pin leaving my inch of single strand sticking out. I made a gig with pieces of solder wick to hold the wires in place and taped everything. I managed to twist the coil wire with the single strand with great difficulty using tools carved from toothpicks. I got out my nasty old faithful solder pencil and put away the fancy station. I cleaned the wires with alcohol, applied flux with a pin and soldered using the solder the iron was tinned with. Then I tested the resistance and started over again. After I got a joint I made a Chanel for the wire in the plastic housing and covered it with vinyl. then carved everything to fit the body and added another coat. In the morning I cut everything free of the homemade rack and with mu wifes help we slid everything together and installed the screws. I sealed the wires where they exited the back of the tweeter body so that they would not pull everything loose and mounted it on the speaker. I am listening now. I hope this was not too boring or confusing but I felt I had to set it down.
Thanks
 

Attachments

  • DSC04959.jpg
    DSC04959.jpg
    42.7 KB · Views: 22
  • DSC04965.jpg
    DSC04965.jpg
    40 KB · Views: 22
Back
Top Bottom