Pedal Pimp Fosi X2 Mod
Ever since purchasing my Fosi Audio Box X2 Phono Preamp, I’ve become obsessed with making it the best it can possibly be. After plenty of trial and error and extensive A/B testing, here’s what I’ve settled on:
The stock cheap adhesive plastic feet on the bottom of the X2 were replaced with premium Hudson Hi-Fi Platinum Silicone Isolation Dots. These absorb surface vibrations much better and suction to the table.
Tube Rolling:
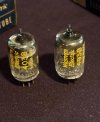
I swapped out the stock tubes for a matched pair of Riverstone Audio JAN 5654W tubes. While there are other options available, these worked best for me. Just be sure to source them from a reputable seller and ensure they’re legitimate and matched. This is a very common upgrade and if you don't do anything else, at least change the tubes.
Tube Dampners:
Consider buying some silicone tube dampers to slip over the tubes and help eliminate filament vibration.
Capacitor Upgrades:
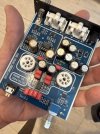
The X2 contains 10 electrolytic and 10 film capacitors that are accessible. Everything else is embedded in the PCB. While replacing the capacitors is optional, I decided to upgrade both types.
The X2 comes with three dual op-amps (JRC 2068D) that aren’t soldered, making them easy to swap. Simply pop them out with a screwdriver. There are plenty of options depending on your budget and preferences, including NE5532, OPA2134, TL072, LM4562, and AD712. Be careful with the pinout orientation, as installing an op-amp incorrectly will fry it. A dot on the chip marks pin one.
After testing several options, I settled on the Nisshinbo Micro Devices MUSES01. It’s not the most expensive option, but the performance is excellent. Maybe one day I’ll spring for the Sparkos SS3602, which is likely the best option available.
Cheers,
The Pedal Pimp
www.pedalpimp.ca
Ever since purchasing my Fosi Audio Box X2 Phono Preamp, I’ve become obsessed with making it the best it can possibly be. After plenty of trial and error and extensive A/B testing, here’s what I’ve settled on:
Outside Mods
Feet:The stock cheap adhesive plastic feet on the bottom of the X2 were replaced with premium Hudson Hi-Fi Platinum Silicone Isolation Dots. These absorb surface vibrations much better and suction to the table.
Tube Rolling:
I swapped out the stock tubes for a matched pair of Riverstone Audio JAN 5654W tubes. While there are other options available, these worked best for me. Just be sure to source them from a reputable seller and ensure they’re legitimate and matched. This is a very common upgrade and if you don't do anything else, at least change the tubes.
Tube Dampners:
Consider buying some silicone tube dampers to slip over the tubes and help eliminate filament vibration.
Inside Mods
Warning: There’s a very thin wire behind the selector pot. Be careful when disassembling the X2 to avoid snapping it—otherwise, you’ll need to replace it.Capacitor Upgrades:
The X2 contains 10 electrolytic and 10 film capacitors that are accessible. Everything else is embedded in the PCB. While replacing the capacitors is optional, I decided to upgrade both types.
- Electrolytic Capacitors:
The stock Rubycon capacitors are decent, but I replaced all the 470µF caps with 25V Nichicon UKW. If you can find and willing to spend on UFG or UKZ capacitors, they’d be an even better choice. Panasonic FC are also great. For the two 100µF caps, I used Nichicon UFG. - Film Capacitors:
The stock film caps are all 1uf and were swapped for WIMA MKS 1µF 63V caps. If you can find and willing to spend on WIMA MKP10 or MKS2, I’d recommend using those instead.
The X2 comes with three dual op-amps (JRC 2068D) that aren’t soldered, making them easy to swap. Simply pop them out with a screwdriver. There are plenty of options depending on your budget and preferences, including NE5532, OPA2134, TL072, LM4562, and AD712. Be careful with the pinout orientation, as installing an op-amp incorrectly will fry it. A dot on the chip marks pin one.
After testing several options, I settled on the Nisshinbo Micro Devices MUSES01. It’s not the most expensive option, but the performance is excellent. Maybe one day I’ll spring for the Sparkos SS3602, which is likely the best option available.
Future Mods (TBD)
The final step in my modding journey will be relocating the AUX jack to the back of the unit and installing a switch. This would allow the AUX jack to remain plugged in, with the ability to toggle between PHONO and AUX using the switch rather than constantly plugging and unplugging. I’ll update this post once I’ve tackled it. I’m cautious about adding excessive solder heat to the circuit, so I may explore cutting the jack loose as an alternative.Final Thoughts
After extensive A/B testing, I can confidently say these mods have significantly improved the performance of the X2.Cheers,
The Pedal Pimp
www.pedalpimp.ca