• The move to the new server is done. There are some software and database maintenance updates in process. This has us passing the hat around to help out. We appreciate any donations. Seriously, even a dollar helps. The payment page may be found here - https://www.audiokarma.org/support.html

Would a 3D printer be a good idea?

For those commenting about 3D modeling software, I highly recommend onshape.com. It's cloud based software, developed by former members of the SolidWorks team and it's nearly as powerful as SolidWorks. You can get a free license for personal use, but anything you model will be visible to the public should they care enough to seek out what you've made (which isn't very likely). Just don't use it for designs you'd like to keep proprietary. There are some great tutorials available on YouTube and through onshape themselves. Once you have a good solid model, converting it for whatever 3D printer you might use is a pretty simple process.
 
I was impressed with how good the subwoofer on this project looks, but I can't say anything about how it sounds. I'm tempted to build one for fun because the sub that I have in my kitchen, onoprice Monoprice SSW-8, is ut bugly.
 
I’ve got a lathe, mill, mig/Tig, plasma cutter etc out in the shop. I also have a 10” table saw, planer, jointer, etc.

I also have a 3D printer.

Out of those options, the 3d printer would be my last choice for making speaker enclosures. The first choice would be the woodworking tools. Not because its “traditional”, but because the wood/mdf has better “vibration damping” properties over plastic, is a speaker box application.

The plastic can be designed with bracing to try and damp resonances, but the wood is always goi g to be superior.

Not to mention, it will take days (to weeks) to print a single full enclosure while it a lazy afternoon of work in the table saw to make several in wood/mdf.

3D printer more useful for little bits like wire organizer's:

IMG_8015.jpeg

and perhaps knobs and other little plastic bits that you can’t buy any longer.

But its not a “do-all” tool as some seem to think.

When I needed a “tape splicer”, I printed one off in abs first. Downloaded the stl file from thingiverse to try it as it looked fairly slick. Did it work? Not really. Kinda, sorta, maybe, mighta if I was willing to be frustrated by it every time and ruined a lot of tapes, splice tape, etc.

So I reworked the design and made it on the mill:

IMG_7563.jpeg

works great in aluminum. Absolutely perfect cuts and splices every single time without having to put a lot of thought into it. The “machine” does the work. The ABS version went into the plastic recycling bin.

Then again, when I needed a new combo gear for the change drive in my 1954 Atlas lathe, I 3d printed a new gear in abs and its been running fine for the past two years:
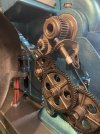
IMG_0210.jpeg

In fact, it runs better than the orginal gear becuase the formely loud and metal ringing the gear drive used to make is now gone. The metal ring noises are absorbed by the abs gear and the end result is a much quieter machine. Theres a bit more going on there than just absorbing vibration, but thats it in a nutshell.

the 3D printer is a valuble tool in the box, but its not for everything. Just as the table saw is not, nor are the metal working tools.

If I were to hazard a guess as to why everyone seems to think 3D printers can make whatever they want, I’d say it a combination of factors: everyone’s used to everything being made of plastic these days and its relatively “low skill” to buy a retail 3d printer, load up some filament, load up an stl file and out pops what (they think) they want out of “thin air”. It’s a little bit more complicated than that, but the “computer generation” seems to understand it more easily than metal or wood shop type work.

You fire up the table saw or the mill with the same general lack of knowledge/skill and you’ll be missing digits (or worse) is pretty short order. Worse thing you’ll get from a 3D printer is a 1st or 2nd degree burn on a fingertip…

 
Last edited:
Old Guy,
3D printing providers on the web quote and print directly from a drawing, so no need for a printing CAM if using a service.
Sketchup is a simple-to-learn starter CAD that still has a free version and will export to the .STL files typically used in 3D printing. MeshLab is a free solid-checker SW (makes sure the 3d object doesn't have "holes"). A home printer is for a 3D printing hobby, and keeping the printer working is a big part of the the hobby.

Also Old, but still in manufacturing.
I thought people stopped using sketchup for 3D printing years ago. Sketchup is great for architectural modeling, but it's awful for 3D printing. It produces errors that have to be repaired before you can print. Design Spark Mechanical is similarly easy to learn and does 99% of what anyone would need, but doesn't produce errors that require correction before printing.

Keeping the printer working is only an issue if you buy the cheapest of the cheap. My printer, that I designed and built myself, is ultra reliable. It has been working for about 8 years without any failures. It doesn't have or need auto tramming or mesh compensation. When I tell it to print, it does, without fail, every time.
 
Last edited:
3D printing is great for some things, but not for everything. If you want to make speakers, you'll print a shell in pieces then fill it with plaster and other stuff. By the time you get done with all that, it would probably have been easier, cheaper, and better to use wood or MDF.

Forget the 3d printer for a minute.
Get yourself a job in manufacturing.
Run a press brake, a lathe, a milling machine and a plasma table, then circle back and tell me with a straight face that you want a 3d printer.
2 points.
The 3d printer must do more and do it better than what everyone has been using to make everything for decades in order to be implemented. It's got to also produce goods cheaper.
It cant.
In comparison its a toy.

The widespread adoption of these toys, has the overall quality level of manufactured goods decreasing while the cost to do so goes up.

You want to make things, save your money and buy a press brake.

Or in your case, since it's speakers, maybe save your money and buy a table saw.

There are millions of useful and decorative things that don't need to be made of metal or wood that a 3D printer can make quickly and cheaply, and sometimes, would be impossible to make otherwise. 3D printing is an enabling technology. Once you have one, and learn a bit of CAD so you can quit printing throw-away starwars junk and tugboats, you find more and more applications for it.

Yeah, so everyone should go to school for a few years to learn enough to get a job in a metal shop or wood shop instead of simply learning how to do a little CAD and get a 3D printer. Instead of telling people how useless they are, I suggest you get a 3D printer or get access to one and try it for yourself. You might change your mind.
 
Reminder: AK rules specifically prohibit thread crapping. If you have something useful to contribute to this thread, wonderful. Many here have demonstrated they can contribute without crapping all over the original poster's idea. Otherwise your thread crapping will be deleted.
 
I would say "no" on 3d printer for all the reasons people say (printed material is weak, size limitations, time to print for large solid enclosures, etc.).

3d printers can be very handy for other smaller objects, but it's very important to get a reliable printer. I bought my son a Creality CR-6 SE printer, and he used it to print custom made poker plaques and a lot of other cool stuff, but the Creality was a bit of a maintenance nightmare. Creality was recommended as a good quality option for the under $500 price range, but it really took a lot of care and feeding to keep it going. You can buy upgraded parts (replacing plastic with metal versions of parts) pretty inexpensively on Amazon, which we did frequently, but it was just kind of a pain to be always fiddling with the printer. Larger prints would sometimes have the printing mess up 12 hours in, then the next print of the same object would work fine for unknown reasons.

It was always a battle, even though the price for upgraded parts was reasonable. Finally, it just stopped working. Can't figure out why -- it gets up to temp, you can feed filiment in manually, but it won't feed itself, even though he replaced the filiment feeder, and upgraded the tubing, I think twice. Will probably give the printer away -- probably easy to fix this issue, but if I wanted to be spending three hours of maintenance work for every 1 hour of use, I'd buy a vintage Lotus instead! :)

I loved what he did with the printer when he had it, so I wouldn't be averse to getting another, but it would have to be far better quality/reliability than that Creality.

After the machine was broken, I needed target paddles printed for a pinball machine, so I outsourced the printing. For small batch, probably easier to outsource the printing rather than to get your own printer.
 
I can agree that creality, while functional and useful, is more of a “kit” than a finished piece. Mine was bought fairly early on, which might have something to do with why I’ve had such an “upgrade journey” with it.

I started with a Cr10 V2. worked fine for a while and then the bordon tube on the feeder just would not stay in place. I replaced the tubes, the gripping clamp...all of it. A couple times over. No dice. The extruder on the gantry would eventually work the borden tube loose and then it would just stop printing. Even worse, it would make a big ball of filament around the gantry and it all turns into a royal mess at that point.

I ended up buying a titan E3 direct extruder for it (mounts directly on the hot end), which made it a CR10 V3. All the filament feed issues just disappeared.

Worked fine like that for a while. Kept having the occasional issue with bed adhesion that I just couldn’t nail down.

Swapped out to an E3 volcano hot end and nozzles because the original seemed to have a bit of trouble keeping up on longer prints with bigger nozzles. That was more of a ”want” than a “need” because I wanted to be able run 1.0 (and larger) nozzles to cut down on print times for larger prints that didn’t need the finer print resolution.

Then I swapped out the bed “springs” for solid mounts, which was one of the major problems with bed adhesion. The springs would tighten and loosen in response to the bed heating, which would just play havoc with my Z-offset settings.

Still had issues with adhesion so I went to a custom version of marlin (ie: firmware) that had many more options and allowed fine adjustment of the z offset. That eliminated the adhesion problems.

Then it started “spalling” the glass bed as it cooled. Adhesion was over the top. So I went to a magnetic flexible stainless steel print bed and now I can just pop the prints off without issue as it cools.

Finally, I had to make an enclosure because I gave up on PLA filiment (horrible for post print processing IMHO) and switched to abs, which is quite sensitive to air currents and drafts but a breeze to work with post printing.

so I have somewhere around 3 hundred over the initial purchase price and it works each and every time I hit print, but it was a bit of an ordeal getting here.

It still requires the occasional teardown and cleaning of any (for lack of a better word) “crystallized” filament that accumulates inside the nozzle at the outside edges on the inside. I just see that as maintenance, the same as any of my other shop tools need occasionally.

I find 3D printing is a bit of a hobby in and of itself. It not like plugging an inkjet into the usb and you’re good to go. Takes a bit of learning and work.

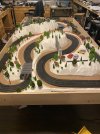
A personal 3D printer makes sense if you’re doing things like Train modeling dioramas or like another hobby I also have , HO sized racetrack dioramas:

IMG_6387.jpeg

IMG_6386.jpeg

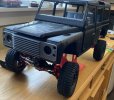
Or RC stuff:

IMG_7860.jpeg

And it has come in handy more than once printing some plastic parts for vintage sewing machine drive pieces (another hobby of mine) that you just can’t get anymore.

All that said, in deference to the thread topic; I still say I wouldn’t choose 3D printing for a speaker enclosure. Not the whole thing. Wood/MDF is the go to for that.

Now, if I wanted a custom sized/shaped port or resonator for inside the enclosure, CAD and 3D printing is the “go to” solution….;)
 
Last edited:
Our city public library has a roomful of various type/size/brand 3-D printers, and offer free classes on how to use them. They charge something like a buck an hour for printed projects that take no more than one day to run.
 
The Bambu Labs printers have a pretty good reputation these days.

I would say "no" on 3d printer for all the reasons people say (printed material is weak, size limitations, time to print for large solid enclosures, etc.).

I printed jack pads for my TT and my ex wife's BMW using TPU filament and used to use them all the time. Prints can be VERY strong, but you have to design things right and use the right materials.

I see a lot of people designing things to be printed that look like they are copied from objects made of metal. You can get away with a L shaped motor mount if it's made of steel, but plastic will flex. You have to anticipate forces and bulk up prints to resist them. And choosing the right infill is important, too. I see people using gyroid infill a lot. I don't think it's any stronger than something like triangles and it takes a lot longer to print gyroid because there aren't any straight lines. But gyroid looks cool, so people print with it.

Most hobbyists print with PLA filament, and I think that's a big mistake. That stuff will soften and deform inside a parked car. How often can you guarantee that your print won't end up sitting in a car or truck parked in the sun some day? I've seen a bunch of sob stories posted by people who printed a bunch of parts of their 3D printers using PLA, then stopped for coffee when they were transporting the machine in their car, only to find that the whole thing had warped when they got to their destination. Prints made from PETG, ABS, and TPU can all be put in a dishwasher. PLA won't survive that.

Printing medium to large ABS parts requires an enclosed printer and a heated enclosure. Getting the enclosure up to at least 50C will help prevent warping and splitting during printing. Without a heater, you'll only be able to print small stuff using ABS.

You can solvent weld ABS parts using acetone, and use vapor to smooth ABS prints, but it's tricky to do it without ending up with a melted blob. Ethyl acetate (sold as MEK substitute) will also solvent weld ABS and PETG prints.

And back to speakers... Speakers usually have flat surfaces. If you're going to build a speaker with a flat surface, it makes more sense to use things that are already flat instead of trying to print something like that. If you want to make something with lots of curvy shapes, a 3D printer can be very useful.
 
Last edited:
Great info in this thread. Didn't know why our ABS prints failed until reading @tourmax and @mrehorst 's posts
ABS is my preferred filament now, but is one heck of a pain to get it right. The biggest issues I've found is the contraction rates as subsequent layers cool. In essence, as the higher layer cool. the contract and pull on the lower layers that are already cooled and this causes warp-age and splits in the lower layers. It also pulls the lower layer corners up off the build plate.

I run my heated bed at 110 to help minimize this (keeps the lower layers warmer longer) and careful selection of the actual shape of the part of the print on the lower layers mattes as well.

I usually print about 20% infill (triangle) if I can still make the part strong enough. Helps cut own on the internal stresses as it cools.

I also use the acetone welding on prints that may have small layer "splits" as well as the vapor smoothing. I find vapor smoothing gives a finer finish is I give the part a sanding first and then vapor for a smooth, shiny finish.

I can print with TPE and TPU, but still learning.

Pretty much have completely abandoned PLA. Maybe a little now and then for some .02 nozzles when doing small, detailed modelling work. I find PLA is a little easier to print that type of stuff.

There's a lot of nuances to printing with ABS. Been printing ABS for quite a few years now and I'm still learning. But that's nothing new. Every time I tig aluminum, run a mig bead, machine a part on the mill or lathe, or build something on the table saw, there's still new things to be learned.....
 
Last edited:
If your bed plate is set to 110C, the enclosed printer may not need a supplemental heater, as long as you wait for it to heat up before printing. In a pinch you can use a cardboard box to enclose the printer for a quick ABS print. You can also insulate with foam- use polyisocyanurate (aka polyiso) board, not the pink or blue polystyrene stuff. If there's a fire, the polyiso won't burn. Otherwise, add a heater to the print chamber. You might have to move the electronics- if you get the chamber up to 50C you'll have many fewer problems with ABS. I sometimes set the chamber at 35C when printing PETG, too. I use a 500W heater switched by an SSR. The printer is so big it takes about 20 minutes to get it up to 50C.

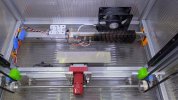
UMMD bottom.jpg
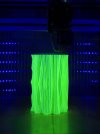
That's the heater just below the fan in the photo. The fan is a 220V unit that is wired in parallel with the 117V heater. When the heater is on, the fan turns slowly and quietly (117V) but moves enough air to keep the heater from getting too hot, and it doesn't stir up the air too much in the chamber. The red thing in the middle is a 30:1 worm gear reducer that is used to lift the bed. The walls are dual layer polycarbonate that is often used for greenhouses. It provides insulation but lets light in. I have about 25W of white LEDs and 20W of UV LEDs in the printer to light things up. The UV LEDs just make the print look cool when I'm using fluorescent filament.

Green PETG vase 4.jpg
 
I only use a small supplemental heater for the enclosure in mine. The heated print bed will get the box up to 35 pretty quickly and top out around 40-50 depending on how warm the ambient in the room is.

My control box is outside the enclosure and has two cooling fans for itself.

Those LED's look neat with that filament. So does that corrugated plastic case. I just have a white florescent in mine so I can see what's going on through the plexi window in the door.
 
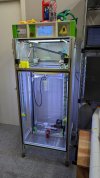
This is my coreXY machine- Ultra MegaMax Dominator. It is my third printer design and build.

UMMD.jpg

All the electronics are in the box at the top. There's another 220V fan blowing air slowly and quietly through the enclosure.

The bed is 300x300 mm and the maximum print height is 695 mm. There are two clear polycarbonate front doors- a smaller one for the top section and a larger one for the bottom. At some point I should make insulated front doors so the chamber will heat up faster and use less power to stay warm.

The bed is 8mm cast aluminum tooling plate with a 750W heater on the bottom and a sheet of 0.7mm PEI on the top surface. The plate sits on a kinematic mount that allows it to expand laterally without putting any force on other parts. The bed is lifted with a single motor driving two belts via a 30:1 worm gear reducer. The bed does not move when power is cut, and more importantly, since it is lifted by a single motor, it doesn't tilt when power is turned on. That means I never have to tram the bed before printing so I don't need a bed sensor. The only time I have to tram the bed is if I take apart the Z axis for some reason and I haven't done that in almost 3 years. Tramming is done with two simple screw adjustments that take about 1 minute. I can fit this machine into the back of my car, drive it across town, set it up and start printing without any adjustments, then bring it back home and do the same.

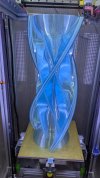
I print stuff like this using a 1 mm nozzle on a volcano heater block. It's great for big stuff like this, but lately I've been thinking I need a smaller machine with a finer nozzle for more detailed work, so maybe I'll design and build another...

mid print.jpg
 
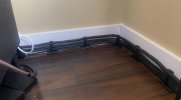
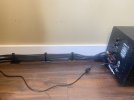
More committed to the process than I am. My CR10 does what I need it to do, so good enough for me. I mostly just do small projects for personal use, like my most recent cable management “clips”:

IMG_8015.jpeg

IMG_8016.jpeg

got tired of looking at bundles of cables in the floor and although these do nothing for sound and such, they look much more neat and organized. Mostly just a “personal satisfaction” thing, although I’ve already had a couple friends commenting they want some. no good to them though if they don’t have 8mm thick rca interconnects! Lol!

I have also used it before to get friends/family out of a jam when they get a broken plastic ”whatsewhosit” that they just can’t buy to repair whatever it was they broke.

My stainless sheet bed has a PEI side also, but I flip it over and print straight to stainless. Had an abs print pull a piece of pei off one of my stainless sheets once (basically ruined it, like it spalls glass beds) so now I go direct to steel.

I do a G29 on each print, but I don’t really need to now that my bed is solid. Guess its just a “legacy” thing for me…
 
Last edited:
I find it best to let the bed cool to 40C or less when removing ABS prints. Then spray a little IPA at the base of the print and pry it off the bed. It usually pops of pretty easily. That technique works for almost any material you print. PEI is actually super tough stuff, but the hobbyist beds use a very thin layer that has little mechanical strength. The 0.7mm thick PEI has been on my printer for >8 years. In the past the adhesive holding it down has failed so I cleaned it up and replaced the adhesive. The last time I did it, 3 or 4 years ago, I added silicone to the edges to seal it and it shows no signs of letting go again.

I never liked the idea of glass beds. They don't heat evenly. We had a Taz printer with a glass bed at the makerspace that broke and I replaced it with cast tooling plate. Never had another problem- with the bed, anyway - those machines were pure junk.
 
My stainless sheet is removable, so I just lift it off the heating plate (careful to not scorch my fingertips) and either toss it on the granite countertops to cool off a little, then a little flex of the sheet and the prints pop right off easy peasy. If left to cool long enough on the granite, they pretty much “self pop”.

As mentioned, I just do stuff at home for myself and friends/family, so my process works fine for me and the limited amount of printing I do.

:)
 
Here’s a fun little print.

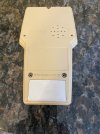
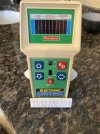
Some time back I found a non working “coleco electronic quarterback” for a couple bucks. I pulled it apart, repaired it and restored it to as close to new condition as I could get it. It’s just one of those things that we all have from a “fondly remembered“ youth.

It was missing the battery door so a little cad work and:

IMG_8060.jpeg

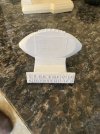
I wanted to display it on a shelf when not using it, so a little more work and:

IMG_8061.jpeg

IMG_8062.jpeg

Thats all in ABS. The stand still needs finish processing and then some paint, but came out pretty good.

Toy? well, yeah. But a collectible one. Maybe not overly valuable, but still a “collectible”.

Makes for a nice little memory machine when I chase the little red led’s across the screen. Simpler times….

Nothing really challenging to it, but still a fun little distraction for a few minutes.

This is where 3D printing excels for me: those little bits and pieces that just tie things together.

Whether it be simply in appearance, or in functioning, 3D printing can be hard to beat for simple things that you otherwise just can’t find anywhere else.

:)
 
Last edited:
Whether it be simply in appearance, or in functioning, 3D printing can be hard to beat for simple things that you otherwise just can’t find anywhere else.

:)
100% agreement there! I make all sort of little stuff, often parts for things that would otherwise be difficult to find or make.
 
Back
Top Bottom