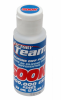
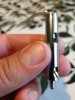
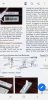
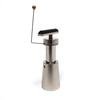
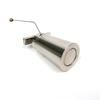
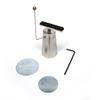
I just finished redamping my YP-D8 and it isn't hard at all. First you will need a set of jewelers precision drivers and specifically a T6 star driver to loosen the screw on the arm lifter base which acts as the retaining screw for the damping shaft assembly. Once you have the proper tools attach your stylus guard and move your tonearm inward toward the spindle. Loosen the screw on the arm lifter base and rotate the arm lifter toward you or the front of the turntable. DO NOT REMOVE THIS SCREW COMPLETELY, JUST LOOSEN ENOUGH TO GET THE SHAFT FREE! You can now lift the damping shaft assembly straight up without ever having to gain access through the bottom! Now that you have the assembly out, remove the brass set screw with a small standard screwdriver and the second T6 star screw which holds the arm lifter platform. That is the moon shaped little metal platform the tonearm rides on with a small shaft attached. Now remove the damping shaft from the housing. Once that is all apart look inside the damping housing and you will see a small spring. Fish this out with a tooth pick or similar item. Clean all parts thoroughly. I used finger nail polish remover because you will see 40 year old brown gunk all over the damping shaft. It will come off easily with the nail polish remover. Now head down to any hobby shop that carries RC equipment and buy a bottle of 500,000 CST Silicone differential oil like the one in the picture. The hobby guys use it for damping fluid in the different shock absorbing components on their model cars. This stuff is thick and sticky as hell. Do not be tempted to buy anything with a lower viscosity for the YP-D8 because it will not work. I know because I have tried. Now with everything clean and dry, drop that little spring you cleaned back inside the housing. Reinsert the shaft of the arm lifter inside the housing and make sure it slides inside the little spring. Now dip a toothpick into the bottle and begin smearing this all over the inner shaft and inside the housing. You will notice that the inner shaft has 3 or 4 recessed areas for the silicone to go. Make sure all of it is coated will with the silicone fluid. Once everything is coated well with this stuff, insert the damping shaft back inside the housing and reinstall both the brass retaining screw and the T6 star set screw. Work this assembly by pushing down with your finger on the metal tip sticking out of the bottom. The shaft will now move up and down very slowly. You will probably have a lot of excess silicone pushing out at this point. That is good. Just work it back and forth and clean away the excess thoroughly. Now reinstall in your turntable dropping it back in the top. Make sure the set screw is accessible from the front of the turntable by turning it to the correct position so you can place your driver on it again and tighten the retaining screw you only loosened on the arm lifter base at the beginning. Now, you will need to slightly loosen the small T6 star retaining screw to set the height and proper position under the tonearm. I suggest that you take pictures of everything exactly where it is located with your cell phone before you begin doing this and during disassembly so you will get it all back together correctly. Setting the arm lifter and tonearm height is a bit of a PIA but just be patient and you will get it. Mine is set so the distance between the stylus and the vinyl is about a 1/4 to 1/2 inch drop to the record surface. Once completed your cueing will work smoothly and drop smoothly to the record surface. The auto lift at the end will also work without making the tonearm bounce but will lift quicker than it drops. This is normal! If you still aren't satisfied and think it is dropping too fast or rising too quickly it means you didn't coat the shaft well enough and will need to repeat the process. I know because it took me three times performing this procedure to get it right. First time with 300,000 cst. lubricant that wasn't viscous enough. The second time I went too light with the 500K and third time was the charm when I really coated the hell out of all the parts and cleaned away the excess. The opening in the housing which contains the set screws will allow any excess silicone to escape and achieve the proper level. Just make sure everything is clean and you have worked the damping shaft back and forth to clean any excess silicone before you reinstall in your turntable. Good luck and take care of that YP-D8. They are one hell of a turntable and along with my YP-D71 I would never part with either of them.
View attachment 1555150