• The move to the new server is done. There are some software and database maintenance updates in process. This has us passing the hat around to help out. We appreciate any donations. Seriously, even a dollar helps. The payment page may be found here - https://www.audiokarma.org/support.html

Your favorite DIY trick

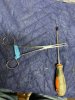
This vacuum tube pin straightener works far better than needle nose pliers. Indispensable for tube gear owners and can be mounted to a stationary surface which I've not done yet. It also helps to keep the pins clean.


380c.jpg
 
To easily replace A.C. cords and save that strain relief grommet. Leave about a 1/2in. of cable w/insulation inside rear panel showing and use a lighter to heat/soften the insulation while using needle nose pliers to curl the cable out from the outside.
 
May not work in all instances…
1. When replacing tube socket cut solder lugs from the bottom of the old socket (leave wiring/components in place) then solder to lugs on the new socket. May also work with terminal strips/ other components.
2. I have used WD-40 to restore faded color bands on resistors. Results may vary. Cleaners like acetone can dissolve color bands
3. Valve grinding compound (available at auto parts store) applied to a screwdriver tip often gives enough gripping power to remove stubborn screw.
4. Part #’s too small to read? Take a digital photo and expand.
5. I take many pictures before AND after. Allows me to inspect now/review later in case I’ve screwed something up.
6. Small parts dropping on floor? Place a carpet remnant (no shag) in the drop zone.
7. Old cardboard insulator on metal electrolytic can disintegrated and need replacing? A) Wrap entire can with several layers of quality electrical tape. B) If you can’t wrap the can with tape first cover top of metal can with electrical tape. Cut a cardboard tube (from paper towels or TP) to the correct length, install over the can. I use a silicone caulk bead to secure tube to the chassis. Don't do this where heat might be an issue over time. For a better look I’ll first dip the paper tube several times in black paint to stiffen and protect the tube. The tube can then be cut and taped/glued for a better fit if desired.
8. Magnetize end of screwdriver to nut driver to hold screw.
 
I just found this trick thread-I will read through 16 pages!
IMG_4606.JPG IMG_4606_Zoom.jpg
Folks here have probably already done this trick. I hope others might benefit.

When I had to hold a nut for a screw-in this case, I had to hold it 3" into the chassis, horizontally, to accept the screw from above. It was far too tight to get my hands in there.

I used a pair of hemostats, holding the nut, and used a rubber band to maintain firm tension, to avoid dropping nuts into the chassis.

Also, I needed to find a way to push up the board, so the end of the screw, mentioned above, would protrude enough to catch the nut I had. My 'third hand' was simply a microfiber towel. I carefully, bur firmly pushed the cloth into the area, moving the board into place, and spreading the force out among the multiple components on the board. That screw on the left was recessed-tricky!
IMG_4608.jpg IMG_4607.JPG
 

Attachments

  • IMG_4608.JPG
    IMG_4608.JPG
    99.8 KB · Views: 79
  • IMG_4608.JPG
    IMG_4608.JPG
    99.8 KB · Views: 80
Old speaker magnets help keep screws from disappearing , attach them to the chassis cover so after the parts arrive nothing is missing. The magnets can be hard to get off the speaker..
 
I often use these binding posts on diy projects. They were originally designed to use as wall plates for HT systems but removed from the plates I've used them in speakers and amps. Bought several plates on close out at Lowes but you can find them even cheaper on line. I prefer the ones that have a set screw on the back that captures the bare wire.

2391bc6e-33a1-4bd7-a09d-833ddc1d6007.8938b8ab2e0ddcf0ccbe4e0e145ca92a.jpeg
 
image.jpg image.jpg I bought a small ‘wire’ shelf cart. Sits about 4’ high. It has shelves below. I cut the cardboard box to make shelf covers, as the wire construction lets equipment legs and tools drop through.

I put larger pieces on it, so I can spin it around, to get to either side easily. Lower shelves hold tools and such. This set up lets me work seated and have my work at eye level, on some gear. I work on R2Rs and this rolling spinable cart has been a big help.
 
Large 3 tier roll around wire shelved unit.
Small wheel size. Handles a load. Two large, one small piece of gear shelved. It rolls smooth !

HSN seller, manufacturer name " Origami " for it's convenient easy fold up and store technology.

I had always thought that a unit sitting on a mechanical Lazy Suzy
Idea , was the best. Now, I am at odds !
 

Attachments

  • IMG_20220909_211553011.jpg
    IMG_20220909_211553011.jpg
    132.5 KB · Views: 43
Last edited:
I like those carts that are basically a workbench on wheels. Sure beats slugging a big piece of gear around to get at the back of it.
 
I often use these binding posts on diy projects. They were originally designed to use as wall plates for HT systems but removed from the plates I've used them in speakers and amps. Bought several plates on close out at Lowes but you can find them even cheaper on line. I prefer the ones that have a set screw on the back that captures the bare wire.

2391bc6e-33a1-4bd7-a09d-833ddc1d6007.8938b8ab2e0ddcf0ccbe4e0e145ca92a.jpeg

If you look closely you can see how I used these inexpensive terminals on the OBs.

P1010020.jpeg
 
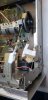
Use tape to secure the dial cord on a receiver or tuner so that you can remove the large tuning capacitor pulley and keep the dial cord in place! I used this trick to replace the drive gear on the capacitor of this Scott 350R.
 

Attachments

  • 20230110_194045.jpg
    20230110_194045.jpg
    76.7 KB · Views: 25
  • 20230110_193355.jpg
    20230110_193355.jpg
    80.5 KB · Views: 23
  • 20230109_080328.jpg
    20230109_080328.jpg
    137.9 KB · Views: 22
  • 20230110_155508.jpg
    20230110_155508.jpg
    101.1 KB · Views: 23
Use tape to secure the dial cord on a receiver or tuner so that you can remove the large tuning capacitor pulley and keep the dial cord in place! I used this trick to replace the drive gear on the capacitor of this Scott 350R.
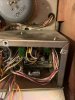
I use tape on the dial cord pulley too (y)
 
Back
Top Bottom