• The move to the new server is done. There are some software and database maintenance updates in process. This has us passing the hat around to help out. We appreciate any donations. Seriously, even a dollar helps. The payment page may be found here - https://www.audiokarma.org/support.html

Zaph Audio SB12.3 build thread

RVT1K

Super Member
This has been a long, sometimes frustrating but mostly fun process.

I have been thinking about building speakers for quite a while now and decided that building from a kit made more sense considering that I have zero experience designing speakers.

My listening space is big and I sometimes like to rock the house so I wanted big, floorstanding speakers. Ideally I wanted a kit that came with pre-cut, knock-down cabinets but I could not find anything like that. So, in the end, I decided on the Zaph Audio SB12.3 kit from Madisound.

I figured that I was only doing this once so I went ahead and ordered the kit with the full upgrade package for the crossovers. I also opted for the optional accessory kit to make things easier for me.

Dealing with Madisound was great. I got a call after placing my order to verify things and to verify shipping. My situation is different in that I now live in Belize and getting stuff shipped involves a freight forwarder. Some companies will not ship to a freight forwarder but, after verifying with Madisound, the order was placed.

So how it works is pretty easy. I have an account with a company that specializes in shipping to Belize and I use their location as my shipping address whenever I order anything from the US. The items go there and orders are consolidated if needed and they put everything on a boat every week or two depending on the season. Once everything arrives in Belize, they put it on trucks and deliver right to your door. It is very convenient and (usually) pretty reasonable. They usually handle customs and the majority of household items will not require any extra duty to be paid.

So this is where some of the frustration came in. First off the shippers charged me above and beyond the typical rates because it was "electronics".
The I got absolutely HOSED by Belize customs. Not only did I have to pay a huge amount for the duty, I also had to pay for a "customs broker" to handle the transactions. Fortunately I was able to make these payments at a local bank as opposed to driving over two hours to the port in Belize City. There were some delays and confusion initially on my part because any additional duty had always been paid by the shipper and added to my invoice. But, once it was all squared away, the items cleared customs and were delivered.

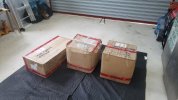
So after all that crap and unexpected (and freaking HUGE) extra expenses the kit finally arrives. To my dismay the boxes were not in pristine condition and even splattered with mud??!! Fortunately all the contents were fine although I did give the shippers some crap.

So this pic simply shows the arrival of the kit. More to follow....

boxes.jpg
 
Register to hide this ad
The way things started is not how they ended.

My original plan was to use "cabinet grade" plywood for the cabinets and apply the finish to that. The finish I wanted to use is called Lin-Speed oil and is some blend of linseed oil and other stuff. Its popular for gun stocks and that is why I knew about it, I remember my dad using it when I was a kid. It was an homage to my dad and also different than the finishes most people use, adding my own touch.

My "shop" consisted of my one-car garage so the vehicle was parked outside for the duration of the build. I had my dad's old, fold-up table saw, an old circular saw, my dad's old jigsaw, and my old and trusty Milwaukee 1/2" drill. My "workbench" was two plastic 55 gallon barrels with a sheet of plywood across them. This being Belize, the shop was mostly hot and sometimes damn hot.

I know enough of the basics of carpentry to do ok. I've done major renovations to my first house among other things but I've never done anything that had to look good.

I wanted these to look good, they were going in my living room not my old dorm room or my old bachelor-pad when aesthetics didn't matter. So I knew that the cuts needed to be done well to start off with. I also knew trying to cut a 4x8 sheet of 3/4" plywood on my own would be a challenge especially since the cuts needed to be nice and straight. The other challenge would be cutting the holes in the front baffle and making the counter bores so the drivers would sit flush as per the plans since I don't have a router.

Based on all that, I decided to ask the carpenter who built all the kitchen cabinets, kitchen island, and bathroom vanities in our house if I could hire him to cut the various pieces and make the holes in the front baffles. I would still do all of the assembly. He was also the same carpenter who built my custom rack for my stereo.

So when I spoke with him, he was very excited about the project and agreed to do it in exchange for some CD's I had that I was trying to give away. He has a big CNC router and said he would use it to cut up everything including the holes and counter bores. So I left him the plywood and the drawing for the cabinets.

This was another part of the project that got a bit frustrating.

Now I knew he had a business to run and wasn't getting a lot for the work despite being excited about the CD's (apparently a few made his girlfriend particularly happy) so I wasn't expecting overnight or even next-week delivery. But when someone says "soon" there are certain expectations. So after a couple/three weeks I stop by to see how things are going. Well he hasn't had a chance to make the program for the CNC but he would "soon". I went back after a couple of weeks and still no luck. I offered to help to simply cut the parts on his big-ass table saw but he insisted it would be "soon". Although I wasn't thrilled, I wasn't surprised either. There were big delays with the work he did for us earlier.

I went back another couple of weeks later fully expecting to see full sheets of plywood and was very pleasantly surprised to see a pile of cut pieces. He had even assembled the two interior parts that form the sealed section for the mids and tweeters.

But he had not cut the front baffles yet. More on this to follow...

Now I had enough to finally begin building after waiting for so long. I was stoked and a bit nervous due to the lack of experience.

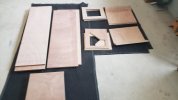
So here's a shot of the pile of cut parts once I got them home.

More to follow.

cut parts.jpg
 
Madisound includes fully assembled crossovers as part of the kit with the circuits for the woofers, mids, and tweeters mounted of separate boards.

They also offer a couple of different upgrade options for capacitors in both the tweeter and midrange circuits. I decided to go with the upgrades to both.
Although the upgrades were not cheap, I didn't want to finish the project and immediately wonder "what if?"

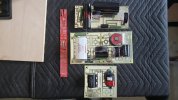
So this is what the crossovers look like. From bottom to top: woofer, mids, tweeters. All in all the construction was good if not fully up to my Mil-Std electrical assembly/soldering trained standards.

More to follow.

crossovers.jpg
 
The next step was to figure out where the crossover circuit boards would be mounted.

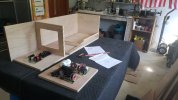
So here is where I did some mocking up to determine where everything would go.

More to follow.

layingout.jpg
 
Assembly begins.
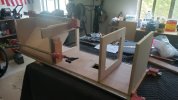
I borrowed several big clamps from the carpenter and started gluing.

Still no front baffles...

assem2.jpgassem1.jpg

More to follow.
 
I didn't need the front baffles to proceed with the build. Every time I inquired I was told "soon". Remember the old commercial "....aaaannnnyyy day now, annnyyy day..."

So I assembled the parts, installed the crossover circuit boards and all the wiring. I also installed the included foam sheeting on the interior surfaces. The exception being the the enclosed spaces that created a specific and sealed volume for the mids. This space was getting filled with the same material as the rest of the cabinet. The designer stressed that this volume was critical and must be maintained if any changes were made to the cabinets. It also needed to be airtight. I choose to build everything pretty much as per the drawings.

One of the things I would have done differently would have been using biscuit joints. I feel that would have really helped keep things in place and made for better alignment of the panels.

I was planning on simply applying finish to the plywood but it became apparent that my assembly skills were not up to the task. So I mentally shifted gears and started exploring covering the cabinets with veneer.

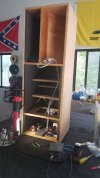
Anyway this is one cabinets completed and waiting for the front baffle. You can see the sealed volume for the mids on the right side. The other speaker is the mirror image.

More to follow.


wiring.jpg
 
Even with everything precut that's no easy assembly job. How did you do the joints? Glue n screw, pocket screws, dowels? Looks like those horizontal panels are butt-joined to the carcass? They're not supporting weight really so I suppose not a big deal but I would have cut a dado in the carcass and slotted them in there for extra stability.

I was planning on simply applying finish to the plywood but it became apparent that my assembly skills were not up to the task. So I mentally shifted gears and started exploring covering the cabinets with veneer.
Have you veneered before? I can be a PITA. Lots of people will say contact cement is the way to go. I hate that stuff and find it super finnicky. And then you really have to have the right tool to put a TON of pressure when you're laying it down. I prefer vacuum bagging but there's a lot of setup and equipment there. But if you have access to a vacuum pump you can probably DIY a bag. Another option I like is wood glue on both surfaces, let it dry to the touch (but not a lot longer than that) and it then becomes iron-on! Magic.
 
Even with everything precut that's no easy assembly job. How did you do the joints? Glue n screw, pocket screws, dowels? Looks like those horizontal panels are butt-joined to the carcass? They're not supporting weight really so I suppose not a big deal but I would have cut a dado in the carcass and slotted them in there for extra stability.


Have you veneered before? I can be a PITA. Lots of people will say contact cement is the way to go. I hate that stuff and find it super finnicky. And then you really have to have the right tool to put a TON of pressure when you're laying it down. I prefer vacuum bagging but there's a lot of setup and equipment there. But if you have access to a vacuum pump you can probably DIY a bag. Another option I like is wood glue on both surfaces, let it dry to the touch (but not a lot longer than that) and it then becomes iron-on! Magic.

Everything was done with butt-joints and Titebond III. That is some TOUGH stuff once it dries.

In a perfect world dados and/or biscuits would have been implemented but either would have required tools I didn't have and probably won't need again. I guess I could have used dowels but, truth be told, I didn't think of it until you mentioned it.

The veneer will be covered in another installment.

More to follow.
 
At this point, it has been well over three months since the order was placed and over a month since I received the cut parts from the carpenter.

Still no front baffles. "Soon".....

Now the lack of front baffles is starting to become a roadblock to further progress.

But, then again, so has my lack of finer cabinet-making skills.
By that I mean I have now fully accepted that I will be applying veneer to the cabinets because they just didn't look good enough to me. Although I think I still would be in this position had I access to some really high-quality plywood, the stuff I bought locally had a tissue-thin top layer and even light sanding was breaking through and causing unsightly blotches. I would now have to do some "bodywork" on the cabinets to get the corners and edges nice and straight.

I also decided to only veneer the top and sides of the cabinets and to paint the front and back black. More on that later.

In the interim I decided to check my wiring and did a phase test on all the drivers. Due to the nature of the crossover, the mids and tweeters needed to be wired out of phase with the woofers and I wanted to be certain that I did not literally get any wires crossed.
So I downloaded a free audio tone generator app for my phone. I have a signal generator but didn't have a cable to adapt the BNC out to the RCA in of the Bluetooth amp I was using and I didn't want to bother cobbling one together.
If I remember correctly, I used 100Hz, 1,000Hz, and 10kHz to test each driver. I fed the Bluetooth amp the test tones via my phone, connected one channel of the amp to the speaker under test and used that as the reference for one channel of my O'scope. The second channel was placed on the positive terminal of the individual driver under test and I verified that both signals were in phase.

Sorry but no pictures of this step.

More to follow.
 
The saga of the front baffles continues...

I think it was approaching two months since I had dropped the lumber off with the carpenter and still no front baffles and I had run out of patience.

The plans called for the drivers to be recessed enough for all the flanges to sit flush on the baffle. This was the main reason I was waiting on the carpenter, I know this requires a router, a jig, and some cutters for the router. I own none of these. And I didn't want to buy them for a couple of reasons. First and foremost this would add at least another month to the project of simply waiting for them to arrive. The other reason was that I probably would not need them again and it all would simply be taking up valuable space.

So I made the decision to just go get my lumber back and do the best I can with what I had. I'll cut the holes with a jigsaw and forego the counterbores.

I go to the carpenter and tell him I want the lumber back and I'll proceed on my own and many thanks for what was done. He mentioned that some of it "may be scored a little".
I can see it is well and truly #@^&-ed up with very deep scores. He must have messed up and used this piece to back the parts that were cut on the CNC router. I bite my tongue and go on my not-so-merry way.

Now I have to buy another sheet of plywood. So I go to the place I bought it from only to find out they no longer have any and didn't know when more would arrive. This is a very typical situation here in Belize, stuff pops up and then disappears. The guys there were nice enough to suggest a different place that I didn't even know existed. Luckily they had 3/4" cabinet grade plywood. So I strap a sheet to the roof of my locally-sourced 2008 Mariner and head home.

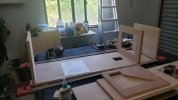
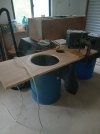
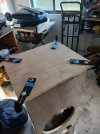
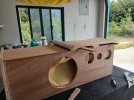
Here's a couple of shots from the "Bob Villa, Central American Division" workshop. The first baffle is done and you can see the cabinet all clamped-up. The battery was placed precisely to damp vibrations from the jigsaw...

More to follow.

FB1.jpg

FB2.jpg
 
Can you borrow or rent a handheld router? Circle jigs are trivial to make. That would be the easiest way to get your couterbores.

If you're the type to like a project within a project, there's the DIY route: Do you have access to a grinder? Maybe your carpenter friend will let you use his as penance for ****ing up your plywood. Or the guys you bought the plywood from. I haven't done this myself but there are videos out there about making a router plane out of an old hex wrench and scrap wood. Router planes are pretty simple so these look like they would work. Then you could make a template or a jig and rout the counterbore by hand.
 
No one here rents tools nor will any of the places selling lumber do anything other than sell lumber...no cutting holes, straight cuts, or otherwise.

I appreciate the suggestions but everything is moot at this point since the speakers have been completed and have been in service for over a month now. Everything I have written is after the fact and not a running commentary on the build.
 
Now that the front baffles have -FINALLY!!- been installed, I can move on to the bases.

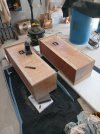
I wanted to keep it simple. So all I did was use a piece of 3/4" plywood and cut it an inch or so larger than boxes.

I also wanted to use outriggers with some sort of spikes/disks arrangement since we have tile flooring but anything I found was not big enough for these speakers. The weight ratings were good but they would not span the boxes.

What I wound up doing was buying a pair and then cutting them in half. Then I drilled a hole at the end of each for mounting, one screw in the original slot and one in the new hole.

Since I cut and drilled the outriggers by hand, each one was a bit different so I simply numbered them and repeated the numbers on the boxes for when I was ready to do the final installation.

More to follow.

outriggers.jpg
 
I looked for veneer that would be wide and long enough to cover the sides and top in one piece each. I didn't feel the need to veneer the backs and talked myself out of doing the front baffles. I was mostly concerned about doing a decent job of cutting the holes since it almost certainly would have involved an X-acto knife. In retrospect, I now realize it wouldn't have been that bad and the flanges would cover the edges. But I had never dealt with veneer of any kind before and took the chicken route and decided to paint the fronts as well.

The veneer arrived rolled up so it spent several days "relaxing" in the house so it would flatten out.

I used wood filler in some spots and even Bondo in a few places to get all the edges as nice and square as I could.

I used DAP Weldwood contact cement and was able to get it at the local hardware store.

I was pleasantly surprised at how well it all went. I used a paint brush to apply the contact cement to both the cabinets and let it dry as per the instructions. The contact cement makes A LOT of STRONG fumes, good ventilation is mandatory.

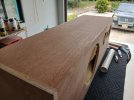
I cut the veneer -before applying the contact cement!- so it would overhang the edges a little. I had bought a small tool for trimming the veneer - a razor blade in a fixture that slides along the edge and trims the veneer flush. It worked really well although an X-acto with the right blade would have worked, too. I just used left over scraps of plywood to keep the veneer from touching the cabinets while it was being placed and a piece of PVC pipe as a roller.

While "easy" might not be the right word, it was a far easier process that I was expecting and I am very happy with the results.

More to follow.

bodywork.jpg

veneer1.jpg

veneer2.jpg
 
With the veneer done, I was ready to paint the front and back.

I wanted a textured finish and thought I would be able to find something locally. What I found and tried was aerosol car undercoating. I think this was a case of theory and practice not aligning... While I did like the finish, I simply could not get it even enough. The product seemed highly pressurized and came out really hard.

After I was done, I wasn't happy. So I sanded it all down as best as I could - it was damn tough after it dried! - and got some sort of heavy-duty paint and gave that a shot. Still not happy but I decided to move on.

Finishing the veneer with the Lin-Speed oil was easy, I just used a small rag to apply thin coats.

The last check involved hooking the speakers up to my Bluetooth amp and verified all the drivers were working with the venerable empty paper towel tube.

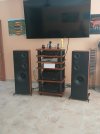
These are definitely the biggest speakers I've ever owned and I had to use my hand-truck to move them from the garage into the living room. Fortunately that is a short trip since the garage is attached and the door opens to the open living room/kitchen. It is just visible on the left side of the attached pic.

I hook the bad boys up, break out my CD of American Beauty and start listening. I don't recall if I made it through the entire album or not but there was LOTS of jumping around my MP3 collection...what does this sound like??.. what does that sound like??..

I'm very, very happy with the way everything has turned out. The balance is great, nothing sounds enhanced or lacking. Strings and vocals sound great. The bass is fantastic! I've never owned acoustic suspension speakers before and I am loving these..deep and tight. My old set-up had a terrible boom at first and the REW/UMIK-1 combo showed a big hump followed by a big dip. Around 50 - 70 Hz if I remember correctly. I corrected it with the DSP. These speakers do not exhibit that, at least nothing that I can hear. I have yet to do any tests with the new ones. I'm currently bi-amping with two, modified Adcom GFA555 II's and a Dayton Audio DSP-408 although I did bridge the Adcoms and used them as monoblocks for a bit.
I'm still nailing down positioning to optimize the stereo image. My listening chair is off-center to the right and there is a wall on my right side and getting the image centered is a bit of a problem and I even had it with my old speakers. Things sound very "right-centric" if you know what I mean. I can play with attenuation and delays with the DSP and will continue to experiment a.k.a. play.

Remember the part about still not being happy with the paint? Well I have received a can of real Dura Tex and will be applying it soon. I also got another can of Lin-Speed oil and will put a few more coats on the veneer.

Thanks for following along. Updates as they occur.

new.jpg
 
They look fantastic from that view.

Thanks!

I broke out the hand-truck, moved them into the garage again and applied the DuraTex the other day. I'm very happy with the results. This is what I should have done from the start.
I also hit the veneer with some steel wool and applied more Lin-Speed oil. I'm gonna let that dry and repeat the process, probably a couple more times.

This being my first D.I.Y. speaker project and considering the tools/materials I had available, I give myself a B+. There are little mistakes here and there that would be apparent under close scrutiny. But I know that, as the builder, they are more obvious to me mostly because I know they are there.

I'll post some better pictures of the finished cabinets after another coat or two of the Lin-Speed oil.
 
Back
Top Bottom