• The move to the new server is done. There are some software and database maintenance updates in process. This has us passing the hat around to help out. We appreciate any donations. Seriously, even a dollar helps. The payment page may be found here - https://www.audiokarma.org/support.html

1st time restoration DQ-10

Dbickel

New Member
Hi folks, this is my first ever restoration (and 1st ever forum, thanks @Blue Shadow for some direction ;))!

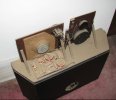
I picked up a set of DQ-10's on the side of the road and they need some work. They fired up and played but there are lots of issues - I'm curious on what everyone thinks is the best "order of operation".
  • Everything "works" but nothing sounds right. Everything is a little crunchy and distorted - especially the woofers.
  • Woofers look to be original but they need to be re-foamed. What is the go-to kit? Simply Speakers? Midwest Speaker Repair? Other?
  • Crossover looks to be original. I'm assuming I'll get better performance by doing a re-cap, yes?
    • I've already seen lots of folks who posted purchase lists for cap's, etc. I'll dig into these - thanks.
  • One of the speakers seems to have been modified - after reading other DQ-10 threads, it seems as if it's common to "mirror" one of the speakers, correct?
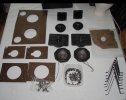
    • Also, you'll see in one photo that there is old felt/glue residue that covered only one of the mid-range speakers. Any thoughts on this?
  • Also, everything is "sticky" - the crossovers and the vinyl wrap are tacky for some reason. Even after an initial cleaning the masonite and electronics have a sticky film on them. Is this a common thing with age (e.g. infamous JBL 4328p's) or is this a one-off for me (e.g. perhaps this was environmental with where they were stored, etc)?
Here is what I was thinking for a plan of attack - please let me know if anyone would suggest a different plan:
  • Order and Refoam woofers
  • Remove cross-over, clean, and do a continuity test on everything. Then rewire, and re-cap as appropriate
  • Then test individual speaker components.
Thanks - I'll try to post throughout the restoration.

David
 

Attachments

  • IMG_7625.jpeg
    IMG_7625.jpeg
    503.3 KB · Views: 44
  • IMG_7624.jpeg
    IMG_7624.jpeg
    465.5 KB · Views: 38
  • IMG_7623.jpeg
    IMG_7623.jpeg
    579.1 KB · Views: 34
  • IMG_7626.jpeg
    IMG_7626.jpeg
    353.7 KB · Views: 29
  • IMG_7618.jpeg
    IMG_7618.jpeg
    536.5 KB · Views: 37
Register to hide this ad
Good luck with your project! I'll be watching your progress for sure.
I've always heard good things about DQ-10's and they seem to be held in high regard but have never listened to a pair.

They certainly have a cobbled-together look to them but that is how Dahlquist made them. Might be a Brit thing..I worked for an e-beam company that originated in England and our products had a bit of that look to them.
 
Hi folks, this is my first ever restoration (and 1st ever forum, thanks @Blue Shadow for some direction ;))!

I picked up a set of DQ-10's on the side of the road and they need some work. They fired up and played but there are lots of issues - I'm curious on what everyone thinks is the best "order of operation".
  • Everything "works" but nothing sounds right. Everything is a little crunchy and distorted - especially the woofers.
  • Woofers look to be original but they need to be re-foamed. What is the go-to kit? Simply Speakers? Midwest Speaker Repair? Other?
  • Crossover looks to be original. I'm assuming I'll get better performance by doing a re-cap, yes?
    • I've already seen lots of folks who posted purchase lists for cap's, etc. I'll dig into these - thanks.
  • One of the speakers seems to have been modified - after reading other DQ-10 threads, it seems as if it's common to "mirror" one of the speakers, correct?
    • Also, you'll see in one photo that there is old felt/glue residue that covered only one of the mid-range speakers. Any thoughts on this?
  • Also, everything is "sticky" - the crossovers and the vinyl wrap are tacky for some reason. Even after an initial cleaning the masonite and electronics have a sticky film on them. Is this a common thing with age (e.g. infamous JBL 4328p's) or is this a one-off for me (e.g. perhaps this was environmental with where they were stored, etc)?
Here is what I was thinking for a plan of attack - please let me know if anyone would suggest a different plan:
  • Order and Refoam woofers
  • Remove cross-over, clean, and do a continuity test on everything. Then rewire, and re-cap as appropriate
  • Then test individual speaker components.
Thanks - I'll try to post throughout the restoration.

David
These will be an enjoyable resto project.
Regarding the caps, all the yellow caps are film, and most likely will still be good. I would replace the one lytic blue cap.
I’ve heard a restored set of these maybe 10-11 years ago, and they were fabulous!
Looking forward to following along.
Cheers, Glenn
 
See if Rick Cobb has surrounds, send email. Info in this thread

One of the speakers seems to have been modified
Yes, Dahlquist instructions to mod to mirror imaged.
Your speakers are between the use of Mylar caps @ s/n: 22,000 and factory mirror imaged @ ~ 29,000.
The s/n was on a small printed paper glued to top of tweeter boards. They usually fell off.

there is old felt/glue residue that covered only one of the mid-range speakers
The mid-woofer had this on the back to prevent sound coming out the rear of the speaker. When mirror imaged the hardboard was turned over to position the two drivers on that board correctly, felt removed, leaving remnants on the front. Both mid-woofers should have the felt on the back. The felt on the front, up to you how you want to deal with it. It’s ‘no bother’ to ‘replacing the hardboard’ depends on degree of ocd of the owner.

Also, everything is "sticky" - the crossovers and the vinyl wrap
The crossover has a wax covering. Why I don’t know but guess it was to keep everything from even the smallest movement/rattling while the speakers played.

The vinyl, haven’t seen them go sticky but vinyl has plasticizer chemicals in the mix when made and these can ooze out. Maybe a good cleaning with strong cleaner will work. If not maybe try some chemical to clean in inconspicuous spot to test. Something like acetone, toluene, mineral spirits, isopropyl alcohol, all stuff I keep in stock for whatever. But I have a bit of a chemical background and read the MSDS for these things.

  • Order and Refoam woofers
  • Remove cross-over, clean, and do a continuity test on everything. Then rewire, and re-cap as appropriate
  • Then test individual speaker components
I’d fix the woofers, check the internals, clean the pot and reinstall the woofers upside down so the spider stretches the other way from what has been done the last 40 years. Then test em if all wiring seems good. Only cap that needs to be replaced has been mentioned. You will not hear the piezo super tweeter as it crosses over at 12,000Hz. Look for its contribution on an audio analyzer app.

I had two pair of early electrolytic-capped, non-mirror imaged speakers, one pair from a smoking home. I did this:

IMG_1176.jpeg
Quarantined and replaced the felt, cleaned the rest and febreezed the woofers. No smell left. Rebuilt both pair as mirrored, recapped with film caps, now including the 80μF cap, had stands built to my specs and installed new grille cloth. I love the way the speakers look behind thin grille cloth that shows the superstructure when light is behind the speaker. The individual baffle boards were sized on purpose to work with the frequency range of the drivers to avoid diffractions. Most think it is a child’s project. I know I’m looking at research and development when I see the superstructure.

I started with two clean DQ-10s and two like this
IMG_1179.jpeg
And ended up with two pair mirror imaged pairs like this
IMG_1182.jpeg

Join the Dahlquist.io group and look over the wiki and files. It shows the factory mod to mirror image, cutting one support. I chose to disassemble and rebuild mine. Lots of info there.

I’ve got more upgrades to do on mine. One in the works, one in the planning stages.
 
Last edited:
Ok, I'm on my way - thanks for all the helpful comments so far!

The surrounds have been ordered from Rick Cobb and I started cleaning up the old foam off of the cones but ran into an unexpected issue.

Before I mention this, yes, I did read all of the comments that I should NOT take off the Masonite from the frames - I had no choice, it was so dry/brittle that it basically detached itself as I was taking the frame out of the cabinet. I didn't want to take the chance that they would rattle upon reinstallation, so off they came! (Gulp)
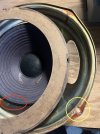
  • Circled in red - kinda tough to tell in the photo, but I was able to clean the old foam off of the cone (basically back to the bare cone material)
  • Circled in yellow - with the Masonite off, I will next clean off all the old frame glue but does anyone know what this orange/red glue is? Or have a recommendation on what to use to reattach the masonite to the frame?
    • I did some searching but couldn't find anyone else who seemed to run into this issue
  • I also took the opportunity while the masonite was off to clean all of the old glue off to have a nice clean surface
    • Pictured is the underside of the Masonite that I cleaned up.
While we're talking glue:
  • There was a bead of calking or glue where the frame attached to the cabinet. It was also dry rot and crumbled off when I took the frame out. Suggestions on what to use upon reinstallation?
Thank you in advance!


IMG_7656.jpeg
 
I use Aileen’s Tacky glue for surrounds. It dries slowly and gives you time to work. It’s water soluble, so if you do screw it up, (non centered VC’s) you can wet it with wet Q-tips to soften the glue and reposition. I’d also use it on the Masonite rings.
 
The Masonite ring usually just comes loose in one area and you hear some splatty sound while listening and have to hunt for the problem. You have the opportunity to glue this piece down properly with it separated from the basket.

I don’t know if there is a preferred way to do this but the key is to have the voice coil centered in the gap when you are done gluing everything back together. @GordonW does speaker repairs and maybe he will drop in and suggest a procedure. I might do the Masonite first then the surround in steps, but I’ll leave it to others to recommend the best way to get things centered properly.

They may provide suggestions on glue, too. I have used Aleene’s Tacky Glue (Walmart, Craft Stores) for replacing surrounds and the Masonite repairs which have been just sections that come loose with the bulk of the ring still attached. I do use the glue over the entire circumference of the ring to prevent further loosening.

The bead of caulking is to seal the cabinet as the woofer is used in an acoustic suspension (sealed cabinet) design. Many use mortite but I have 3M strip caulk which is another product that does not dry out and remains pliable while sealing the basket to the cabinet. There are also foam insulating tape that can be used if there is enough surface area to put a layer of it and have the woofer basket compress it. Parts-Express has a couple sizes of it. They call it Speaker Gasketing Tape. Something I have collected from shipping materials is expanded polyethylene foam sheets. These can be cut to be a gasket for drivers in many speakers. I have thin I use for midrange and tweeters and thicker sheets that cane be used for woofer gaskets. Important to make sure there is no air leak once the woofer is installed.
 
Last edited:
I would use the opportunity to clean both the cone and the masonite of old surrounds. Then I would mount the surround to the cone. Next, glue the masonite back in place, using old glue as a guide. You can remove anything loose but you want to have enough left to reposition the ring where it originated. Lastly the outside of the surround gets glued to the masonite, using a 30hz tone to center.

You can use shims, but they aren't really needed on these. Pretty big gap. Ymmv.
 
I have use a signal generator, set to very low output . Since they are woofers, Probably 120hz or even higher like 500hz. VERY low signal level. It will naturally center the voicecoil in the gap. Gently clamp the Surround to the Frame. Turn off the Signal generator and let the glue set.
 
I have use a signal generator, set to very low output . Since they are woofers, Probably 120hz or even higher like 500hz. VERY low signal level. It will naturally center the voicecoil in the gap. Gently clamp the Surround to the Frame. Turn off the Signal generator and let the glue set.

You need to use a very low frequency to get the cone moving enough to affect the surround. 120hz won't do it. 30hz, low volume. Don't flap the cone.
 
I would use the opportunity to clean both the cone and the masonite of old surrounds. Then I would mount the surround to the cone. Next, glue the masonite back in place, using old glue as a guide. You can remove anything loose but you want to have enough left to reposition the ring where it originated. Lastly the outside of the surround gets glued to the masonite, using a 30hz tone to center.

You can use shims, but they aren't really needed on these. Pretty big gap. Ymmv.

If you've got the masonite rings off, this is a procedure that definitely works.

Regards,
Gordon.
 
Back
Top Bottom