• The move to the new server is done. There are some software and database maintenance updates in process. This has us passing the hat around to help out. We appreciate any donations. Seriously, even a dollar helps. The payment page may be found here - https://www.audiokarma.org/support.html

Adding a drainage tube in old VPI 16.5 RCM machine

dibs

New Member
Hi All,

Is there any thread or any link on how to add a drainage tube in the older models of VPI 16.5 machines. I see no options to clean the tank water. I am just worried that I may damage the box which is a MDF material and can cause the unit to a total shut down. I got this from someone on sale and didn't realize it was the older model without the drainage option, anyway its a great machine so I moved on. I really don't want to damage this machine with water and not been able to use.

Is there a workable solution for the liquid drainage. I tend to use less liquid and also just clean 5-6 records max in 2-3 days.

Appreciate your help and suggestions
 
Register to hide this ad
Just to clarify, VPI made the older model "16" RCM. This was the Machine that had the Vacuum Wand built in to the Lid. Is this what you have?

This VPI 16 had no drainage tank that I'm aware of, just a Sponge sitting within the machine affixed to its Bottom Cover. Have you looked inside your machine?

I seem to recall VPI did make a kit to modify a model 16 to 16.5 status, but I believe that only entailed a new Lid, the Vacuum Wand and entire mounting assembly for the Vacuum Wand.
This Wand Assembly would then be mounted at the hole on the top deck. And that this kit did not include the Stainless Steel Drainage Tank and Drain Hose.

Sure, do a marathon cleaning run with these older VPI 16 RCMs, and you're going to wind up with an Aquarium. LOL

About all I can suggest as a simple way to deal with such, without the addition of a fluid recovery tank, is to try to find some sort of small Tray that can be affixed to the inside of the bottom Cover to catch fluids.

Such a tray-pan could be affixed with something like RTV Silicone, and if one was inventive, sure, one could somehow install a nipple tube to the bottom this tray, connect a length of plastic or rubber tubing, have the hose exit the bottom rear of the machine, and devise some sort of shut off cock-valve when one would wish to drain-empty the tank after use without the need to dis-assemble the machine.

With a newer, factory made VPI 16.5 (which I own one), the method for draining the Recovery Tank is simple.

Unlock the Plastic Hose Clamp on the Hose, tilt the machine rearward, and empty the Recovery Tank into some vessel, be it a glass, bowl, bottle, what have you.

If you have already noticed damage caused by fluids within the machine, this can be of course cleaned up, sand smooth, and apply some form of waterproof covering, be it a paint or urethane varnish. This will stave off any future damage occurring.

If I can be of further help, I'll do my best to help.
 
Last edited:
Usually one prone area for water damage on both the older model 16, and model 16.5 is the area at the top deck and the hole where the vacuum occurs, and will have the Vacuum Wand Assembly mounted on the newer 16.5 RCM.

If water damage occurs in this area, swelling of the MDF can occur. What this can then cause, is the Vacuum Wand not being parallel to the record's surface, and thus inefficient fluid removal will-can occur.

If such has occurred, then the only fix on a newer 16.5 RCM would be repair to this area, via sanding, and perhaps the use of an epoxy (bondo or such) to fill, and level this area flat again. The Hole, or any other areas of the MDF can be painted to then help aid water-proofing.

Note the video I link to, does the top of your machine look like this in regards to the Vacuum Wand and how it is affixed to the top deck?

 
Last edited:
Hi Mark I have the 16.5 which seems to have a tank inside that I can peep through the vacuum hole and can see the liquid. I am just worried if it overflows and damage the machine box. Any way we can get these water out. I don't see any option. Someone mentioned turkey blaster, not sure if that's the only option.
 
OK, the VPI 16.5 should have a stainless steel fluid recovery tank. So far, it appears you have one.
Yes, a Turkey Baster is an option, as a preliminary tool to mostly empty the tank, and should be done before this procedure which I'll mention below.

So, I'll ask this question. Do you see anything like a small round hole at the back of the machine?
On the back should be a Female IEC Outlet with a built in Fuse, and a Hole where a Drain Hose should exit.

Coming out of the Hole, should be a Drain Hose.
The only way you're going to actually know what's going on, is to flip the machine upside down, and remove the bottom cover.

This is not hard to do, first remove the Vacuum Wand Assembly off the top of the machine, and set aside.
On a clean work surface, lay down a towel first.

Lay the Machine upside down, and you should see 4 Rubber Feet. The 4 Screws that retain the Feet also serve dual purpose, by also attaching the bottom cover.

My 16.5 RCM Bottom Cover has 3 small slotted "Vents". Does your machine possess such?

Anyway, after removel of the Bottom Cover, you might likely see a couple sheets of batting insulation. these can be easily moved to the side to further inspect the inside of the machine.

You should see the Vacuum Motor, and then see that the face of that Ametek-Lamb Rotary Vacuum Motor merely slips into a cut out portion of part of the internal wood bracing.

Some 16.5 RCMs varied in this regard of retainment of the vacuum motor. Some had an additional Strip of wood attached to the inside of the bottom cover, and some others had a separate wooden strip that was removable.

There, you should then see the SS Recovery Tank. Do you? Do you then see a Nipple-Tube Brazed onto the Tank anywhere?

If not, then you have no option of drainage via a drain hose and clamp which is standard, at least on all late model HW-16.5 RCMs.

This leaves you with 2 options should you have this recovery tank, but no nipple tube where a hose was attached. The simple option, use a Turkey Baster.
Option two, the removal of the Tank, and somehow brazing a nipple to the tank, or finding some other means of attaching a drain tube to this Tank.

Another feature you might then notice. That between the face of the Rotary Vaccum Motor and the cutout on the side of the Recovery Tank, there should be some Foam Gasketing that acts as a seal, and is there to promote better suction of the vacuum motor. Any compromise of this Gasket will reduce vacuum bar pressure, and thus less efficiency when vacuuming fluids off the record surface.

When inside, check common connections such as electrical, and other attachment hardware such as screws that might be holding the tank,

Inspect for any water damage.

A picture or two would say a 1000 words, not sure if you have such capability, but if not, some further inspection, and your comments after would be of help.

In any case of what you find, and what method you may have to use to then empty the recovery tank, it is always a good idea IMO, that after a cleaning run, drain the tank in the best manner that you can, then leave the vacuum wand off the top of the RCM deck for a period of a good 24 hours to further permit full drying of the tank.

As I said, operation on these machines is relatively quite simple. Report back when you can and let me/us know what you find?
 
OK, the VPI 16.5 should have a stainless steel fluid recovery tank. So far, it appears you have one.
Yes, a Turkey Baster is an option, as a preliminary tool to mostly empty the tank, and should be done before this procedure which I'll mention below.

So, I'll ask this question. Do you see anything like a small round hole at the back of the machine?
On the back should be a Female IEC Outlet with a built in Fuse, and a Hole where a Drain Hose should exit.

Coming out of the Hole, should be a Drain Hose.
The only way you're going to actually know what's going on, is to flip the machine upside down, and remove the bottom cover.

This is not hard to do, first remove the Vacuum Wand Assembly off the top of the machine, and set aside.
On a clean work surface, lay down a towel first.

Lay the Machine upside down, and you should see 4 Rubber Feet. The 4 Screws that retain the Feet also serve dual purpose, by also attaching the bottom cover.

My 16.5 RCM Bottom Cover has 3 small slotted "Vents". Does your machine possess such?

Anyway, after removel of the Bottom Cover, you might likely see a couple sheets of batting insulation. these can be easily moved to the side to further inspect the inside of the machine.

You should see the Vacuum Motor, and then see that the face of that Ametek-Lamb Rotary Vacuum Motor merely slips into a cut out portion of part of the internal wood bracing.

Some 16.5 RCMs varied in this regard of retainment of the vacuum motor. Some had an additional Strip of wood attached to the inside of the bottom cover, and some others had a separate wooden strip that was removable.

There, you should then see the SS Recovery Tank. Do you? Do you then see a Nipple-Tube Brazed onto the Tank anywhere?

If not, then you have no option of drainage via a drain hose and clamp which is standard, at least on all late model HW-16.5 RCMs.

This leaves you with 2 options should you have this recovery tank, but no nipple tube where a hose was attached. The simple option, use a Turkey Baster.
Option two, the removal of the Tank, and somehow brazing a nipple to the tank, or finding some other means of attaching a drain tube to this Tank.

Another feature you might then notice. That between the face of the Rotary Vaccum Motor and the cutout on the side of the Recovery Tank, there should be some Foam Gasketing that acts as a seal, and is there to promote better suction of the vacuum motor. Any compromise of this Gasket will reduce vacuum bar pressure, and thus less efficiency when vacuuming fluids off the record surface.

When inside, check common connections such as electrical, and other attachment hardware such as screws that might be holding the tank,

Inspect for any water damage.

A picture or two would say a 1000 words, not sure if you have such capability, but if not, some further inspection, and your comments after would be of help.

In any case of what you find, and what method you may have to use to then empty the recovery tank, it is always a good idea IMO, that after a cleaning run, drain the tank in the best manner that you can, then leave the vacuum wand off the top of the RCM deck for a period of a good 24 hours to further permit full drying of the tank.

As I said, operation on these machines is relatively quite simple. Report back when you can and let me/us know what you find?
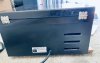
IMG_6713.jpg
Here is the picture Mark, I think the 3 ventilators that you see inside are some kind of wool or sponge
 
The machine you have is quite different to more current models, and to mine.
As far as I know, all that's changed over the past 6-8 years on the VPI 16.5, is a change from the older Metal from mounted Toggle Switches, to Rocker Switches.

Also, there was a minor change on how the Top Lexan Cover was, in that some covers sat on top, larger in size, whereas on my RCM, the Lexan Cover sat inside, and rested on two small stops on the front inside top wall.

The link I will include here, is a lengthy article I wrote about my machine, and my friend Jim Pendelton of Osage Audio posted it to his website.

The article pertains to a couple shortcomings I felt, and a desire to modify my machine. These were an internal cooling fan installation, and a change from the MDF Platter and Cork Mat to an Acrylic Platter, and soft Rubber Platter Mat (easier to clean and keep clean long term)

You'll note in my one picture of the rear of my 16.5, a protective grid-cover for the Cooling Fan, but keep in mind there was no holes in this area prior to the fan installation. The 3 slotted holes you show on the back of your machine are on the bottom of my machine, so it's evident VPI had made changes sd the years passed.

You can also see on the rear of my Machine, the clear plastic drain hose, and there's a clickable squeeze type shutoff for that hose. It is necessary for that hose to remain closed shut during operation.

As I've mentioned earlier, we won't know what you have inside until you get inside the machine to inspect.

The first article listed is mine. Hope this helps.

http://www.audiointelligent.com/rcmmuseum.htm
 
The machine you have is quite different to more current models, and to mine.
As far as I know, all that's changed over the past 6-8 years on the VPI 16.5, is a change from the older Metal from mounted Toggle Switches, to Rocker Switches.

Also, there was a minor change on how the Top Lexan Cover was, in that some covers sat on top, larger in size, whereas on my RCM, the Lexan Cover sat inside, and rested on two small stops on the front inside top wall.

The link I will include here, is a lengthy article I wrote about my machine, and my friend Jim Pendelton of Osage Audio posted it to his website.

The article pertains to a couple shortcomings I felt, and a desire to modify my machine. These were an internal cooling fan installation, and a change from the MDF Platter and Cork Mat to an Acrylic Platter, and soft Rubber Platter Mat (easier to clean and keep clean long term)

You'll note in my one picture of the rear of my 16.5, a protective grid-cover for the Cooling Fan, but keep in mind there was no holes in this area prior to the fan installation. The 3 slotted holes you show on the back of your machine are on the bottom of my machine, so it's evident VPI had made changes sd the years passed.

You can also see on the rear of my Machine, the clear plastic drain hose, and there's a clickable squeeze type shutoff for that hose. It is necessary for that hose to remain closed shut during operation.

As I've mentioned earlier, we won't know what you have inside until you get inside the machine to inspect.

The first article listed is mine. Hope this helps.

http://www.audiointelligent.com/rcmmuseum.htm

Thanks Mark, you are correct the top glass cover doesn't go inside and its on top. Also there are 2 ventilators below the machine also. Surely lot many modifications over time. Just that I am least experienced to be confident to open the unit :)

I will read through the shared article and see if I could take a chance or just use the turkey blaster for now

I really appreciate all the details and reverting on my questions
 
Sorry I made a small typo error on the post you responded to. That should've read changing from "Front" mounted Toggle, to Rocker Switches on most recent models.

Well, the Turkey Baster option works, is easy, and are easy enough to find one if you don't have one.

All these 16-16.5 RCMs are, is a Wood-MDF Box is all. I'd be quite certain in all instances, the bottom cover is only just that, a cover. That there should be nothing of significant importance attached to that bottom cover.

There has to be some access to the inside, and the bottom cover is it.
Just remember which way the cover comes off, so it goes back on the same way, and the screws will all line up with the existing holes is all.

Would be great for my/our educational purposes to see what's inside and if you can take a couple-few more pictures? Especially of the motors, and of the Recovery Tank if one is present? I might even vaguely recall, that there was a time that VPI used a Plastic Tank instead of a Stainless Steel Tank.

Yep. I think I seem to remember one user who had such, and it had developed a crack in his tank and it leaked. I think I/We suggested he use some form of 2-Part Epoxy Glue, something like JB Weld Glue for a fix.

I'd also like seeing a picture of the top deck of the unit with the Dustcover Lid open. I'd like seeing what your Vacuum Wand looks like as well.

I know more little tricks with these machines, to get the very best performance from them.
 
This little post of mine is not meant to be insulting of VPI, but just some basic facts about certain aspects of the company when it was in its infancy in the 80's and 90's.

Basically in the early days, VPI wasn't much more than some back alley operation in a Garage was all.
Many of the items they sold, their RCMs, and their Turntables were pretty much just a hodge podge of cobbled together parts-components, many being fabricated from 3rd party companies, and machine shops.

This went for many things, Platters, Platter Bearings, Motors al sourced from various manufacturers, Dayton, Hurst, Ametek-Lamb, a lot of basically "ala WW Grainger" and Home Depot Variety goods, etc.

Turntables such as my HW-19 were not very complex, and again, there may not have been much that VPI themselves manufactured, other than the assembly of said parts by a handful of people was all. At least they pretty much were intimately involved, and technical advice and sourcing parts was not a hard thing at one point. It wasn't like they had to pick up the phone, and call some overseas Asian Company.

This can all be seen as a weakness of the brand, but on the other hand a beauty as well. When certain models started becoming obsolete, and VPI's stock of parts began to dry up, like for instance the HW-19 Turntable, people then started becoming inventive. As suspension systems, everything from Campbells Soup Cans, to Foam Pool Noodles was fair game! LOL

Armboards for some of the HW-19 Tables, people then made them, either from the Black Acrylic, or simply used wood, or other materials, Corian, etc.

The motors used inside the RCMs, again, common sourced motors, usually Dayton and such, ala Grainger, etc.

Things such as worn out Platter Bearings, again, and although VPI may not repair or renovate such parts at current day because of lost connections with certain machine shops they used, but usually any decent machinist worth his salt can replace Sintered Bronze-Nylon-Rulon Bushings, and wear-thrust plates, etc. Cork Mats, and hardware, bushings, materials, etc are often easily gotten from a source like McMaster-Carr.

To this very day, I'd still be of the belief that VPI out-sources for many of their needed components. And as well, any electronics like their SDS and ADS Speed Controllers, I'm sure some electronics company on another continent makes such for them, they simply slap their name on it is all.

Maybe one day, you'll work up enough courage to delve inside your 16.5. But for now, sure, use the Turkey Baster Method for removing fluids from the tank. Clean 4-5 records or so, remove the wand, and suck the fluids out, then continue.

It's good to give the machine a rest here and there. Clean 2-3 records, then give it a rest for 10-15 minutes, have a beverage, then resume if wishing to clean more.
 
By the way, I didn't quickly notice this until now, but have noticed you are a new member here!

I'd like being the first to welcome you here! Have fun!

Most if not all members here are all great people, and can be very helpful. Sure, there's maybe a little hiccup or personal dispute between a member or two once in a blue moon, but such is not normally tolerated.

We have members here from all over the world who participate in the many sub-forums, such a great place to come and interact with folks on so many different topics.

I might suggest filling in your personal profile a little bit, maybe at least add what country you live in. I might gather it is not the USA?
 
Back
Top Bottom