
• The move to the new server is done. There are some software and database maintenance updates in process. This has us passing the hat around to help out. We appreciate any donations. Seriously, even a dollar helps. The payment page may be found here - https://www.audiokarma.org/support.html

Altec MLTL with Model 19 drivers

I'm a wipe on finish guy. Oil or poly or a poly/oil mix can give stunning results.

I'd love to spray lacquer, but just haven't tried it yet.
Yeah, about the same here. The BIL gave me some more of his overstock, some of this Tung oil. I think I'll try it out on this birch ply because the surface veneer is very fragile on some sheets.

Yeah, spray laquer gets a nice finish, instantly. The downside is that you need a shitload of gear and I only have so many braincells left. :sigh:

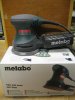
BTW, picked up this little 5" Metabo sander at 7 Corners, the other day. I'm really liking what it does. It seems to do a nice job on final finishing.
 

Attachments
  • IMG_0001.JPG
    IMG_0001.JPG
    118.1 KB · Views: 63
Last edited:
I use a can, but we do have an airbrush.
I see, do you get a pretty good, consistent finish? What brand of spray laquer do you use?

FWIW, I've used both air pump and spray can and never got good results with a can. Of course, that was a while ago, the technology and ingredients have probably improved.
 
I have used a can for finish application once or twice and I agree with you Lance that it's real tough to get a good even finish without drips and runs in the surface. I guess a spray booth is what you want but that's in a perfect World, on my last project what I ended up resorting to was to apply the gloss while that surface was parallel to the ground and then let it dry before moving. I know it sounds a bit ridiculous because it takes a really long time to do a whole speaker. I did a lot of flipping and lifting I tell ya. One bonus of this method is that it can go on very heavy, when I started applying my finish like this the first couple coats I was basically pouring the finish on the surface then evening it out with a brush, making sure no drips were running down the sides. With a smooth finish like your working with it probably would only take 2 or three coats to build up an appreciably gloss. As the coats progress it is good to thin your lacquer more and more to get a really even finish. Takes longer to dry but it's worth it. Looking good btw, hope your having a good one.
 
Thanks for the tips, Shawn. Most of my lacquer spraying has been either auto finish (metal, of course) or on trim and cabinets in houses. I've putzed around with spray cans a little but never got the quality I could with a gun.

For me, a good wipe on oil finish is easier to apply, tends to seal and harden surfaces better, and is better for my health. I think I've actually become sensitized to some of these chemicals from past work history. I know I have to stay away from Xylene as much as I can, it irritates the s&^ out of me if I have too much contact. I blame that on my petrochemical tanker days when we carried millions of gallons of various Xylene's and it was impossible to not get over-exposed. I have stories.

I am working on the horn sleds, today, deciding if I want to use chunks of spalted Maple I have in stock or use the same Baltic Birch plywood as I used for the cabs. I think I'll hack a couple of pieces of the Maple and see how it works.
Initial plan is to build a fame to mount the horn flange and attach the frame with hinges to the flat sled. I will also attach a small "shelf" to the top of the horn frame that will hold the AMT-1d's. Off to the saw.

I'm thinking of using these concealed barrel hinges, rather than a piano hinge.
 

Attachments

  • IMG_0002.JPG
    IMG_0002.JPG
    119.4 KB · Views: 79
I see, do you get a pretty good, consistent finish? What brand of spray laquer do you use?

FWIW, I've used both air pump and spray can and never got good results with a can. Of course, that was a while ago, the technology and ingredients have probably improved.

See my passive preamp thread for results.
It is necessary to do many, many coats, and sand between them.
But it looks fantastic.
 
Thoughts needed on this: I made up some spalted Maple 1 x 2's (nominal) and thought I'd use them for the mounting frame for the 811. Is there any reason why I'd need a wider or taller frame? Baffle step wouldn't be an issue, correct?
 

Attachments

  • IMG_0001.JPG
    IMG_0001.JPG
    105.5 KB · Views: 80
Nope West, you don't need any more than to hold it up. I've used "L" brackets on either side of them before. However, they can ring so you might want to apply some kind of dampening material to the inside of the top and bottom lip. I use Dynamat. It is sold at car audio shops and works better than anything else I've tried.
 
It's projects like this that show me just how much of an amateur I am. That is some beautiful work. Dado and rounded braces. Nice! You need to install a clear inspection port so you can view the terrific work inside while in operation:yes:.

Beautiful man, beautiful!!!
 
Nope West, you don't need any more than to hold it up. I've used "L" brackets on either side of them before. However, they can ring so you might want to apply some kind of dampening material to the inside of the top and bottom lip. I use Dynamat. It is sold at car audio shops and works better than anything else I've tried.
DJ, what I have done in the past is to place a length of thin weather-strip foam between the horn flange and the mounting surface. I bolt the horn onto the wood and have never heard any ringing. Maybe I'll try your Dynamat application this time around.

It's projects like this that show me just how much of an amateur I am. That is some beautiful work. Dado and rounded braces. Nice! You need to install a clear inspection port so you can view the terrific work inside while in operation:yes:.

Beautiful man, beautiful!!!
Thanks, your comments keep me motivated. :yes:

To be honest, I'm not that great on detailed woodworking. My long history with a circular saw, chopping framing lumber, is not a good teacher for fine woodworking. I get impatient and try to use less than satisfactory techniques at times. In my favor, I tend to over-build and things don't come apart or fall down. GM has taught me the importance of reducing any interference from bracing. If left to my own devices, there would have been massive pieces of lumber inside the box. :D
 
I'm not sure how the hell it happened, but I've totally missed this thread up to this point, Lance! Just caught up now...

I'm not sure what to say except that I'm way beyond impressed.

Fantastic work, my friend!! :thmbsp:
 
I'm not sure how the hell it happened, but I've totally missed this thread up to this point, Lance! Just caught up now...

I'm not sure what to say except that I'm way beyond impressed.

Fantastic work, my friend!! :thmbsp:
Thanks, Nate!
I'll have to have you over for listening when I have them all squared away.
 
The frames for the horn mounting are assembled and we are watching paint dry on the 811's. I am thinking of something kind of crazy for the sled base. we will see if that's doable.
One of the attached pics shows finish choices, one coat of tung oil.
 

Attachments

  • IMG_0001_2.JPG
    IMG_0001_2.JPG
    122 KB · Views: 113
  • IMG_0004.JPG
    IMG_0004.JPG
    92.7 KB · Views: 108
  • IMG_0003.JPG
    IMG_0003.JPG
    94.6 KB · Views: 82
  • IMG_0002.JPG
    IMG_0002.JPG
    78.3 KB · Views: 99
That is some beautiful wood Lance. The sleds will look real nice.

Do I see the spray cans in warm water trick in the horn picture?
 
That is some beautiful wood Lance. The sleds will look real nice.

Do I see the spray cans in warm water trick in the horn picture?

Indeed you do, sir. I picked up that tip on this Forum, I believe. It works very well, the paint seems to cover better and the spray pattern is even.

The spalted Maple is in homage to the BIL, who is always helping me out with woodworking and gave me some of his cast-off pieces of this tree. He cut the 150 yr. old tree down when the better part was cracked off in a storm. He stored it for two years and then had it kiln dried. I've been storing the pieces for a couple of years and was trying to think of a use for them and this project came along.

I am thinking of cutting a couple pieces for the sled bases and leaving them with the rough edges, kind of an organic look. I need to whittle them down to less than 12" so I can shoot them through the planer. Still trying to decide on that.
 

Attachments

  • IMG_0001.JPG
    IMG_0001.JPG
    128.2 KB · Views: 72
Well, I looked over the rough cut pieces I had, then looked at them a few more times and decided that the organic edge treatment deserves a project all by their lonesome, maybe a small table, shelf, or even part of a gear rack.:scratch2::dunno:

Pics attached of the sled bases in their glue-up stage. I used a piece of Baltic Birch ply and edge banded it with the same Maple. It should be good enough for the girls I go out with. :D I also cut up the bases for the Heil tweets and they will just be a smaller version of the sled bases.
The last picture shows the unmachined pieces that will make up the cradle for the horn and the adjustable uprights.

Edit: Just about complete on the sleds. The tweeter bases are glued on and drying. I put a couple of ledger pieces under the tweeter bases, I had forgotten just how heavy those Heil AMT's were. I'm hoping that when all is together, it will be somewhat balanced, I don't want to screw the sled to the cabinet if I don't have to.

IMG_0003_1.jpg


IMG_0002_1-2.jpg


IMG_0001_1-2.jpg
 

Attachments

  • IMG_0001.JPG
    IMG_0001.JPG
    71.3 KB · Views: 27
  • IMG_0002.JPG
    IMG_0002.JPG
    114.2 KB · Views: 29
  • IMG_0004.JPG
    IMG_0004.JPG
    83.6 KB · Views: 28
Last edited:
I've got some wood.....

Here's some wood glamour shots of the sleds for the horn and the AMT, I'm really liking the Maple, the tone matches real well with the finished birch:

IMG_0014.jpg


IMG_0013.jpg


IMG_0009-1.jpg


IMG_0011.jpg


One coat of SW Tung oil on and about four more to go. I think Ill use a different finish for the cabinets, I'm getting impatient.:smoke:
 
Back
Top Bottom