• Please note that Audiokarma will be offline briefly for updates early on Monday morning, September 28th.

Any Chance of Repairing a Pair of Wharfedale Super 3 tweeters?

bce22

Active Member
Hi AK!

I recently purchased a set of 1962 Wharfedale W90s. Unfortunately the 2 Super 3 tweeters in one speaker were dead on arrival. I have confirmed that they test open when uninstalled from the crossover.

On the bright side, I was able to find 2 working 1963 Super 3 tweeters as replacements. They are installed and working beautifully.

I would love to self repair these broken tweeters if at all possible since they are in pretty great shape (beside being broken of course ;) ) I don't mind taking some calculated risks with these since I already have working replacements installed.

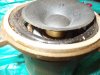
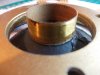
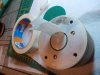
I've taken some closeup photos of them for you. Personally I can't find anything visually that would be the reason for them to not work. Any ideas on where I should begin?

Best Regards,

Brad


Register to hide this ad
Hey,

So far, this is the only reference I've found for repairing older Wharfedale drivers. And he does work on a Super 3 tweeter.

http://www.ln271828.net/wharfedale.html

He's an awesome human being and a user here. He stopped by one of my Wharfedale threads. But for the life of me, I cannot remember where or his user name. Dangit. I hope the link helps a bit!

Biggles
 
Hey Dr. B!

Thanks for the link. I took a quick look and it appears that the webpage you linked might be Grumpy's. Isn't he the Big Kahuna around these parts? ;)

I have to look at the Super 3 page closely to see if it provides me with enough information on how to repair these heavy, broken, little gems. I'm not 100% confident however that it will provide enough instruction to this neophyte.

Thanks,

Brad
 
Hey Brad,

I don't believe that's him, doesn't ring a bell. I'm not convinced it provides enough information for us. I've got a foam surround Super 3 and a Super 8 that need attention too. What we need to do is just sit down with them and make our way through it. We may break them, but we should at least try to do what we can.

Ha! I did a google search of the url I listed above and it came up with a thread he posted in. The user here you're looking for is Klipschorn. I don't believe he's very active, but leave him a Conversation/PM. He's always been very helpful and very kind. Go!

Biggles
 
Let's do it!

What's the worst that can happen? The upside is huge!!!

Exactly. They're already useless.

I believe my Super 8 just fine, the date on the cone is '58. When I got it the original foam was still intact, but useless. The Super 3 is whole 'nother situation. the paper cone just falls out of the coil, pretty ratty.

Biggles
 
Hey guys, I have a super 3 that needs some attention and was wondering if any of you ever went forward with attempting repairs on these amazing drivers! If you have any advice or threads you can link me to I'd greatly appreciate it.

Thanks,

Matt
 
Please see post #3 in this thread for a link. This is the only link I'm aware of that we have available.

Biggles
 
One thing to check for is corrosion at the terminals. Measure DCR on the leads, before the terminals, and see if you get a reading.

If it's still open, remove the four screws holding the basket to the magnet and inspect the coil itself for a break somewhere.
 
All Wharfedale Super 3,s have an aluminium wire voice coil and in the case of failure there are two likely causes :- 1/.a coil that has unravelled itself from the paper former.
2/. solder joints of the lead out wire to the flexible pigtail wire have gone open circuit.
Klipschorn may be a person of interest,concerning possible repairs in the USA.
 
All Wharfedale Super 3,s have an aluminium wire voice coil and in the case of failure there are two likely causes :- 1/.a coil that has unravelled itself from the paper former.
2/. solder joints of the lead out wire to the flexible pigtail wire have gone open circuit.
Klipschorn may be a person of interest,concerning possible repairs in the USA.

Yes! Klipschorn is the only one, so far, that's done most exquisite work on the older Wharfedale drivers. He's the author of the web site mentioned in post #3, http://www.ln271828.net/wharfedale.html.

Biggles
 
Thanks for pointing me in the right direction guys, I really want to get these working again as I've grown quite fond of them. When I first got the W70's, there was a little distortion from one of the tweeters, I thought they were a little blown by a previous owner but I don't drive them very hard and a year or so later, its gotten a lot worse. To the point where the driver is just adding distortion to the mix if its at an audible volume. So correct me if I'm wrong but thats most likely not the issue as far as I can tell. Which means in my limited knowledge of diagnosing distortion in drivers, as far as I can see there are 2 possible alternative reasons I'm having this issue...

The voice coil is rubbing - which I would need some guidance on the best approach for...

OR

After another careful inspection, it is clear that the glue at the base of the cone/ voice coil is very dry and has a couple small gaps. After lightly prodding an air bubble with a toothpick the bubble practically dissolved. Maybe (hopefully) the distortion is coming from the cone rubbing the voice coil where the glue is all dried out and isn't doing its job?

What are all of your thoughts? If it is the glue what is the best solvent to remove the old glue before reapplication?

Thanks again guys!

Matt
 
Hey matt,

I will generally use a small file or pick to get old dried out glue out of a crevice. Sometimes, I have to set up my shop-vac close to the crack so no dust gets into the voice coil or other places where we don't want bits to be. I use Aileene's tacky glue to get things back into place, but nearly any good adhesive should do the trick. The tough part can be getting the affected parts clamped together while the glue dries. Each project is a little different.

Biggles
 
Just want to thank all of you for the kudos. Matt has been in touch. And, to Matt, from what you said in post #13, it seems the coil hasn't opened. You are lucky. Hopefully, my response to your PM hasn't discouraged you as it now seems to be a very simple fix, without having to disassemble the tweeter. Hopefully, you haven't yet done that.

Something like Titebond or Elmer's White glue can be applied using a toothpick or longer sliver of wood to the junction of the cone & coil. It may also be advisable to dab a little on the wires coming from the coil which are glued to the underside of the cone.

Under the dust cap which is part of the cone, there's a foam disk sandwiched between two phenolic washers; that is the centering device, aka, spider. While that foam will become brittle over time and may even shed particles into the gap, that shouldn't necessarily be a problem. By thumping the tweeter on a table with the tweeter facing upward, the particles, if any, will settle to the bottom of the gap. Even with the tweeter playing in a horizontal, these particles are unlikely to migrate to the coil. Additionally, while thumping the magnet, tilt the tweeter gradually to a 45 degree angle. This will allow the particles, if any, to move to the outer side of the gap. By further rotating the tweeter as if pouring a liquid, the particles may creep to the top of the gap and fall out. Something to protect the table and cushion the impact is advisable. The thumping shouldn't be vigorous.

The cloth annulus will keep the tweeter coil centered. Admittedly, this is a temporary and maybe even a diagnostic procedure. The right way is to disassemble the tweeter which we will get into later. However, application of adhesive to the cone & coil junction prior to disassembly is recommended, especially if the coil is not open. That aluminum wire is extremely fragile and any tension on it while removing the cone & coil may cause it to break.

Looking forward to your reply to the PM.

Robert.
 
ADDENDUM:
It was just noticed in the last three photos that there appears to be an external spider, the thickness of which can be seen in photos 3 & 5 in the OP. The 4th seems to show the spider ripples just behind the forward bolt. It became more apparent after importing the photo into software and adjusting the brightness and contrast. It seems Wharfedale abandoned the internal foam spider and probably for the same reason they abandoned the foam annulus.

Therefore, it follows that the thumping process can also be abandoned. It would then be safe to conclude that the spider is precision cut so as to use the casting upon which it is fixed as a means to center the coil in the gap as shims can't be removed after installing a one pieces cone & coil.
 
Hey Brad,
For one thing, I may have confused you and Matt in my posts. As for my web page on the Super 3, I will have to admit that it does make some, if not a lot of assumptions. My apologies for that. If you need further assistance, PM me or post here.

If you do, as already suggested, remove the bolts and lift the basket. It might be a good idea to mark the basket and magnet assembly prior to removal to maintain the same position during reassembly. Don't lose those bolts. They may look like SAE 10-32 or SAE 12-24 but they most likely BSW (British Standard Whitworth) and the threads have a slightly different pitch.
If the coil is unraveled, you're S.O.L. Replacement coils can be found or wound but I doubt they're aluminum wire. If the wire isn't broken and if you're a masochist, it can be rewound, assuming it can be untangled. I did it once on a Super 8 but NEVER again. If the coil is slightly detached from the cone, that can be re-glued with something like Titebond or Elmer's. It might be a good idea to use clear nail polish, not ridge filler as that too thick, spread with your finger after brush application to the coil windings to ensure they don't come apart later. Apply just enough to fill the gaps between the windings.
A can of compressed air can be used to remove dust from the gap; keep your eyes clear of the action. Masking tape, about 2 inches folded with a slight overlap with the sticky side out will work wonders in the gap. After folding, gently pinch the tape with your thumb and forefinger to dull the stickiness of the tape as it'll stick very effectively in the gap making it difficult to insert. Once in, rotate it around the gap. This works extremely well if magnetic particles have entered the gap. Before laying the magnet aside to do something else, cover the gap with tape. Stuff has a way of sneaking into places. Remi8ds me of an engine rebuild back in then 60's. I placed a can of hand cleaner into a cylinder for convenience. It fit in so nicely and was flush with the top of the block. It went unnoticed during the rest of assembly but was brought to out attention very rapidly after turning the key and initiating the starter. Such precious memories.

Robert
 
Hi, firstly thank you for sharing your experience, it has given me the confidence to take on a rescue more than intentional restoration. I just purchased two Super 3's from Italy. Transport vibrations took out the perished after market surrounds and the coils had lifted completely out. Fortunately they seem undamaged. This might be a long read. I have a few questions directed to Robert if I may. In particular help identifying a spider solution,. I have had the pleasure of reading your web page several times. Worked out some measurements to metric. Was unsure on the foam for a spider, came in at 3mm which is quite thick.

I have taken a few photo's of the drivers I have. I was planning on using a set of spiders I cut from obscure satellite speakers. But the mention of an internal spider and the self adhesive foam disc remnants I found at that location bring up a question mark or two. Also the lack of a Formica washer, screw and foam pad solution. Maybe this was a later cheaper to produce type.? Well this is what I have. The Cone, coil and cap are all joined and still attached to the basket (no breaks). No spider and no surround. I was going to kind of wing it and hope for the best regarding alignment etc.. I am used to working accurately and the tolerances don't seem that strict, it is a pretty robust design. I assumed this originally had a foam outer spider that had disintegrated.

This is my plan, but maybe this is over kill. The spider I have feels weight wise as if it is in proportion with the felt surround and cone assembly weight. But that Alnico might have other idea's.

I was planning to:
Glue the inner ring of spider to cone base at coil/cone joint,
Attach basket, re-seat coil, glue outer ring spider to basket inner flange.
Attach outer ring surround felt to outer ring basket, then outer cone.

Do you think the foam adhesive disc on this driver is an inner spider? The foam was mostly gone. I thought perhaps it was a buffer to stop it bottoming out. I can find little evidence of there ever being an external spider. No glue at cone base, only coil/cone join. Nothing on the basket.

I was going to use a felt pad as buffer (smaller than core dia.) and fit the external spider and hope for the best.

Also can you see by the photo's if this is an aluminium coil?

What would you do. Any advice would be very much appreciated.

Regards,

Mark
 

Attachments

  • DSCN1379.JPG
    DSCN1379.JPG
    92 KB · Views: 95
  • DSCN1412.JPG
    DSCN1412.JPG
    92.1 KB · Views: 90
  • DSCN1413.JPG
    DSCN1413.JPG
    95.2 KB · Views: 89
  • DSCN1415.JPG
    DSCN1415.JPG
    63.4 KB · Views: 93
  • DSCN1421.JPG
    DSCN1421.JPG
    79.3 KB · Views: 90
Mark, thanks for your query. Please allow me a day to digest the content as I just received notice of your post.

You seem to be on the right track. Thanks for the high quality photos.

Robert
 
Back
Top Bottom