• The move to the new server is done. There are some software and database maintenance updates in process. This has us passing the hat around to help out. We appreciate any donations. Seriously, even a dollar helps. The payment page may be found here - https://www.audiokarma.org/support.html

BIC T-1 Restoration - Advice needed

SpeakerdeJon

New Member
Hi,

I recently found a BIC T-1 in good condition for $10 on ebay. The only problem preventing it to play was that it the recording switch was stuck in REC mode preventing play back.

After this fix I found that the flutter and wow is pretty nasty and I suspect that the felt has lost its elasticity contributing to uneven play back speed, everything else seems to work.

I have done some research and these decks are apparently a pain to swap out the belts in. I was going to change the main belt as it looks to be the easiest and in my mind has the greatest influence on playback.

If anyone has any ideas or advice on if I have the right idea let me know. Also I cant find the service manual on the net , if anyone can point me in the right direction that would be appreciated.

Regards,
John
 
Register to hide this ad
Update*

So I had a look and determined the following:
-Speed controller is dependent to the counter belt,
-Second assist belt needs to be replaced anyway because of disabled forward and rewind,
-The drive belt seems to work the following way:
+At normal speed the belt rests on the motor on the spindle in a HI position. If it does not rest here wow/flutter city.
+At double speed of the two speed settings centripetal force throws it to the low part of the wedge shaped spindle increasing the RPM thus play speed.

Conclusions: Belts need a full set. If any knows a good place for a full set please let me know.
 
you can download other t-series cassette deck service manuals from hifiengine. compare its
cassette belt configuration with yours, should be the same. differences will be in the electronics.
the M models added metal tape support.

google/bing mars communications. here and there. he sell belts. signup at tapeheads for
lots of information on repairing cassette decks.

I had a t3m and while it didn't need belts, I decided to sell it before it needed belts.
 
I have had a look at the other series (T-3/4Ms). The T1 & T2 have a mechanical drive system and made the other manuals a no go. I have a feeling that if I do attempt it it might be worth documenting it. 2 speed decks , interesting hybrid.

regards.
 
if you do a complete overhaul, do document it thoroughly, instead of "I replaced all 7 belts"
take pix every step of the way since these BICs are complicated. you may have to find creative
ways to uninstall then re-install belts, then the order of these swaps may not be obvious
and can have N! combinations, including doing one then redoing it on a different one, etc...

all too often the poster decides to post one picture, show 10-40 caps replaced, with no
statement on how to remove that particular board, then dozens of other attempts on
that same unit from others show up and it takes more time to put a single doc together than
to do it with simpler instructions.

I recently posted a "upgrading the Dahlquist DQ-LP1" and found so many things I
could not do and documented them. I couldn't find a higher wattage power transformer
to fit, which meant I couldn't use higher draw opamps (therefore eliminating the
possibility of using any opamps other than the now 40+ YO opamps), then I replaced
the RCA sockets the hard way and did not re-do the mount strip, etc.

good luck
 
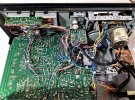
Hello. Just wondering if anyone has any helpful info to share here regarding the BIC T-1 and changing all three belts. Ther main belt is not super difficult, and I got that one. But I am in the dark on how to change the counter and the pulley (second assist?) belt. I've scoured forums online and have yet to find anyone who really dug into this machine and shared the details on changing these belts. If anyone can offer some advice or instruction on how to change these belts, I'd be so grateful!
 
I did a full belt replacement on a T-3 M. 3 belts.

I did not take pics, other than a few to show how a few parts needed to be mounted (orientation, where a spring needed to be reattached, etc).

I did not find the SM very helpful. I do recall that the eject mechanism was a pia-needed to be removed to get transport out. From there, things seemed pretty self evident for what needed to be removed to get a belt installed. I have done several rebelt jobs on decks. I can’t imagine being successful if this were my first deck to work on.
I was successful however, but sold the deck as I have many others. The two speed thing was a neat novelty, but it never ‘took off’ in my mind, so I cut it loose.

Sorry I can’t help otherwise.
 
I did a full belt replacement on a T-3 M. 3 belts.

I did not take pics, other than a few to show how a few parts needed to be mounted (orientation, where a spring needed to be reattached, etc).

I did not find the SM very helpful. I do recall that the eject mechanism was a pia-needed to be removed to get transport out. From there, things seemed pretty self evident for what needed to be removed to get a belt installed. I have done several rebelt jobs on decks. I can’t imagine being successful if this were my first deck to work on.
I was successful however, but sold the deck as I have many others. The two speed thing was a neat novelty, but it never ‘took off’ in my mind, so I cut it loose.

Sorry I can’t help otherwise.

Thanks for your helpful advice. It turns out the counter belt and the pulley belt didn't need replacing. I just used some rubber rejuvenator, and they seem to function fine. I'm glad because I don't have the skills to take this deck apart in any major way. It is my first deck restoration project. This particular model seems quite challenging. Anyway, it seems to function well now, after a good cleaning and capstan belt replacement. I appreciate your tips and guidance.
 
Thanks for your helpful advice. It turns out the counter belt and the pulley belt didn't need replacing. I just used some rubber rejuvenator, and they seem to function fine. I'm glad because I don't have the skills to take this deck apart in any major way. It is my first deck restoration project. This particular model seems quite challenging. Anyway, it seems to function well now, after a good cleaning and capstan belt replacement. I appreciate your tips and guidance.
I've done the same with mine. That pully belt is just too scary of a thing to contemplate changing. The service manual gives pretty good instructions for doing it, but I didn't want to fool with it. Mine appears to be in fine shape overall, so I've just applied some Rubber Renue to it and crossed my fingers. The main belt and counter belts were easy enough.
For anyone looking to do this job, the main capstan belt for T-1, T-2 and T-2M is an FBS 9.4" and it's .2" wide.
The pully belt is about 6", and the counter belt is about 3.5"
The Pinch roller is 13mm x 8mm x 2.5mm. If you're doing the belt, you might as well do the pinch roller while you're in there.
010 (2).jpg
 
The Pinch roller is 13mm x 8mm x 2.5mm. If you're doing the belt, you might as well do the pinch roller while you're in there.
If you got the pinch roller off its bracket, you're more clever than I. And not for lack of trying. That pin would not budge, even in a vise. I resigned myself to cleaning the surface with 2000 grit and then Rubber ReNue. Wasn't happy about it, as I have spare pinch rollers of those dimensions just looking for a home.
 
If you got the pinch roller off its bracket, you're more clever than I. And not for lack of trying. That pin would not budge, even in a vise. I resigned myself to cleaning the surface with 2000 grit and then Rubber ReNue. Wasn't happy about it, as I have spare pinch rollers of those dimensions just looking for a home.
Hey I'm sorry, I missed your post/query.
To replace the pinch roller, you need to drill out the pin from the back side, just enough to get rid of the flange, then you can tap out the pin from the other side. The pin is useless at that point and will need to be replaced. I made a longer replacement pin from a cotter pin.
 
Back
Top Bottom