

You are using an out of date browser. It may not display this or other websites correctly.
You should upgrade or use an alternative browser.
You should upgrade or use an alternative browser.
Citation V clone rebuild
- Thread starter nerdorama
- Start date


crispycircuit
Super Member
Looks good!


I bought it all from Mouser. I used perf board with a 0.100" grid. The turrets I chose fit in a 3/32" hole and are by Keystone Electronics. I had to search through the Mouser and Keystone web sites to get all the details and be sure it would all work together. Since then I have also found plans for a DIY staking tool on the Tube Depot web page. Not sure how well it would work with the turrets I purchased. I staked the turrets in my drill press. You have to make a holder for the staking tool anvil. I drilled a 1/4" hole in the edge of a 3/4" thick board and inserted the anvil. Make certain to leave it protruding enough that already installed turrets won't hit the board. I will make something along the lines of the Tube Depot DIY tool anvil for the next go around but will keep the Keystone swage as it has a rounded forming profile that would be hard to duplicate DIY.
From Mouser:
Turrets Keystone p/n 1514-2
Staking tool Keystone TL-5
Perf board Vector 0.100" grid, 0.062 thk, p/n 169P44 (I had some of this board so didn't actually use the Vector which I purchased) You can used non perforated board and other thicknesses but will need a different turret number to fit the particular thickness of board.
The DIY staking tool is at: https://s3.amazonaws.com/tubedepot-...ched_files/turret_swage_fit_v1.pdf?1382029920
John

Nyjblbob
Hooked on Horn's and Tubes. Go big or go home
I see the chassis is not painted,?I bought it all from Mouser. I used perf board with a 0.100" grid. The turrets I chose fit in a 3/32" hole and are by Keystone Electronics. I had to search through the Mouser and Keystone web sites to get all the details and be sure it would all work together. Since then I have also found plans for a DIY staking tool on the Tube Depot web page. Not sure how well it would work with the turrets I purchased. I staked the turrets in my drill press. You have to make a holder for the staking tool anvil. I drilled a 1/4" hole in the edge of a 3/4" thick board and inserted the anvil. Make certain to leave it protruding enough that already installed turrets won't hit the board. I will make something along the lines of the Tube Depot DIY tool anvil for the next go around but will keep the Keystone swage as it has a rounded forming profile that would be hard to duplicate DIY.
From Mouser:
Turrets Keystone p/n 1514-2
Staking tool Keystone TL-5
Perf board Vector 0.100" grid, 0.062 thk, p/n 169P44 (I had some of this board so didn't actually use the Vector which I purchased) You can used non perforated board and other thicknesses but will need a different turret number to fit the particular thickness of board.
The DIY staking tool is at: https://s3.amazonaws.com/tubedepot-...ched_files/turret_swage_fit_v1.pdf?1382029920
John
No plans to refinish it before the Rebuild?
Just saying .
@Nyjblbob,
I think I will reuse the transformers and power supply rail and build a new amp with fresh parts. It's either rebuild it completely or put the new turret boards in and get it going as is. If I have to strip the old chassis components to refinish it then I will want to install new sockets and at that point I might as well go all the way.
John
Nyjblbob
Hooked on Horn's and Tubes. Go big or go home
Go at your own pace,@Nyjblbob,
I think I will reuse the transformers and power supply rail and build a new amp with fresh parts. It's either rebuild it completely or put the new turret boards in and get it going as is. If I have to strip the old chassis components to refinish it then I will want to install new sockets and at that point I might as well go all the way.
John
Try and make it sound as good as possible
First and foremost! If you like the results
You can easily refinish it then.
Just a bit more Masking.
When mine is running perfectly It sounds better than both my Citation 2’s,
Different builds!
All my Citations are Triode switchable
Highly preferred if you Run Horns!
Keep it going
Bobhorn

I'm a firm believer that if you are going to invest all of that time, money, and love on a project, that cosmetics are important, too.
Awhile back I had a bunch of chassis fabricated for tube amps. I've displayed a number of projects using them here on AK (see attachments). I had a couple of 3" high 17" x 12" prototypes made. I gave one to a neighbor who used it for a Citation II rebuild. Unfortunately I don't have any left, but it will give you an idea of some possibilities. His Citation build is included below.
Buzz
Attachments


Nyjblbob
Hooked on Horn's and Tubes. Go big or go home
Beautiful Builds!I'm a firm believer that if you are going to invest all of that time, money, and love on a project, that cosmetics are important, too.
Awhile back I had a bunch of chassis fabricated for tube amps. I've displayed a number of projects using them here on AK (see attachments). I had a couple of 3" high 17" x 12" prototypes made. I gave one to a neighbor who used it for a Citation II rebuild. Unfortunately I don't have any left, but it will give you an idea of some possibilities. His Citation build is included below.
Buzz
I’m looking for a larger Chassis my self
Nice ones are pricey
I've been looking at this chassis. It would have about 16" x 13" of chassis space with 3.25" depth.
http://www.iagaudio.com/proddetail.asp?prod=CH-01
http://www.iagaudio.com/proddetail.asp?prod=CH-01
Nyjblbob
Hooked on Horn's and Tubes. Go big or go home
Nice size and finishI've been looking at this chassis. It would have about 16" x 13" of chassis space with 3.25" depth.
http://www.iagaudio.com/proddetail.asp?prod=CH-01
Good price as well
While working on the new turret boards I'm thinking about options for chassis and other details. One avenue of contemplation is about the fixed bias scheme. I'v been looking at the auto bias modules at Erhard Audio and also wondering if the EFB system might be appropriate in this amp. Without a distortion analyzer (I have one but it needs a repair) is there any other way to determine the EFB parameters? @dcgillespie
Thanks,
John
Thanks,
John
Finally made a bit more progress. Got the new turret boards populated. Not sure when I will get a chassis either purchased or built so this may be the end of progress for a while. I am tending toward the DIY'ers standby of a flat plate top and a wood base but this means I have to finish rebuilding my table saw.
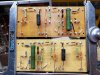
Staying home and avoiding the world,
John
Staying home and avoiding the world,
John
I'm to the last component on the turret boards, the input stage grid resistor. The original design has a 1M resistor but I assume this is because of the tube preamp's of the day. Seems like about 100k would be more in keeping with modern requirements or at most 270k to 470k. Opinions?
Thanks
Thanks

There's really no purpose in going lower in resistance than 470K, or maybe 220K, on the input grid resistor. All you're doing is loading down whatever is driving it, more.
I would put it at 470K, personally- so it will work well with stuff like Dyna PAS preamps and such.
Regards,
Gordon.
I would put it at 470K, personally- so it will work well with stuff like Dyna PAS preamps and such.
Regards,
Gordon.
Nyjblbob
Hooked on Horn's and Tubes. Go big or go home
I think the ability to bias the tubes individually has advantages in their adjustability compared to an auto bias.
I can hear a difference with different bias levels.
Especially with my Triode switched Citations 2 and 5.
I also currently run a Variac in front of my amps and they are much cooler run at 115 volts ac
That also changes the Bias setting
What about tube rolling?
Your limited
Either way Your amp done your way with the help of the experts here
can continue to advise you along the way
Enjoy
Bobhorn