• The move to the new server is done. There are some software and database maintenance updates in process. This has us passing the hat around to help out. We appreciate any donations. Seriously, even a dollar helps. The payment page may be found here - https://www.audiokarma.org/support.html

CS-63DX Cross Over Re-Cap Question

berdman

New Member
I have not been able to locate information on how to deal with the caps on my cross overs. They are standing on end and potted to the board. It appears the leads both come out of the end nearest the board. They are marked Elna, 63V, 0.5uf, 3.3uf, 7uf, and 14uf.

I have learned that this is a radial electrolytic. I have not been able to find the values I need for replacement.

I have read about "parallel" caps to get to values but don't see how one would parallel this type of cap.

Can anyone point me in the right direction?

Since I can't get the attachment to work here is a pic of the cross over. http://i171.photobucket.com/albums/u308/berdman4865/DSCN0785_zps1311c748.jpg
 
Last edited:
Register to hide this ad
What are the values of the caps ?
From the photo, i dont see any -/+ markings, i think you can use regular non polar caps (the one with wires on both ends)
 
I added the values.

That sounds easy. But where would I pot them to the board? I would hate to cover anything making it hard on the next owner.
 
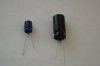
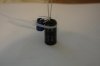
The crossovers with the Elna caps seem to have weird values sometimes.Here is how I would do it. Yes you will parallel where you need to. After you remove the old ones select the capacitor closest in value to the one you are replacing. Now select the smaller one that you need to add to bring the value up to the same as the replacement. Hold them both side by side with the bases even. Hot glue or zip tie them together. Take one lead from the smaller,bend it 90degrees to one side and wrap it around the one lead from the larger. Don't bend the lead from the larger. Do the same for the other lead. Now you have a parallel set which is basically like a regular radial cap with a growth on one side. Solder the places where you wrapped the leads, trim the excess and solder to the board as if it was one cap with another "on the side" but leave it sticking up a little from the board because of the wrapped part. I can make pictures later. I am late for a meeting right now. Hope that makes sense.
 

Attachments

  • DSC05274.jpg
    DSC05274.jpg
    22.5 KB · Views: 28
  • DSC05275.jpg
    DSC05275.jpg
    19.5 KB · Views: 32
  • DSC05277.jpg
    DSC05277.jpg
    20.6 KB · Views: 29
Last edited:
Okay, now I am wondering if I should get regular Dayton poly caps or their super dooper 1% Precision Audio Capacitor.
 
I've got the Regualr Dayton's in my CS-66G's and they are fine. IMO 1% x-over caps in a mid-fi is a waste of money and spec's unless you've got a system that is super tight and overbuilt with 1% parts.
 
Hi
I added pics to my earlier post to give you the idea. I did not trim or solder anything because I need those caps for something else but you should be able to get the idea. You may want to try to position the caps so that the values show after they are glued together. I would keep them 1/8" above the board when soldering them in to avoid shorting wires. Hot glue or Goop flowed under them after completion will keep them isolated.
 
The avatar kitty is cute. I had a kitty once but it got very old and then sick. I too have gotten somewhat old and recently recovered from an arn' addiction (love of restoring old woodworking machinery). Now I am headed down the slippery slope of vintage speakers!

After reading your pre-pic post, I went ahead and ordered the axial type caps from PE. I found a post describing a process much like yours with axials but mounting them on end. It should work fine.

Hi
Looks like our Kitty too. Watch out for that speaker jones. It can be a hard one to kick. I am fighting hard not to begin doing re-veneer projects. It is a slippery slope!
I was going to mention that alternative but I figures you'd discover it yourself anyway. Watch out for cheaper ones that do not have long enough leads to go all of the way to the board when stood on end. You can also lay them on their sides with the leads going beneath them and into the holes. If you need to piggy back then just put one on top. I had to do some creative stacking on this one
http://www.audiokarma.org/forums/showthread.php?t=441632
Just go for it.
 
The avatar kitty is cute. I had a kitty once but it got very old and then sick. I too have gotten somewhat old and recently recovered from an arn' addiction (love of restoring old woodworking machinery). Now I am headed down the slippery slope of vintage speakers!

After reading your pre-pic post, I went ahead and ordered the axial type caps from PE. I found a post describing a process much like yours with axials but mounting them on end. It should work fine.

Here is another way of mounting the caps: http://www.audiokarma.org/forums/showthread.php?t=330805&highlight=CS-99a+crossover
 
berdman, can you post a list and part numbers of the caps you used? I'll add a link to this post to my Pioneer Recap list post!
 
Back
Top Bottom