

You are using an out of date browser. It may not display this or other websites correctly.
You should upgrade or use an alternative browser.
You should upgrade or use an alternative browser.
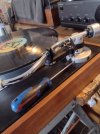
Cue Damping Gone, on Linn Basik LVX tonearm. Repaired successfully!
- Thread starter Old Guy8
- Start date

pcourtney
New Member
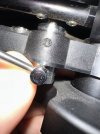
Finally with a lot of care, I removed the glue around the 1.5mm hex ( allen key ) , don't know why Linn or the Linn dealer applied some
glue in the past, then used a 1.5mm allen key to undo the screw, used a much better fir screwdriver for the top screw, very odd design
that screw, why I ask myself, then I removed the black circular washer, put a few drops of Tornado 350 cSt silicon oil in the reservoir at
the top, I will put the arm back on the table tonight and see if it's OK, if not I will add some more over the next few days.
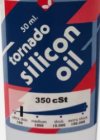
glue in the past, then used a 1.5mm allen key to undo the screw, used a much better fir screwdriver for the top screw, very odd design
that screw, why I ask myself, then I removed the black circular washer, put a few drops of Tornado 350 cSt silicon oil in the reservoir at
the top, I will put the arm back on the table tonight and see if it's OK, if not I will add some more over the next few days.
pcourtney
New Member
Think thats way too thin.............
It's between 200 and 500cSt, so should be OK, we will see in 3 to 7 days


Thank you very much!Also a thankyou for my help wouldnt go amiss .,
This was very informative. Even made me look to see what lube I had and found one container unopened.
So thank you very much!
Yes, thank you.
pcourtney
New Member
I found one container unopened.
Well done - what viscosity is it ?
Last edited:
kwayde, from the chart above which cSt viscosity value do you have, the OP ( Old Guy8 ) used 500cSt ( which is equivalent to Medium Fuel Oil) , and I used 350cSt which is equivalent to Lawnmower Engine Oil SAE 30, and pockets64 used 200cSt which is equivalent to Engine Motor Oil SAE 20W-20
Old Guy8 said 500cSt made the arm lower a bit too slowly, but then got better after time
pockets64 said 200cSt made his arm lower a bit too quickly
I have been trying out 350cSt and after only 24 hours the speed at which my arm lowers is pretty much identical to my other LVX arm ( sitting on a Linn Axis turntable ) , when timing it with my stopwatch it's 2 seconds, which is approx the same as I'm getting with the arm that I added the 350cSt silicon to, which is a result !
I have a couple different viscosity and can't remember what I had bought one for. They've been in a drawer out of sight.
My current turntable is an SME 20-2 that I use 60,000 cSt in the tonearm damping trough.
I also have some 800 cSt and I don't remember what I used it for.
I don't currently own the LVX but used to have a Linn LP-12 with one before I got the SME. I replaced the LVX with an Akito arm thinking it would be a nice improvement but was very disappointed. I didn't notice any change. That's when I decided to go with the SME.
pcourtney
New Member
Please don't give up Sir, every day is a learning day for me, I just spoke to Linn in Scotland, and the original grease that used was called ROCOL Kilopoise 0868G ( Grease ) , the cp value is 200,000 which is about 300 to 350k ( 350,000 cSt) SO YOU ARE RIGHT AND I AM WRONG
Kiloposie is an extremely high viscosity grease damping lubricant. Used for the lubrication of slides, gears and threads on instruments to impart smooth positivemovement with a ‘silky’ feel by providing damping and increased friction/drag. The spec sheet is here https://www.farnell.com/datasheets/494930.pdf

 support.newgatesimms.com
So rather than use Silicon Oil, I'm going to try and find a suitable 350k cSt gease.
Kiloposie is an extremely high viscosity grease damping lubricant. Used for the lubrication of slides, gears and threads on instruments to impart smooth positivemovement with a ‘silky’ feel by providing damping and increased friction/drag. The spec sheet is here https://www.farnell.com/datasheets/494930.pdf
Finding an alternative for Rocol® Kilopoise™ 0868 damping grease
Looking for an alternative to the discontinued Rocol Kilopoise 0868 damping grease range? We have and alternative damping grease available to buy online
support.newgatesimms.com
So rather than use Silicon Oil, I'm going to try and find a suitable 350k cSt gease.
Last edited:

Thanks to this thread; I just managed to take apart mine! Was just thinking about how to do this last night.
I'll leave pictures here for documentation's reasons.
1. Obviously; take the tonearm support bracket off the lifter by unscrewing it, and remove the lifter from the tonearm. That pesky set screw was discussed here ad nauseam
2. Access is thru the top black cover - a "washer". It's plastic, and in my case, it wasn't even glued on. My tweezers in between that and the shaft lifted it effortlessly.
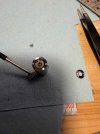
Under is as you can see is a snap ring. It was too cold outside for me to go get my snap ring pliers, so I used two sharp tipped dental type picks I had on my bench to get the snap ring out.
Careful - there's a spring underneath! Make sure it doesn't.. "spring" on you.
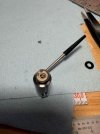
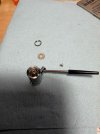
You can then pull out the spring, and the piston. Look at all that yummy goo!
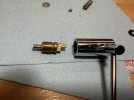
After the piston is out, the lever will come out, and you will be left with the barrel. A light push on the cover on the lever side will "unglue" it - it's glued with that sticky goo (about vaseline viscosity):
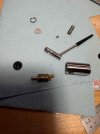
Clean, lube, assemble. Bonus points: polish the OD of the brass piston and the ID of the cylinder you took all these works out of.
I'll leave pictures here for documentation's reasons.
1. Obviously; take the tonearm support bracket off the lifter by unscrewing it, and remove the lifter from the tonearm. That pesky set screw was discussed here ad nauseam
2. Access is thru the top black cover - a "washer". It's plastic, and in my case, it wasn't even glued on. My tweezers in between that and the shaft lifted it effortlessly.
Under is as you can see is a snap ring. It was too cold outside for me to go get my snap ring pliers, so I used two sharp tipped dental type picks I had on my bench to get the snap ring out.
Careful - there's a spring underneath! Make sure it doesn't.. "spring" on you.
You can then pull out the spring, and the piston. Look at all that yummy goo!
After the piston is out, the lever will come out, and you will be left with the barrel. A light push on the cover on the lever side will "unglue" it - it's glued with that sticky goo (about vaseline viscosity):
Clean, lube, assemble. Bonus points: polish the OD of the brass piston and the ID of the cylinder you took all these works out of.