• The move to the new server is done. There are some software and database maintenance updates in process. This has us passing the hat around to help out. We appreciate any donations. Seriously, even a dollar helps. The payment page may be found here - https://www.audiokarma.org/support.html

Denon DP-75 rebuild

Terry Mc

New Member
Hi All,
I am new on here and while not a true audiophile.
I do love music. And I love a system that images well, has large dynamics, and has a broad soundstage.
I listen to a mix of classic rock and contemporary Jazz. (think mostly Al Di Meola and other artists along this genre)
I have a nice but not over the top Home Theater system with a Marantz AV-8802A and Crestron amps along with an old Boston VR speaker compliment. Sub duties are handled by a Monolith M-15 v. 1. along with a nice set of cans (Sennheiser HD-700)

Enough of the background.

My current project fell into my hands about 2 weeks back.

I was on the lookout for an inexpensive turntable because my collection is old an not anything that warrants a high-end turntable.(a lot of classic rock from my youth)
One day on offer-up I spotted a Denon DP-75 ad. Doing a little research he started with asking a grand, then down to 500, then down to 250. This told me it would have some issues but I wanted to look and see what was there.

I drove cross town and met with him at a gas station.
He pulled up on a bicycle pulling a trailer. Hmmmm this will be interesting.
we pulled the truntable out of the trailer and put it in the back of my SUV and I began to assess the damage.

It had lots of issues. and I mean a lot.
First it has a european 230 volt cord end.
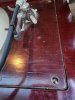
The plinth is a DK-110 with the veneer on the tonearm board cupping due to drying out.
The Tonearm itself (a Denon DA-401) had the delicate plastic headshell socket broken in two and glued together with the headshell twisted. The Azimuth not even close to aligned.
The Dust cover was missing the upper half of the hinges and one of the finger lifts on the right side.
The cartridge is a good match for the DA-401 but has a broken stylus. It is a Shure V15 type V.

I discussed all the damage to the turntable with him and he assured me it still worked.
I knew he was lying, but did not know how much is operational still.
We negotiated and I walked out with the pieces of what once was a fabulous turntable for $100.

Now the adventure begins.

I am not a novice at restoring things.
While most of my stuff is not restored to original condition it would be what in the Hot Rodding world would be referred to as Restified. A cross between restored and modified.
 
Register to hide this ad
I thought, So how do I proceed?
Close examination to the tonearm is it is nearly destroyed.
The original value is gone. critical irreplaceable parts have been broken.
The wiring was destroyed when the socket was broken.
The arm itself, the pipe, the pivots, bearings, counterweights, and lift are all in great condition along with the cartridge head.
This set forth the plan I will describe below since to replace a simple part would require buying a whole tonearm.

I disassembled the plinth, tonearm, and platter drive.
I cleaned all components and noted all the small items that needed work placing all objects in baggies along with their associated components.
Some buffing out, showed the dust cover and plinth to be in good condition minus the cupped veneer on the tonearm board.

I found hinges for the dust cover on Ebay out of japan so for an investment of $50 shipped the dust cover fits back onto its old home.
I tired to reamalgamate the laquer on the tonearm board and found it too far gone. Arggh!
I sanded down the finish and the veneer was too thin to save.
So I have ordered a sheet of Buginga wood veneer which came in over the weekend. the grain is a good match for the rest of the plinth so it will be applied and refinished to match the rest of the plinth.

The platter drive I tested adapting the 230 euro socket to 110 volt
removing the platter you find the frequency setting switch and the multivolt selector switch.
This was a great surprise, as I was not sure if I was going to have to set a transformer to supply power for this or not.
checking all the settings they were correct for US power. so I fired up the platter drive.
VICTORY!
The platter locks in at 33 rpm and 45 rpm the strobe shows a perfect lock on speed.
So the most expensive and desired component here is completely in tact with nothing more than a new cord needing done.
 
That brings us to the tonearm and the plan for this.
I know the value of the DA-401 and what it represents in the ultra low mass approach that Denon use during the fashionable period.
As I said the broken parts are beyond repair and the value is lost.
I spent weeks debating this in my head.
Should I sell it to someone that needs the parts and buy a nice tonearm?
Can I find the parts? NO!
Can I fix the Parts? NO!

I recognize its strengths and weaknesses and set forth a plan that many on have issue with.
I am restifying the tonearm.
Some people do a tonearm rewire direct from the cartridge to RCA outputs. and I know the service is a little pricey depending on who does it.
I have bought a Cardas tonearm rewire kit and I am going to rewire direct from the cartridge bypassing the socket that has been broken.
This will replace the wiring that is already torn in 2.
The socket that is broken I am removing the pins and removing the pins in the headshell drilling out each to allow the
new wiring to pass thru.
The broken plastic where the socket I have measured and found it to be 5.5mm o.d.
I have bought 5.5mm carbon fiber tubing in an effort to keep this low mass tonearm just that, low mass.
My plan is to epoxy the carbon tubing to the socket and create a set screw on the bottom of the S-pipe to allow azimuth adjustment of the headshell.
The disadvantage of all this is that the head shell will not disconnect the wiring from the tonearm. it will still be removable since only the socket will be
attached to the tonearm. you just have to disconnect the wiring from the cartridge then loosen the set screw and pull the wires thru the headshell hole.
 
The last piece in all this is the cartridge itself.

As you can see I have done a lot of reading and research on all the pieces I have bought for a minimal price.
The stylus being broken had me thinking of replacing the cartridge and then I read enough to see that the high compliance Shure V15 type V.
was part of a whole package, that works as a synthesis of all the parts.

The cantilever is completely gone on the stylus so retipping is not a plan, so I have decided to buy a Jico SAS boron stylus for this cartridge.

All thoughts are welcome event the expected ones of I am committing sacrilidge.
 
Last edited:
Arrived on a bicycle pulling a trailer... You can't make that stuff up! Beautiful story!

Sounds like you've got a serious project going there but got it under control. I'm using a DP62L that I love. I found another exactly like it that works but needs love. I'll get to it..

Gonna need pictures of your TT. I'm happy for you and applause your determination and skill.
 
Nice write up. I would try to repair tonearm as well since you have nothing to lose. The Shure V15 Type V is a very good cartridge and with the Jico SAS boron should produce nice quality SQ assuming you get the TA sorted out.

By the way, there is DP75 / 80 Owners thread here on the TT Forum. Might think about posting there to get feedback / advice. Best with your project and welcome to AK.
 
Last edited:
thanks for the feedback guys.
I will get photos up soon.
I just found the upload files button so that will happen soon.

jbjsr,
I will check out the owners thread.
 
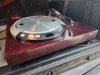
The first picture is in the back of my Sequioa,
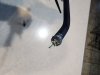
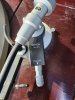
second and fourth the sloppy cover up of the broken socket,
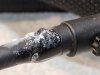
The third is when I started disasembly in my kitchen.

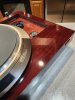
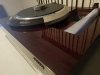
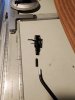
Second post of pictures, first 2 are to show how bad the plinth was and the tonearm board.
the third and fourth are after polishing the plinth using automotive technics of compounding and then using polishing compound to remove swirls.
I may touch up the plinth some more but I am cautious about removing too much material and going thru the laquer. As that can be tricky to fix.
 
Welcome to AK!

Great project, and very good description of the problems and fixes:thumbsup:

Have a DP 75 myself, and it has a 401, the 401 came with 2 headshells and 2 or 3 headshell weights ( I’d have to go count to be sure) and an additional counterweight. It can be manipulated into kinda a medium effective mass arm if the weights and heavy counterweight are used…

VR
Andy
 
Great info Andy,

a previous owner had added weight to the headshell in the form of duct putty.
He also added it to the plinth as well. Obviously to add weight and dampening to the plinth.
I assume he added it to the headshell to change the resonance frequency.
Personally I think there are probably better ways to achieve that goal. rather than duct putty. Maybe I am wrong.LOL
 
So did a little work on it tonight.
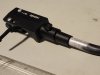
I cut the carbon fiber tube and did a test fit.
It looks like it is going to be a very solid connection once I epoxy it to the socket.
I have the S-pipe sanded to remove the last of the epoxy residue and prepare it for a small nut to be brazed onto the bottom for a set screw for
Azimuth adjustment.

The CF tubing is practically weightless with the tiny size.
20230116_212129.jpg


20230116_212229.jpg


20230116_212312.jpg

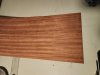
Here is the unfinished veneer, the challenge will be finding a stain that has the right tint of reddish purple.
20230116_212044.jpg
 
Different note, no pun intended.

Last week I found a Technics SL-1300 for next to nothing, it had an issue with the speed control and a broken stylus.
I found a switch to repair it on Ebay and it came in. So tonight I soldered it in and everything is working on the speed control.
Just ordered a stylus for the cartridge. I ordered an upgrade from LP Gear.
This one I will sell to help fund the Denon. I wont make much but every bit adds a piece to this beauty.
 
So did a little work on it tonight.
I cut the carbon fiber tube and did a test fit.
It looks like it is going to be a very solid connection once I epoxy it to the socket.
I have the S-pipe sanded to remove the last of the epoxy residue and prepare it for a small nut to be brazed onto the bottom for a set screw for
Azimuth adjustment.

The CF tubing is practically weightless with the tiny size.
View attachment 2769557


View attachment 2769558


View attachment 2769559

Here is the unfinished veneer, the challenge will be finding a stain that has the right tint of reddish purple.
View attachment 2769562
Excellent work :trebon:p
 
T68,
I look at things this way.
Look not for what is broken, but for what is there.
That can be applied to a turntable or to life depending on how Philosophical you want to be.

The Marco,
Yeah I had looked at the value of the platter drive before I met with the guy.
I could tell he was just looking to get cash for his next high. And told him I could take a chance at a hundred.
At that point it still had risks since I did not know if anything would be salvageable beyond the plinth.
Once I got it home and fired it up I found the motor unit does hold speed. It locks in and the strobe indicates no fluctuation.

I then knew I had done as well as hoped.
I considered at one point the idea of splitting it up and making a small killing on the deal.
Plinth approx. 100-200, platter drive 400+, tonearm for parts 150-200'ish, and the Shure V15V probably 150-200ish from what I have seen.
But then what, spend more than that for something that would not compare?

I have done the numbers, when I am done including the Jico SAS-B stylus I will have approx $500 into this project and I will have what I consider to be
a beautiful turntable that should be better than what I would have bought otherwise.
 
Back
Top Bottom