

You are using an out of date browser. It may not display this or other websites correctly.
You should upgrade or use an alternative browser.
You should upgrade or use an alternative browser.

T68,
I look at things this way.
Look not for what is broken, but for what is there.
That can be applied to a turntable or to life depending on how Philosophical you want to be.
The Marco,
Yeah I had looked at the value of the platter drive before I met with the guy.
I could tell he was just looking to get cash for his next high. And told him I could take a chance at a hundred.
At that point it still had risks since I did not know if anything would be salvageable beyond the plinth.
Once I got it home and fired it up I found the motor unit does hold speed. It locks in and the strobe indicates no fluctuation.
I then knew I had done as well as hoped.
I considered at one point the idea of splitting it up and making a small killing on the deal.
Plinth approx. 100-200, platter drive 400+, tonearm for parts 150-200'ish, and the Shure V15V probably 150-200ish from what I have seen.
But then what, spend more than that for something that would not compare?
I have done the numbers, when I am done including the Jico SAS-B stylus I will have approx $500 into this project and I will have what I consider to be
a beautiful turntable that should be better than what I would have bought otherwise.
Oh yeah you'll be coming out swinging. You'll have a $1200+ TT when you're done with this project. Maybe even more.
So exciting that the motor unit is fully functional. This is a VERY high spec turntable. Check it out: https://www.vinylengine.com/library/denon/dp-75.shtml
I'm actually hoping to one day find a DP-75 or DP-80 motor unit as cheap as you did because it would make mine even better than it already is

So I have not added for a little while.
The reason is I was hesitating on the next step.
Knowing something is broken and parts are not available is one thing.
Taking a drill and changing and taking that broken part further from original is another thing.
Today at lunch I finally bit the bullet and drilled out the pins for the headshell and the headshell socket.
As I said I have been dragging my feet on this one. One wrong move and I could damage more parts that I cannot replace.

When I drilled out the socket the insert in the socket came out at the last size.
This is good and bad.
The insert was providing support for the carbon fiber tube and formed a stop for it.
The good is it is one less piece of plastic that would just be wedged in there by the tubing.
Now I will have to marka stop on the tubing and make sure it holds alignment when I bond the 2 pieces with epoxy.
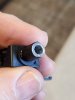
This was the hard part as the head shell was 100% intact so it made it hard for me to justify drilling, but in for a penny in for a pound.
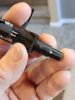
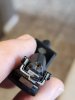
So I have a path now for the direct wiring, I am still debating whether to keep the DIN socket on the bottom of the tonearm or delete it and go straight to an RCA junction box.
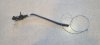
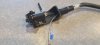
Here is the tonearm with the Cardas wiring.

So I also measured the Shure V15V coil resistance today also.
one side is 868 and the other 890 ohms. The manual shows 815 typical.
So not sure if these are within spec. and some can be attibuted to calibration staking of instruments.
Side to side is open so that is good.
As you can see the stylus has the cantilever ripped out by the less than bright individual I bought this from (tweeker probably?)
It is a shame since everything else on the Turntable points to that the original owner had probably had a VN5MR stylus in it.
If anyone has input into DC resistive values of the V15V coils please let me know before I spend $$ on Jico SAS stylus.
Tonight I will probably bond the CF tubing to the socket and look at brazing a nut to the pipe so I can create a jam nut for an azimuth adjustment.
The reason is I was hesitating on the next step.
Knowing something is broken and parts are not available is one thing.
Taking a drill and changing and taking that broken part further from original is another thing.
Today at lunch I finally bit the bullet and drilled out the pins for the headshell and the headshell socket.
As I said I have been dragging my feet on this one. One wrong move and I could damage more parts that I cannot replace.
When I drilled out the socket the insert in the socket came out at the last size.
This is good and bad.
The insert was providing support for the carbon fiber tube and formed a stop for it.
The good is it is one less piece of plastic that would just be wedged in there by the tubing.
Now I will have to marka stop on the tubing and make sure it holds alignment when I bond the 2 pieces with epoxy.
This was the hard part as the head shell was 100% intact so it made it hard for me to justify drilling, but in for a penny in for a pound.
So I have a path now for the direct wiring, I am still debating whether to keep the DIN socket on the bottom of the tonearm or delete it and go straight to an RCA junction box.
Here is the tonearm with the Cardas wiring.
So I also measured the Shure V15V coil resistance today also.
one side is 868 and the other 890 ohms. The manual shows 815 typical.
So not sure if these are within spec. and some can be attibuted to calibration staking of instruments.
Side to side is open so that is good.
As you can see the stylus has the cantilever ripped out by the less than bright individual I bought this from (tweeker probably?)
It is a shame since everything else on the Turntable points to that the original owner had probably had a VN5MR stylus in it.
If anyone has input into DC resistive values of the V15V coils please let me know before I spend $$ on Jico SAS stylus.
Tonight I will probably bond the CF tubing to the socket and look at brazing a nut to the pipe so I can create a jam nut for an azimuth adjustment.
On hindsight I might have reconsidered drilling out the headshell.
and just tried finding pins and used them to connect to the headshell pins.
But that would have added one more point of resistance.
All the drilling was done in stepping up in sizes.
Small drill bit then slightly larger, then larger and the final size.
That way I was sneaking up on the outer borders of the inserts and not damaging the surrounding plastic.
Plastic is so easy to damage with a drill bit and having metal pins inside of plastic that you are drilling is just one step from breaking something.
I left the last bit of headshell insert plastic (the white part) as a precaution because any larger bits were getting dangerously close to damaging the headshell.
They are too small an delicate to have put in a vice on my drill press, so I benched a hand drill against a counter and moved the parts instead of the drill.
That way you are not dealing with 2 things moving just one.
and just tried finding pins and used them to connect to the headshell pins.
But that would have added one more point of resistance.
All the drilling was done in stepping up in sizes.
Small drill bit then slightly larger, then larger and the final size.
That way I was sneaking up on the outer borders of the inserts and not damaging the surrounding plastic.
Plastic is so easy to damage with a drill bit and having metal pins inside of plastic that you are drilling is just one step from breaking something.
I left the last bit of headshell insert plastic (the white part) as a precaution because any larger bits were getting dangerously close to damaging the headshell.
They are too small an delicate to have put in a vice on my drill press, so I benched a hand drill against a counter and moved the parts instead of the drill.
That way you are not dealing with 2 things moving just one.
I think I may have answered my own question on the coil resistance.
I found this thread here and it looks like his values are almost identical to mine.
https://audiokarma.org/forums/index...question-on-measured-results-vs-specs.915508/
I found this thread here and it looks like his values are almost identical to mine.
https://audiokarma.org/forums/index...question-on-measured-results-vs-specs.915508/

Well new twist today.
I have been on the look out for an original VN5-MR stylus for my Shure VL15 type V.
I stumbled on a Shure Ultra VST V and made an offer on it that was accepted.
I got a reasonable price considering it has the original MR stylus and seeing what the standard V15V's are going for.
I figure if I can sell my cartridge for what I see most asking it will be about the same money spent as buying the Jico boron for mine.
I have been on the look out for an original VN5-MR stylus for my Shure VL15 type V.
I stumbled on a Shure Ultra VST V and made an offer on it that was accepted.
I got a reasonable price considering it has the original MR stylus and seeing what the standard V15V's are going for.
I figure if I can sell my cartridge for what I see most asking it will be about the same money spent as buying the Jico boron for mine.
Question for you all.
Does anyone know of a source of the finger lifts for the dust cover for the DK-110?
Mine is missing one of the 2.
I have been considering standoff caps of the same dimension but kind of like the idea of keeping those original.
Even though I am changings some other things.
Does anyone know of a source of the finger lifts for the dust cover for the DK-110?
Mine is missing one of the 2.
I have been considering standoff caps of the same dimension but kind of like the idea of keeping those original.
Even though I am changings some other things.
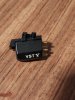
So today I received my new to me V15 type V Ultra VST cartridge and OEM MR stylus.
It took a while to get as it came from Germany.
If you are ever on Ebay and wonder about vinylistica-viola
I think they are the real deal.
The proof will be in the sound. Hoever,
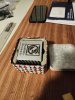
He triple boxed the cartridge, the innermost box being a tin.
each layer was wrapped in foam and the cartridge within was wrapped in foam.
Then is a separate acrylic case the original Shure VN5MR stylus was wrapped in another layer of foam and the acrylic case was in
hand cut EPS.
This is a first for the layers of layers or layers of packaging for the shipment.
I can be a little over the top but he is insane on the level of protection that he provided for this gem to find its new home.
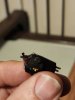
and the cartridge looks brand new it is obvious it was well cared for and cleaned thoroughly.

It took a while to get as it came from Germany.
If you are ever on Ebay and wonder about vinylistica-viola
I think they are the real deal.
The proof will be in the sound. Hoever,
He triple boxed the cartridge, the innermost box being a tin.
each layer was wrapped in foam and the cartridge within was wrapped in foam.
Then is a separate acrylic case the original Shure VN5MR stylus was wrapped in another layer of foam and the acrylic case was in
hand cut EPS.
This is a first for the layers of layers or layers of packaging for the shipment.
I can be a little over the top but he is insane on the level of protection that he provided for this gem to find its new home.
and the cartridge looks brand new it is obvious it was well cared for and cleaned thoroughly.
Although I can see I need to take the stylus out and get some of the foam off of it. LOL
Interestingly, I thought the VST was supposed to be the same weight as the standard V15V with only the Ultra 500 being heavier.
But in the hand I could definitely feel a slight increase in heft from the V15V.
Maybe I am imagining things as I have sold the old cartridge as planned,
which made this acquisition the same or less cost than buying a Jico SAS boron stylus for my old cartridge.
Interestingly, I thought the VST was supposed to be the same weight as the standard V15V with only the Ultra 500 being heavier.
But in the hand I could definitely feel a slight increase in heft from the V15V.
Maybe I am imagining things as I have sold the old cartridge as planned,
which made this acquisition the same or less cost than buying a Jico SAS boron stylus for my old cartridge.

totem
Addicted Member
I could definitely feel a slight increase in heft from the V15V.
You'll need a digital stylus scale at some point order one and have it on hand.
clintalloy
New Member
Hi Terry Mc, if you are still around, thanks for the nice pics on this thread. I am working on DA-401 tonearm that got damaged in shipping (headshell connector broke off the arm tube). Going to have to modify it a bit and rewire, and epoxy.So I have not added for a little while.
The reason is I was hesitating on the next step.
Knowing something is broken and parts are not available is one thing.
Taking a drill and changing and taking that broken part further from original is another thing.
Today at lunch I finally bit the bullet and drilled out the pins for the headshell and the headshell socket.
As I said I have been dragging my feet on this one. One wrong move and I could damage more parts that I cannot replace.
View attachment 2777442
When I drilled out the socket the insert in the socket came out at the last size.
This is good and bad.
The insert was providing support for the carbon fiber tube and formed a stop for it.
The good is it is one less piece of plastic that would just be wedged in there by the tubing.
Now I will have to marka stop on the tubing and make sure it holds alignment when I bond the 2 pieces with epoxy.
View attachment 2777454
This was the hard part as the head shell was 100% intact so it made it hard for me to justify drilling, but in for a penny in for a pound.
View attachment 2777455
View attachment 2777456
So I have a path now for the direct wiring, I am still debating whether to keep the DIN socket on the bottom of the tonearm or delete it and go straight to an RCA junction box.
Here is the tonearm with the Cardas wiring.
View attachment 2777459 View attachment 2777462
View attachment 2777466
So I also measured the Shure V15V coil resistance today also.
one side is 868 and the other 890 ohms. The manual shows 815 typical.
So not sure if these are within spec. and some can be attibuted to calibration staking of instruments.
Side to side is open so that is good.
As you can see the stylus has the cantilever ripped out by the less than bright individual I bought this from (tweeker probably?)
It is a shame since everything else on the Turntable points to that the original owner had probably had a VN5MR stylus in it.
If anyone has input into DC resistive values of the V15V coils please let me know before I spend $$ on Jico SAS stylus.
Tonight I will probably bond the CF tubing to the socket and look at brazing a nut to the pipe so I can create a jam nut for an azimuth adjustment.
How did you get the arm tube out of the body of the tone arm? I can’t budge the screws. There are a couple smaller holes on the under side that might have time hex nuts, but can’t really see. Trying not to break it—
Thanks for any suggestions.
g
clintalloy
New Member
to follow up on my own post. It was like someon put a little bit of super glue or thread lock on every screw on this tonearm, or just old grease got real hard. Anyway, I eventually got everything apart, with *only* two stripped screws, which should be replaceable... Will see how the rewire goes, eventually.Hi Terry Mc, if you are still around, thanks for the nice pics on this thread. I am working on DA-401 tonearm that got damaged in shipping (headshell connector broke off the arm tube). Going to have to modify it a bit and rewire, and epoxy.
How did you get the arm tube out of the body of the tone arm? I can’t budge the screws. There are a couple smaller holes on the under side that might have time hex nuts, but can’t really see. Trying not to break it—
Thanks for any suggestions.
g
Glad you were able to get it out.
Yeah mine was a total mess with the arm being superglued together where it had been broken.
Funny thing is I look at this thread and I totally got sidetracked, Life sometimes gets in the way as the saying goes.
I just pulled the turntable out of the spot it was being stored and put in my office/ computer room/ now listening room.
I bought a used desk and Credenza that match the finish of the Plynth beautifully.
I need to finish this up and get the tone arm board finished and put everything together.
Yeah mine was a total mess with the arm being superglued together where it had been broken.
Funny thing is I look at this thread and I totally got sidetracked, Life sometimes gets in the way as the saying goes.
I just pulled the turntable out of the spot it was being stored and put in my office/ computer room/ now listening room.
I bought a used desk and Credenza that match the finish of the Plynth beautifully.
I need to finish this up and get the tone arm board finished and put everything together.