• The move to the new server is done. There are some software and database maintenance updates in process. This has us passing the hat around to help out. We appreciate any donations. Seriously, even a dollar helps. The payment page may be found here - https://www.audiokarma.org/support.html

Early Mcintosh MC250 restoration

James Cox

AK Subscriber
Subscriber
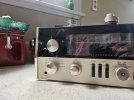
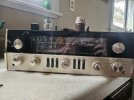
Hi everyone! I recently found a great deal on an MC250 poweramp with an MX110z preamp. My initial plan was to restore the MX110z first but unfortunately it was very badly damaged in shipping (broken glass, broken tip of the power knob, broken panloc button, etc) so I've decided to start with the MC250 first. Both power on and sound decent but there is a low level hum present in the MX110 that I will tackle by modifying some of the wiring after updating the components, but for now we start with the power amp.

This MC250 is one of the earliest versions based on the schematic I found that matches the circuitry of my unit. Fortunately, there are not many parts and this should be a fairly easy restoration. There are a few color coded and striped capacitors who's value im not sure of yet but will be pulling up the schematic and using that figure out the values if no one here knows off hand.

My plan for this restoration is to replace all 4 of the large can capacitors on top along with all of the electrolytic, mylar, and disc capacitors inside. I also plan on checking most of the resistors and replacing any that are off value. How do people feel about using different types of resistors like low noise metal films on this unit? On the 2 9600uf cans on top, does anyone have any recommendations for drop in replacements? I see people recommend increasing the capacitance, but how high can we safely go? One guy on Ebay recommends using 18000uf chemi-con brand cans that fit without modifying the chassis. Also if all of the voltages check out and the diodes test good do you guys recommend changing those still? Any troublesome transistors that should go?

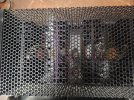
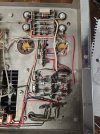
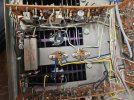
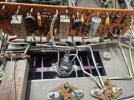
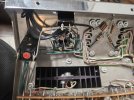
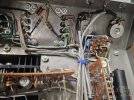
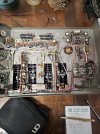
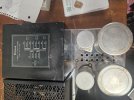
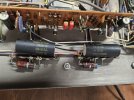
It will be a few weeks before I get all of the parts in and have time to work on the unit but I will be posting a parts list along with the replacement parts I will be using in the meantime. If anyone has any recommendations or ideas for this restoration I am all ears. I have attached pictures of my unit along with the schematic for this particular piece.
 

Attachments

  • 20241201_174855.jpg
    20241201_174855.jpg
    201.1 KB · Views: 89
  • 20241201_174740.jpg
    20241201_174740.jpg
    150.7 KB · Views: 84
  • 20241201_174752.jpg
    20241201_174752.jpg
    107.5 KB · Views: 81
  • 20241201_174756.jpg
    20241201_174756.jpg
    148.5 KB · Views: 80
  • 20241201_174759.jpg
    20241201_174759.jpg
    130.1 KB · Views: 77
  • 20241201_174803.jpg
    20241201_174803.jpg
    124.1 KB · Views: 78
  • 20241201_174807.jpg
    20241201_174807.jpg
    151.8 KB · Views: 75
  • 20241201_174814.jpg
    20241201_174814.jpg
    122.9 KB · Views: 75
  • 20241201_174851.jpg
    20241201_174851.jpg
    153.1 KB · Views: 81
  • 20241201_174733.jpg
    20241201_174733.jpg
    170 KB · Views: 96
Last edited:
Register to hide this ad
There are a few color coded and striped capacitors who's value im not sure of yet but will be pulling up the schematic and using that figure out the values if no one here knows off hand.
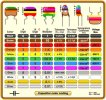
Check the caps using this code and then compare to the schematic. Same with all the parts. Sometimes the values are changed during the production run and the changes are not documented - or your model is later or earlier than the schematic you have in hand.

See below pic of the color code from the internet:
1733235819122.png

As far as resistors go - Metal film is great in the power supply and in any position where there is no signal (they pretty much work anywhere) but I sometimes like to go with carbon film in the signal path - depends on what is available. I also like to use the search engines and filtering on the digi/mouser websites to look for a brand/series that has most of the values that I need for the project so the value designation makings all match and the boards have a professional look after the work is done instead of looking like a hodgepodge of old resistors that don't match aesthetically.

I like to keep the filter caps the same value or slightly higher if the original value is not available - as close as possible but not below. With a McIntosh I don't think they used a lower value then needed for economic concerns, their value is too tied to their quality.

If you want to replace the multi-cap with a can you can try https://hayseedhamfest.com/
Just using multiple modern caps under the deck also works.

If a transistor works, I leave it. I only replace transistors that are causing noise problems.

Finally - take it with a grain of salt. These are my preferences and there are many ways to skin a cat.
Nice Amp!! Glad you are bringing it back up to spec. Enjoy!
 
Thanks theres a lot of good information there. I made a parts list ill get posted soon and went ahead and ordered all of the small passives from mouser. I went with carbon films for most of the 1 and 2 w resistors. There was one value that was only available as a metal film though. I also found this useful chart for the different types of color coded caps. I think some of the caps are actually the last ones in the picture and should be read from the leads up. That lines up more with the schematic anyway.
 

Attachments

  • Capacitors-color-code-example.jpg
    Capacitors-color-code-example.jpg
    52.7 KB · Views: 12
Heres a list of the parts that I'm replacing:
Can Capacitors
1.) 9300uf 45v filter capacitor x2
2.) 80/80/150/50uf 200v
3.) 200/500uf 100v/75v common positive
Electrolytic Capacitors
1.) 500uf 16v x2
2.) 100uf 12v x2
3.) 330uf 3v x2
All other capacitors
1.) .22uf x4
2.) .0001uf x2
3.) .005uf x2
4.) .02uf x2
5.) .0012uf x2
6.) .047uf x4
7.) .0047uf x4
8.) .00068uf x2
Resistors > 2w
1.) 400ohm 5w
2.) .33ohm 5w x2
3.) .55ohm 5w x2
4.) 3600ohm 10w x2
1 and 2w resistors
1.) 220ohm
2.) 2.2kohm x2
3.) 100ohm x2
4.) 270ohm
5.) 1.6kohm x2
6.) 1.2kohm x2
7.) 6.8k ohm
I decided to replace all of the 1 and 2w resistors with 2w rated ones since the cost difference is negligible and there's not really any space constraints.
All other resistors in the amplifier are 1/2w. I did not order any of those as I have an ample supply of 1/2w resistors and will be testing those individually during the restoration and replacing any that are out of spec.

I ordered all of the small passives from mouser and have attached my parts list to this post.

For the can capacitors there replacements available for all of them. I found an Ebay seller with the 200/500 common positive cap for $45 and I ordered that today along with the mouser order. The 2 9300uf caps will be replaced with 2 chemi con 15000uf/100v capacitors because the screw in lead spacing matches up with the originals. On the 80/80/150/50 cap I'm going to order that from Hayseed but I don't quite have the funds available for the filters or the Hayseed order yet.
 

Attachments

I noticed what looks like 2 bias pots on this board but I don't see anything in any of the service manuals I have. Does anyone happen to know if these are bias pots or dc balance pots? If so what is the ideal setting and what point would you measure from?
 

Attachments

  • 20241201_174814.jpg
    20241201_174814.jpg
    122.9 KB · Views: 19
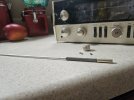
Here's some bonus pics of the MX110z that was damaged in shipping. When I'm satisfied with the MC250 I'll be starting on this. I found a source for the glass but the power/balance pot appears ro be unobtanium so I'm going to try to repair it with some JB weld and a piece of wire I think. Unless someone here knows where I may be able to find one, that's the best idea I've been able to come up with. The panloc button shouldn't be too hard to fix. After that there's some problems underneath. Messy repair work, a broken terminal strip, then the usual restoration stuff.

Oh and what do people generally recommend for shining up the chrome without damaging the silk screening? Just polish around the lettering? I'm also going to touch up some of the black paint on the MC250. Any recommendations for black paint that people like to use on this old Mcintosh gear?
 

Attachments

  • 20241127_144550.jpg
    20241127_144550.jpg
    123.6 KB · Views: 20
  • 20241127_144548.jpg
    20241127_144548.jpg
    91.8 KB · Views: 19
  • 20241127_144543.jpg
    20241127_144543.jpg
    96.5 KB · Views: 18
  • 20241127_144541.jpg
    20241127_144541.jpg
    104.7 KB · Views: 20
I think Terry Dewick recommended a particular brand paint.
I don't have time to do a search right now, but the info is here on AK.
 
It looks like Terry recommended Rustoleum brand black spray paint. Do you think the transformers are flat black or semigloss?
 
Sweet thanks for the info. After I'm satisfied with the electrical restoration I'll work on polishing up the chrome and painting the trannies.
 
This is my first set of Mc gear so I'm really eager to get this thing finished. Going to try not to rush though. It's finals week in the electronic tech program I'm in and I have to present my project next week. I'll have time to work after that.
 
I noticed what looks like 2 bias pots on this board but I don't see anything in any of the service manuals I have. Does anyone happen to know if these are bias pots or dc balance pots? If so what is the ideal setting and what point would you measure from?
Any info on this? My small passives parts arrive today and I'm really curious about these pots.
 
I noticed what looks like 2 bias pots on this board but I don't see anything in any of the service manuals I have. Does anyone happen to know if these are bias pots or dc balance pots? If so what is the ideal setting and what point would you measure from?
DC offset, they removed that option in later models...
 
Nice amp, I have one and the trannies are a semi gloss, Audio Classics went thru it several years ago
Although I think I prefer semigloss, the transformer cans on the MC75s are gloss black, and I'm going to stick with original gloss paint. The semigloss/satin does to me look more modern though.
 
Ok cool so i just measure the voltages at the speaker terminals and adjust to zero then?
Yes you can, most of the DC is shunted to ground through the Auto transformer but you can adjust to get the perfect 0mV DC....
 
Although I think I prefer semigloss, the transformer cans on the MC75s are gloss black, and I'm going to stick with original gloss paint. The semigloss/satin does to me look more modern though.
Ok so on the solid state MC250 is it a gloss or semi gloss? I don't want to paint the entire transformer, just touch up a few small scratches with something that matches the original.
 
Back
Top Bottom