• The move to the new server is done. There are some software and database maintenance updates in process. This has us passing the hat around to help out. We appreciate any donations. Seriously, even a dollar helps. The payment page may be found here - https://www.audiokarma.org/support.html

Eico HF 20 Rebuild Parts List + Suggestions

mcaddie7

Active Member
Hey all,

Recently bought two HF 20's I would like to give the same treatment as my 2050. Completely strip and rewire with all new and high end parts. My plan is to once again replace most caps with Orange Drop Film (other than Elec caps) and all resistors with 1% metal film. I've went through the parts list for these amps, and made a full cap and resistor list for anyone else in the future. This list includes the Addendums to the original design / list as well.

Stock #TypeSymbolDescription
22038​
CapC1Film, 25uf
22507​
CapC2Film, 2200pf
20039​
CapC3Film, 0.1uf, 400V
22507​
CapC4Film, 2200pf
22518​
CapC5Film, 2700pf
22508​
Cap17Film, 3300pf
22509​
CapC6,16Film, 100pf
20039​
CapC7,25,10-13Film, 0.01mf
22510​
CapC8,23Film, 0.02mf
22514​
CapC9Film, 850pf
23011​
CapC14Elec, 50uf, 50V
22512​
CapC15Film, 330pf, 800V
22513​
CapC18Film, 5000pf
22514​
CapC19Film, 850uf
22515​
CapC20Film, 500pf
22518​
CapC21Film, 2700pf
22516​
CapC22Film, 47pf
23014​
CapC24Elec, 10uf, 6V
24003​
CAN CapC26,27 (x2)Elec , 20uf, 450V: 10uf, 350V
20043​
CapC28Film, 0.03uf
10425​
ResR156K, 1/2W
---ResR3330K, 1/2W
10426​
ResR4,4333k, 1/2W
10427​
ResR51.2K, 1/2W
11523​
ResR6,868k, 1/2W
11531​
ResR9470k, 1/2W
10410​
ResR11100k, 1/2W
10420​
ResR123.3k, 1/2W
10428​
ResR13,1747k, 1/2W
11500​
ResR3210k, 1/2W
10400​
ResR1510k, 1/2W
10429​
ResR16470, 1/2W
10442​
ResR181.5k, 1/2W
10424​
ResR19,2022k, 1/2W
10424​
ResR2122k, 1/2W
10850​
ResR2233K, 1W
10431​
ResR23,24470K, 1/2W
10955​
ResR25,2647K, 2W
11527​
ResR27,28,34,35100k, 1/2W
10432​
ResR29,301k, 1/2W
14301​
ResR316k, 10W
11536​
ResR364.7M, 1/2W
11511​
ResR37560K, 1/2W
11518​
ResR382.2M, 1/2W
10023​
ResR3968K, 1/2W
10020​
ResR4033K, 1/2W
11510​
ResR411.138K, 1/2W
11526​
ResR42200K, 1/2W
11524​
ResR44117.7K, 1/2W
11528​
ResR45375K, 1/2W
11512​
ResR462.4K, 1/2W
10433​
ResR47560, 1/2W
14700​
ResR48350, 10W
Step 8Wire = 47k, 1/2W


No just like a b-hole, when it comes to circuit upgrades, everyone seems to have an opinion. After looking through several forums it appears that this may be a worthy mod / personal addendum?
C26A = 47uf, 400+V
C26B = 100uf, 450V
C27A = 100uf, 450V
C27B = unchanged


Now, I'm looking to keep these mostly stock for resale value. I don't want to add transformers, chokes, etc. But are there any simple updates / part changes people have done that make this amp sound tonally better?


I hope this list helps someone save time in the future and thank you all for any suggestions :)
 
Register to hide this ad
You'll find that many of the parts are already high end or perhaps beyond high end in this vintage unit.
There's almost certainly some carbon comps at the high end of tolerance and probably others that are well beyond there stated value...
The problem with terms like "high end" are that they mean different things to different people.
When I see folks in the forum use the term I assume it means: "im going to purchase the most expensive parts I can find for this thing because expensiver is better"
I use bad grammar intentionally because this is an ignorant approach to building anything... Cars motorcycles Amplifiers you name it.

Generally the cheapest metal film resistors will be way better than what was in this thing for temp stability and drift.
They're also much quieter.
Film caps will go in and probably never come out expensive ones don't work any better than commodity grade parts from mouser or Digi key. I suggest shopping there...
 
  • Like
Reactions: P78
C7, C25, C10~C13 are 0.1uF, not 0.01uF.

However, to help ensure stability, C10 & C11 should be increased to 1uf/400VDC or 2.2uF/400VDC. This staggers the low frequency time constant and will eliminate potential "motor boating" of the woofers.

This will increase the value versus stock if you are concerned about resale.
 
Any update on this build?
Thanks for the responses! I've ordered the parts with your suggestion (x2 obviously for each amp). However, the fleabay seller whether on purpose or not did not have a full picture of the transformer and it was no original. So I went and bought a 3rd amp for $99 on marketplace that had an OG transformer.

Now I'm waiting for some paint stripper to come in. All 3 chassis and transformers are pretty beat up and rusty, though not dented so a new paint job will do them wonders. I've learned many of these old amp's metal was coated with cadmium which is highly toxic, especially when heated or sanded.

Hoping the paint stripper and a plastic scrape tool make quick work of most of the paint. Then I'll have to do some research for how to get rid of the rust without poisoning myself lol.


Then paint. Another obstacle is the stickers. Thinking of buying transfer numbers/ letters to put over the paint before clear coating? Any knowledge is greatly appreciated.


I'll post pictures of all 3 units in the next day or so.
 
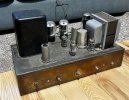
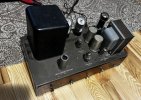
Restoration continues.

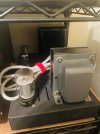
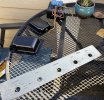
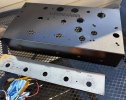
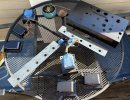
IMG_6242.jpegIMG_6241.jpegIMG_6240.jpeg
Started with sandblasting the bottom plate and larger transformer, I’ve then primed both and am ready to paint them.

I think I’m going to paint the chassis ahaered black gloss. Unsure what to paint the transformers yet, whether matched black or another color like hammered bronze to match the face plate. One faceplate also polished!
IMG_6285.jpeg
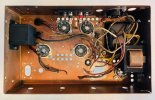
Next is to strip the insides and then repaint the chassis.
 
Restoration continues.

View attachment 3590803View attachment 3590802View attachment 3590801
Started with sandblasting the bottom plate and larger transformer, I’ve then primed both and am ready to paint them.

I think I’m going to paint the chassis ahaered black gloss. Unsure what to paint the transformers yet, whether matched black or another color like hammered bronze to match the face plate. One faceplate also polished!
View attachment 3591088
Next is to strip the insides and then repaint the chassis.

Not sure if anyone pointed out that the power transformer is not correct, is your 2nd unit matching?

If not i may have a match for you, I have a spare HF22 that someone installed a similar triad transformer on. If you need it let me know the HF-22 is currently gutted and the chassis has been wrinkle painted and the output has been black enameled and the power transformer looks like a match to the one you have.

I also have a thread up on the HF20, have all new components for mine as well, just need to set up shop and a new bench and can get to soldering.

good luck with it and ill be following along!
 
Yes, so I'm no transformer expert but one of my HF20s has a StanCor PC 8411 and the other a Triad. From my research:

Stancor:
High voltage secondary: 375-0-375V at 150ma
Filament: 6.3v @ 5A
Rectifier heat: 5v @ 3A

Triad R-18A:
High voltage secondary: 375-0-375V at 175ma
Filament: 6.3v @ 6A
Rectifier heat: 5v @ 3A

So could I use these on each respective amp? I'd gladly take you up on the Triad offer if needed. Any transformer info you could share is always welcome :)

Was able to get one of the amps stripped, cleaned and painted last night. All parts are curing, I'll take pictures once they can come inside. I painted the chasis and base plate hammered black, and the transformer cover / large transformer a hammered silver. It's almost too shiny, and I worry it'll clash with the bronze front faceplate however. Thoughts?

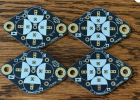
I also want to replace the can caps with the following board. It'll make it easier to service in the future and gives it a more modern look. Hopefully this isn't sacrilige or severly hurt resail value after all this work.
1757505307222.png
 
The one with the Triad may do a smidgen more power at full crank because of the higher capacity, but not enough to care about. The higher current capacity should make for a bit less supply sag at full load.

but functionally I don't think you're going to have any problems from the difference.


Problem with those boards is it doesn't look like the caps mount to wafers, which makes installing these more difficult. If the twist lock caps mount to cutouts in the chassis designed for them, you'll have to drill the squared off cutout to round, and add the two small holes for mounting.

personally in cases like this, I abandon the old caps in place and mount terminal strips underneath to hang the caps from. That doesn't affect the looks and the chassis doesn't have to be modified either.
 
Yes, so I'm no transformer expert but one of my HF20s has a StanCor PC 8411 and the other a Triad. From my research:

Stancor:
High voltage secondary: 375-0-375V at 150ma
Filament: 6.3v @ 5A
Rectifier heat: 5v @ 3A

Triad R-18A:
High voltage secondary: 375-0-375V at 175ma
Filament: 6.3v @ 6A
Rectifier heat: 5v @ 3A

So could I use these on each respective amp? I'd gladly take you up on the Triad offer if needed. Any transformer info you could share is always welcome :)

Was able to get one of the amps stripped, cleaned and painted last night. All parts are curing, I'll take pictures once they can come inside. I painted the chasis and base plate hammered black, and the transformer cover / large transformer a hammered silver. It's almost too shiny, and I worry it'll clash with the bronze front faceplate however. Thoughts?

I also want to replace the can caps with the following board. It'll make it easier to service in the future and gives it a more modern look. Hopefully this isn't sacrilige or severly hurt resail value after all this work.
View attachment 3592432

I’ll snap a pic of it this evening we can compare them to see if it’s a match :)
 
Yes, so I'm no transformer expert but one of my HF20s has a StanCor PC 8411 and the other a Triad. From my research:

Stancor:
High voltage secondary: 375-0-375V at 150ma
Filament: 6.3v @ 5A
Rectifier heat: 5v @ 3A

Triad R-18A:
High voltage secondary: 375-0-375V at 175ma
Filament: 6.3v @ 6A
Rectifier heat: 5v @ 3A

So could I use these on each respective amp? I'd gladly take you up on the Triad offer if needed. Any transformer info you could share is always welcome :)

Was able to get one of the amps stripped, cleaned and painted last night. All parts are curing, I'll take pictures once they can come inside. I painted the chasis and base plate hammered black, and the transformer cover / large transformer a hammered silver. It's almost too shiny, and I worry it'll clash with the bronze front faceplate however. Thoughts?

I also want to replace the can caps with the following board. It'll make it easier to service in the future and gives it a more modern look. Hopefully this isn't sacrilige or severly hurt resail value after all this work.
View attachment 3592432

IMG_9979.jpegIMG_9980.jpegIMG_9981.jpeg

Ok so it may not be a triad, but if you want to measure the shape and size we can compare. If it’s a match you’re welcome to it, you’d have to pay for shipping but the transformer is available if it’s correct. I had always assumed it was from a set of Dynakit MK3’s but I have no clue as it came like this.
 
View attachment 3592794View attachment 3592795View attachment 3592796

Ok so it may not be a triad, but if you want to measure the shape and size we can compare. If it’s a match you’re welcome to it, you’d have to pay for shipping but the transformer is available if it’s correct. I had always assumed it was from a set of Dynakit MK3’s but I have no clue as it came like this.

Thanks friend! I’m actually good though, although they aren’t matching both have around the same specs so I decided to go with them. They’ll be sister amps but one will be a little bigger.


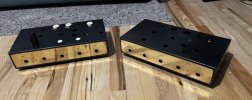
I finished painting the amps hammered black, and lacquered the polished face plates. They’re a little beat up that even polishing couldn’t fix but they do shine and it adds to the look of age

IMG_6452.jpegIMG_6451.jpegIMG_6450.jpeg

Next is to assemble the hardware side of things!
 
Thanks friend! I’m actually good though, although they aren’t matching both have around the same specs so I decided to go with them. They’ll be sister amps but one will be a little bigger.


I finished painting the amps hammered black, and lacquered the polished face plates. They’re a little beat up that even polishing couldn’t fix but they do shine and it adds to the look of age

View attachment 3598956View attachment 3598957View attachment 3598958

Next is to assemble the hardware side of things!

Ohhh this is getting good!!!! :)

You ever use wrinkle paint? :)

IMG_4200.jpeg


IMG_4193.jpeg

IMG_4253.jpeg

The company VHT “very high temperature” makes some great wrinkle paint. Great for transformer bell houses or chassis. Stiff is rated at like 1500 degrees and never chips off if applied correctly.

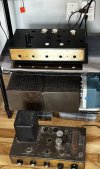
This is a Stromberg Carlson AR-37 I’m working on.
 
Ohhh this is getting good!!!! :)

You ever use wrinkle paint? :)

View attachment 3599013


View attachment 3599014

View attachment 3599015

The company VHT “very high temperature” makes some great wrinkle paint. Great for transformer bell houses or chassis. Stiff is rated at like 1500 degrees and never chips off if applied correctly.

This is a Stromberg Carlson AR-37 I’m working on.


Nice! Thanks for that, I think if I had known about it before hand I would have done my power transformers like that instead of matching the matte black.

Here’s a pic of the pieces somewhat put together, need to order some more tube sockets and some more hardware / knobs. Any knob suggestions that are black and look like originals? IMG_6459.jpeg
 
Nice! Thanks for that, I think if I had known about it before hand I would have done my power transformers like that instead of matching the matte black.

Here’s a pic of the pieces somewhat put together, need to order some more tube sockets and some more hardware / knobs. Any knob suggestions that are black and look like originals? View attachment 3599540

So oddly enough I buy solid aluminum feet and knobs off eBay.


There is all sorts of them that will fit the bill.

IMG_0087.jpeg

IMG_0086.jpeg

I like the oversized solid aluminum feet, they just add to the looks and are solid built.
 
So oddly enough I buy solid aluminum feet and knobs off eBay.


There is all sorts of them that will fit the bill.

View attachment 3599565

View attachment 3599566

I like the oversized solid aluminum feet, they just add to the looks and are solid built.


Thanks for this! You’re right the plastic knob I bought did not do the front justice. I’ll have to splurge and spend some money on some nice metal ones, def worth it after all this work.

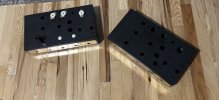
Painted and polished. Ready for hardware to be reinstalled before wiring and adding back transformers.
IMG_6524.jpegIMG_6525.jpeg
 
Back
Top Bottom