I am gonna concentrate on the part i designed since dissassembly and assembly of the turntable to reach this part is already explained in other forums. Plus the maintenance documents are also available on the internet.
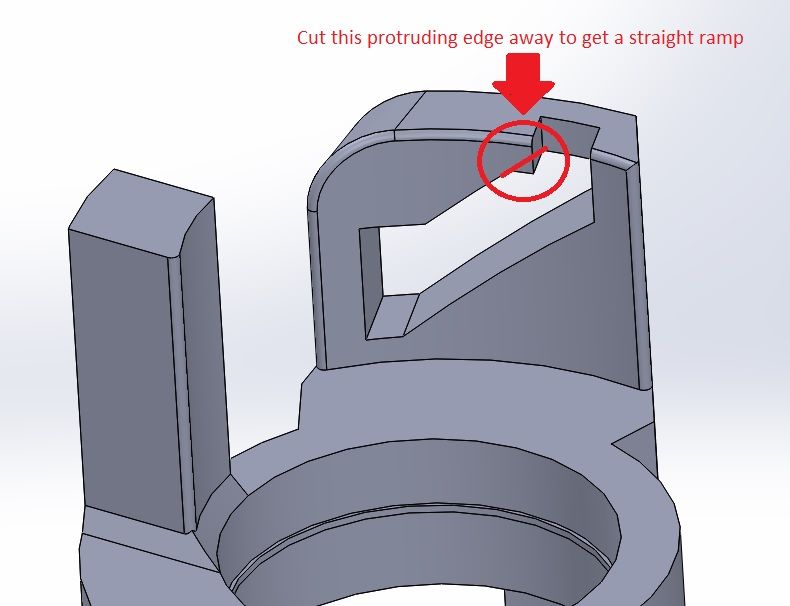
First thing to do is cut this little edge in the picture below away. It is a remnant of 3d printing tolerances etc:
Second thing to do is to smoothen the ramps where the knob of the cueing piston rides in. (see the angled ramps in the picture above) The surface finish of the 3D printed part is rougher than the original. This is because of the nature of 3D printing in this material.
Best results i got is with a very light sanding with very fine sand paper + adding graphite (dry lubricant) to the ramps by rubbing on it with a soft pencil (graphite, don't use color pencils:nono

Third thing to do is to see how the metal ring will fit in the new part.
The metal ring needs the be press fitted into the new part. Some light sanding of the hole of the new part helps to get it over the ring if there is too much resistance. You can sand the ridge in the hole of the part down a bit too but don't overdo because it keeps everything in place. Remember it just needs to fit snuggly together, too much pressure is not good because it will break, too little is also not good because it will come loose.
BEFORE YOU PRESS FIT THEM TOGETHER MAKE SURE THE GROOVE IN THE RING IS ALIGNED CORRECTLY TO THE RIDGE IN THE PART. Because the groove/ridge is not in the middle. There is no second try when you do it wrong.
Last thing to do is check the clearances when the tonearm is reassembled. Make sure nothing touches the part when you move the tonearm left to right while the cue is either up or down.