

You are using an out of date browser. It may not display this or other websites correctly.
You should upgrade or use an alternative browser.
You should upgrade or use an alternative browser.
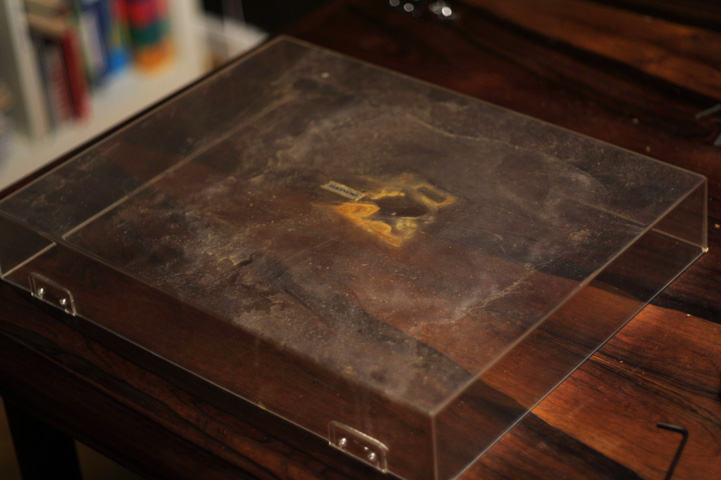
Fixing those scratched dust covers..
- Thread starter Punker X
- Start date


Shackman55
Super Member
I use the Meguires #4 as a finish polish on my covers and CD's seems to be work pretty well, but I have often wondered if I had used the same elbow grease and say turkey gravy, I might get equal results. Hmmmm I think I have some in the fridge.. I'll have to try that on my Dual 1249 cover.

Laserdude
No polar bears here...
I don't think this was mentioned, apologies if it was. My 12 year old car's headlights were completely hazed over and scratched. I used the headlight restoration pack sold at www.myheadlight.com to bring them back to new status in around 30 minutes. I forgot to take pics, but the before and after pics on the website are good representations. My headlights were as bad as the ones on the first page of the website.
The kit contains chemicals and abrasive sheets - one set for each headlight. I am not sure if the plastic composition of headlights v TT covers is close enough, but seems the process is same.
Now I´v bought a set so we will find out. My tt cover looks like those headlights! very bad....

BrianR
Randomly Variable Anomaly
I've got my dad's old Yamaha YP-D71 on loan. The cover was in good shape, just kinda scuffed from things being set on it. Some Meguiar's M105 polish on a microfiber took out most of it and then some M205 brought it to a nice shine.
There's still some slightly deeper scratches that I could wet-sand out no problem, but it looks really good.
There's still some slightly deeper scratches that I could wet-sand out no problem, but it looks really good.

klama2006
Super Member
Do I have to wet the fine grit sandpaper? Thank you.
In high school / college, I used to work part time in a home brewed auto body shop, for a friends father.
Literally anything could be polished up, given the time. Wet dry sandpaper, is a gift from heaven for a prospective refinisher. The water helps out quite a bit.

JStrid
Active Member
:First off, let me thank all of you guys for all of the fabulous advice! :thmbsp: I recently picked up a Denon DP-55K turntable that was in some slightly rougher cosmetic condition here and there, but I kept reading great reviews about what a solid table it was. I had seen this thread, and figured I would try out your suggestions (after first practicing a bit on the corner of an old Pioneer lid out in the garage...). With a little elbow grease, this came out looking sharp! I used some fine steel wool to get out the big scratches, some 1500 grit paper, followed by some 2500 grit paper followed by some Meguiar's M105 polish, and then finished it up with some Meguiar's M205. I can still see some VERY light scratches here and there, but only at an angle under a bright light. I could probably get those out, but after all that work I am thinking that it is good enough. Besides, if I spent all of the time making it perfect, I would seriously kick myself for even the slightest little swirl or faint scratch that I am sure to give it somewhere down the line. I would like to finish it out with one final buffing using the combination of Pledge and Windex that was recommended as well in this thread.
As for the plinth, I used Howard's Restore-A-Finish, then Howard's Polishing and Burnishing products on the finish, and then gave it some Wax and Feed. Man, that stuff works awesome as well (yes, I do know this is the the dust cover repair thread, but I thought I would mention it anyways...). There were some heat rings near the headshell where someone had left hot drink cups (??) and they came right out. I think the only way to get it better would be to do a complete refinish on it.
The only bummer? I forgot to take photos of the "before" state. The place I got the table couldn't move it, despite the low price, apparently because of the cosmetics. I am friends with one of the guys who works there, so I can't wait for him to come over and check out the finished product.
As for the sonics of this thing, it has a Magnepan Unitrac tonearm, and I just scored a killer deal on a slightly used Sumiko Blackbird (less than 30 hours). I can't wait to get this sucker up and running--hopefully it will sound as good as it looks! :yes:
Before:
After:

Never mind. I just saw Josafans earlier response.
Last edited:
Shackman55
Super Member
Ok, I have polished a few but not in a while. I just remembered a question I never have been able to get a response too. What has anyone come up with for a replacement for those little rubber or silicone feet that are in the front corners of many covers. I have emailed foot manufacturers and have been told "No proplem, we'll make em for you.. Just have to order 10,000 min to get them fabricated."
I have had to settle for a peice of peel and press rubber sheet cut to a tiny square and although it is functional I would much prefer to have the little insert feet. I have about 6 or 7 that would benefit from these. I don't think I have seen a vintage TT that didn't have these missing altogether or rotted. Just one of those things that irks me.. I got em shiny but still not complete.
I have had to settle for a peice of peel and press rubber sheet cut to a tiny square and although it is functional I would much prefer to have the little insert feet. I have about 6 or 7 that would benefit from these. I don't think I have seen a vintage TT that didn't have these missing altogether or rotted. Just one of those things that irks me.. I got em shiny but still not complete.
Attachments


.. Just have to order 10,000 min to get them fabricated."
I'll take 4.
I'll take 4.

Ed in Tx
Super Member
Any suggestions how to remove the "Pioneer" badge in the middle of the dust cover? I've tried soaking it in naphtha thinking it would seep under and soften the adhesive, but it wouldn't loosen up.
Also has anyone come up with an acrylic filler to fix chips? Looks like some knucklehead let the AC cord prongs hit the top of a dust cover I am trying to make look good. Put about a dozen little chips in the surface, look like little rock chips in a windshield. Too deep to sand and polish out. Polishing leaves white residue buried in the chips which makes them look even worse.
Also has anyone come up with an acrylic filler to fix chips? Looks like some knucklehead let the AC cord prongs hit the top of a dust cover I am trying to make look good. Put about a dozen little chips in the surface, look like little rock chips in a windshield. Too deep to sand and polish out. Polishing leaves white residue buried in the chips which makes them look even worse.

kaplang
Works for me !
Ok, I have polished a few but not in a while. I just remembered a question I never have been able to get a response too. What has anyone come up with for a replacement for those little rubber or silicone feet that are in the front corners of many covers. I have emailed foot manufacturers and have been told "No proplem, we'll make em for you.. Just have to order 10,000 min to get them fabricated."
I have had to settle for a peice of peel and press rubber sheet cut to a tiny square and although it is functional I would much prefer to have the little insert feet. I have about 6 or 7 that would benefit from these. I don't think I have seen a vintage TT that didn't have these missing altogether or rotted. Just one of those things that irks me.. I got em shiny but still not complete.
Have you looked at McMaster-Carr Supply Company
Maybe something like this http://www.mcmaster.com/#silicone-rubber-rounds/=669mdd Rubber disks , rubber cord or rubber rod cut to size
kaplang
Works for me !
Any suggestions how to remove the "Pioneer" badge in the middle of the dust cover? I've tried soaking it in naphtha thinking it would seep under and soften the adhesive, but it wouldn't loosen up.
Also has anyone come up with an acrylic filler to fix chips? Looks like some knucklehead let the AC cord prongs hit the top of a dust cover I am trying to make look good. Put about a dozen little chips in the surface, look like little rock chips in a windshield. Too deep to sand and polish out. Polishing leaves white residue buried in the chips which makes them look even worse.
It the chips are not too deep you can sand them out. You will need to use course paper to start and gradually work to some very fine wet and dry maybe 2400. then use rubbing compound, then polishing compound and last a coat of car wax. It can be very labor intensive but if done properly will yield good results.
I brought back a heavily scratched cover for my Pioneer PL560 this way. It now looks close to new.:thmbsp:
Shackman55
Super Member
Have you looked at McMaster-Carr Supply Company
Maybe something like this http://www.mcmaster.com/#silicone-rubber-rounds/=669mdd Rubber disks , rubber cord or rubber rod cut to size
Yup I have tried them and couple of others this is sort of the design that we would need to fit the bill. Maybe the shaft more just straight up and down 4mm high or so, that could be trimmed and flexible enough that the shaft could be squeezed into a variety of hole sizes so a one size fits all kinda deal.
pictures here.
http://www.audiokarma.org/forums/showthread.php?t=260821

theAEoN
New Member
Somebody mentioned the 3M Headlight Repair System earlier on. Picked it up at Canadian Tire for $29 and tried it out yesterday on my dust cover that had heavy scratches and some light melting from a candle being left on it. Works great! Finished it off with some Pledge/ Windex combo to make it shine.
I might need to give the Meguiar's plexi polish a shot just to give the sides some extra shine.
I might need to give the Meguiar's plexi polish a shot just to give the sides some extra shine.
Shackman55
Super Member
I use the Meguiars on all my covers, and even if I don't want to put too much effort into one, a quick rub down with Meguiars and a microfiber gives them a much improved look.

Amcrebelfan
Super Member
I stopped at the hardware store and bought a multi pak of wet/dry 220/500/1000/1200. They were out of anything higher than the 1200, I also have some plastx to use. I have a couple of deep scratches should I start with the 1000 or lower? Will the 1200 be fine enough with the plastx or will I need to go finer? I didn't see anything but these sizes and empty holes for 1500 and 2000.
Last edited:
Shackman55
Super Member
From the various writings I have seen, 1200 is a good starting point for deep scratches. I have not been able to find anything better than about 800 So I am ordering up some 1200, 2000, and 2500 working my way through the grades and the plan is to finish with the Meguirs. I might toss in some 3000 grit too just to see how fine!