• The move to the new server is done. There are some software and database maintenance updates in process. This has us passing the hat around to help out. We appreciate any donations. Seriously, even a dollar helps. The payment page may be found here - https://www.audiokarma.org/support.html

Full Recap or Partial ??

Think im in the school of min disassemble, my amp is pretty easy to get to most stuff. Well was practicing tonight desoldering, using wick, and im going with a desolder gun i found on amazon with some pretty good reviews. I think it will save me loads of time and possiable damage to the board, its $129, i do plan on doing this as a hobby so there will be other amps to work on.
Post a link to the tool you're interested in and people can give you their evaluation of whether it's a quality tool.

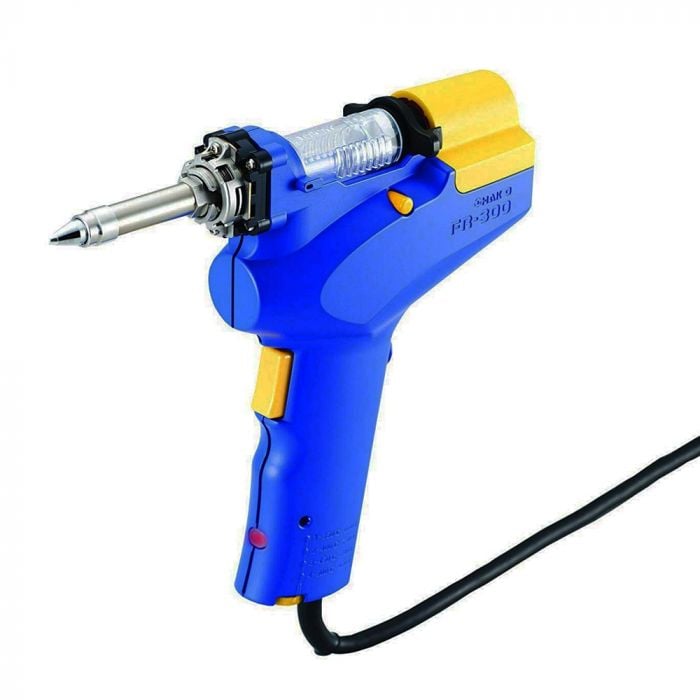
This is the tool I use:

fr-300.jpg
 
I think for hobby usage and recap 1 or 2 units you don't need a desoldering gun or desoldering station. I was doing professional work for 10 years without that tool. I'd improve your desoldering skills first. Different situation is if you are planning to do this regularly and desoldering will become an important task, desoldering ICs and selector switches, with dozen or even 100 pins (I had to desolder a selector switch with more than 90 pins, that day I bought the desoldering gun). But to recap the unit in this thread, I think you don't need to invest in a professional tool yet. Of course, if you can afford it, those desoldering guns make the work easier.

This is the tool I use (no affiliation)
https://toolboom.com/es/desoldering-gun-goot-tp-100/
 
Last edited:
You know I have to agree with you for one or two recaps probably not worth it but I'm already kind of in over my head as far as tooling up didn't think I'd be getting this much stuff cuz I basically started with much of nothing tried to do it on the cheap. I am finding using the wick to desolder seems to be the best and cleanest way and less chance of damage.

Then there's a side can I afford it probably not by the time I get all the tools to be convenient and to do this quicker and more efficiently I could have probably paid someone to do it but then again I don't get the fun of doing it that way. I was pretty frustrated in the beginning I'm less frustrated now and it seems like something I would like to keep doing probably never going to do it as a business but I have to think about that desoldering gun looks like it would just speed things up dramatically.

That's not bad $189 for that gun made in Japan looks like it's good quality the one I'm looking at on Amazon and now it's got some good reviews and you can always return it if it's a pile of junk.

Didn't realize I was going to need a desktop magnifier which I had to buy off of Amazon with the light built on to it cuz it's impossible to see the stuff without it so I've been acquiring quite a bit of tools I guess I'm just trying to talk myself into that desoldering gun.
 
The problem with those desktop magnifiers on Amazon they say they're 3x 5X 8x it's not a true 5X I have a 5x and it's not even strong enough I'm going to actually trade it in for 8x and I also have the thing that you put on your head with the magnifier that goes over your eyes.
 
If it does macro shots, your cell phone camera is great magnifier. Mine only has 4X zoom but it's impressive how well it works. I've used mine for electronics, splinter removal, label reading without my reading glasses, insect identification...
 
I don't know if my phone does macro shots I know it has a very good camera I'm going to have to check into that. Unfortunately my close-up vision is not that good and I wear glasses all the time my far away vision is like a hawk.

It's really hard when you wear eyeglasses and you have to put one of those things over your head with the magnifiers I found one that works pretty decent but again it doesn't have enough magnification the particular one that I have that's why I bought the desktop light with magnifier which I love using it it's just not strong enough.
 
Hey guys have a question, i have run into caps that have bent over leads, when i clear the solder do i just pull them straight out ?. Most leads stick straight up, now im running into alot of bent ones.
 
Last edited:
That's one of the challenges, and where the pull while applying heat may work. If you're soldering iron has a chisel tip, you can apply light prying pressure to lift the lead just enough to wick the rest. You can apply a little heat while wiggling the cap. There's numerous methods, but that is one of the challenges.
 
Hey guys have a question, i have run into caps that have bent over leads, when i clear the solder it still wont come out ????

I don't think it makes a lot of difference which equipment you have for joints like that - you just have to be much more careful. I use a couple of approaches:

- If I can access the part leads easily above the board, I'll cut them, remove the part, and then remove the solder joints & remains of the leads from the solder side of the board. Unfortunately, this is rarely the case.

- If not, I'll remove as much of the solder as possible, using a solder sucker and/or desoldering wick. That will rarely be enough to 'release' the part though, especially if the leads have been well bent over - so as a second step, I'll hold a hot iron on the joint just long enough to melt any remaining solder, and (with the iron still on the joint) gently but quickly 'lift' / 'tease' the bent over lead up from the pad using a small pointed tool. It's easy to say, but 'don't force it'.... it does take some practice & 'feel', and you do need to be very cautious as to how long you're heating the pad... if you 'lift' too soon, 'lift' too hard, or heat too long, you risk delaminating the solder pad / trace from the pcb. Once the bent over lead has lifted a little, desoldering wick can get the remaining solder out and the part normally releases quite easily. For the pointed tool, I tend to just use wooden cocktail sticks cut to a chisel shape, they're quick, cheap, easy, and don't absorb the heat from the iron.
 
I do more or less what Goldie99 described, but usually trying to remove all the solder to remove a small capacitor is much more invasive than just melting the solder and pull the part. I usually desolder small capacitors that way, without any desoldering tool or technique, I melt the solder on one lead, and with my thumb I pull the capacitor to one side. Then, the same on the other lead, and pull the other half. Working fast, not leaving the iron on the PCB for long. Max 2 seconds.
 
Sorry been dealing with personal problems last few days. Thanks for the reply on taking out the bent leads, will have to practice more as the new reciever has arrived. I have to say other than the cracked front glass on the tuner section this thing looks unused, i mean its clean as a wihistle inside and out, no dirt nothing. Im going to practice some more on removing parts and then get moving here. I have decided not to buy the desolder gun. I got to test my dim bulb tester and she works perfect.
 
As you decide on cap replacement, a general rule of thumb, if it hasn't been mentioned before, is..."if it looks original, and it disagrees with the schematic or service manual, go with what's on the board.". You might ask, how do I tell if it's original? Look at pics of gear from that vintage...caps tend to be grey, lavender, orange, yellow (usually indicating low leakage), perhaps light blue. I'd expect to see a bunch of lavender sleeved caps since it's a Panasonic machine.

Compare what the scat or SM says SHOULD be there, with what's actually installed. Many of the physically larger caps will have been glued to the board during manufacturing. Acetone and or Isopropyl alcohol can soften it to acid in removal. Just a drop or two should soften it enough. A flat bladed Xacto blade works well to break slip under and free it from the board. Not sure if Panasonic/Technics used glue that turns corrosive, but remove as much as you can.
 
Will do thank you, you're right it does have a lot of those colors you mentioned for the caps. I do know from my first attempt that there is glue on the really big caps in the power supply area there is glue and there was lots of it holding it down, will use the alcohol to help loosen it up and dissolve the glue.

And this time I will be testing it to play music after everything I replace.
 
Ok its game on been working on it tonight and so far going well and tested and working good. I think in my practice and messing around taking caps out im going to buy a desolder gun to speed things up. Think im getting the hang of soldering my solder joints look pretty decent.
 
Ok thanks, im trying to price it out myself not going well when i put the part number nothing comes up, but i was on Digi Key.

Tried Mouser.com and parts i punch in off the service manual dont come up?????

as others have noted, those part nos are likely all obsolete. Enter in the uf values and voltages and you should have better luck on Mouser and digikey.

The nichicon UPW grade are really good caps for electrolytics.
 
Hey guys i have hit a roadblock, i have 3 ...22uf caps and can only find one that goes on C103, . When i look at the list of parts in service manual cant find other 2 but there in my kit.


Have searched the service manual, and looked all over the board and cant find any more 22uf 50v caps. There are 0.22uf, i reordered the 700 bag from the guy on ebay and he sent it to me, its has the same parts as original 700 bag, the other 22uf dont exist as far as i can see, so why are they in the bag, or am i missing something.

My other question is shouldnt i be recapping the whole board ? or is this kit the most prone to going out parts, i dont know.
 
Last edited:
I've never bought a kit, so can't say definitely, but you may want to contact the seller to see if he/she increased the capacitance of say a 10uF cap to the 22uF you have in the kit.
 
He just put extra parts he told me by mistake, there are no other 22uf caps. I will get back to work, funny thing is this new SA 300 looks like it had work done, i can tell by the bad soldering job, but i have replaced parts and it works fine. Now i will keep going, really getting the hang of soldering.
 
Back
Top Bottom