• The move to the new server is done. There are some software and database maintenance updates in process. This has us passing the hat around to help out. We appreciate any donations. Seriously, even a dollar helps. The payment page may be found here - https://www.audiokarma.org/support.html

Grundig Help Tuning String and Turntable Mandello

sko19

Active Member
Need Help. The dial/tuning string is broke. I do not have many options of getting it fixed near me and the place I do has a 3 month weight and will cost 200. I have the string and the spring. Therefore I am gong to attempt to do it myself and hope that it is not a disaster.

Question 1. what is an alternative to the string? IT looks like clear mono filament can i use fishing line? I read on line that a lot that people sometimes use dental floss any opinion.Do you think that this is a really bad idea and i should just find someone (the way i look at it, if i cant do it i will end up taking it in).

Question 2. The turntable on this is somewhat seized up. Do any of you know a trick to get the platter off ?

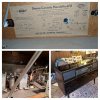
I found a manual for this but it is in German. Any suggestions of where I can find one in English?> 20190507_123431-COLLAGE (1).jpg
 
Register to hide this ad
Dial cord is the stuff to use. Antique radio supply places sell it. tubesandmore, oldradioparts.net, etc should all have listings. You'll just need to know how fat it is. Dial stringing is mildly frustrating but not exactly hard so long as you know how it is supposed to run.


What sort of turntable? I believe Grundig used several different types and they don't all come apart the same way.
 
Dial cord is the stuff to use. Antique radio supply places sell it. tubesandmore, oldradioparts.net, etc should all have listings. You'll just need to know how fat it is. Dial stringing is mildly frustrating but not exactly hard so long as you know how it is supposed to run.


What sort of turntable? I believe Grundig used several different types and they don't all come apart the same way.
As soon as I get home I will take a picture. The TT is in the console. Mandello d/U
 
Some of the Grundigs used a dial cord (string) and a wire, each with springs on the ends. Let's see if we can find you a diagram. Generally, it takes three hands to redo a dial cord.

For the turntable look for a C-clip around the spindle in the center of the platter.
 
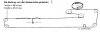
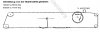
Here's the FM dial cord for the Mandello c/ST. Same tube lineup as yours so hopefully same dial chord. There is also a separate AM dial cord.

This one does have the separate string (Textilseil) and wire cable (Stahlseil). The string is the longer of the two and I believe it is the one that wraps around the pointer/indicator.

You will need to take this diagram as literally as possible. Everything in it is there for a reason, such as the 1 turn around the tuner shaft, and the number of turns around the pulley where both ends attach.

One of the tough things about dial strings is that the wheel centers and pulley shafts could use a tiny bit of lubrication but the cords will not grab and turn the shaft very well if any lube gets on the string.


Grundig FM Dialstring.JPG
 
This is great. I will give it a try. I have nothing to loose. I found a replacement dial cord taped inside. Do i need separate cord for the SW?
 
This is great. I will give it a try. I have nothing to loose. I found a replacement dial cord taped inside. Do i need separate cord for the SW?

That is the right attitude. I won't lie, doing these can really try your patience. If you start having smoke come out your ears, just step away for a while
 
Yes, that is one aspect where the two Mandello models differ. They did make different bands for the domestic and export models. But I believe all the short wave and medium wave bands work off the same shaft as the AM (which might be called BC for Broadcast), so it would be the same dial string.

Since you have a spare string, you can measure it to see which it goes with, and you'll also know the length of the one that pairs up with it.
 
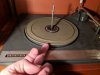
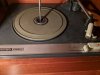
This is the TT. I can't figure out any way to get to it. The platter and mat are both on super snug.

Some of the Grundigs used a dial cord (string) and a wire, each with springs on the ends. Let's see if we can find you a diagram. Generally, it takes three hands to redo a dial cord.

For the turntable look for a C-clip around the spindle in the center of the platter.
 

Attachments

  • IMG_20190507_213714.jpg
    IMG_20190507_213714.jpg
    63.3 KB · Views: 17
  • IMG_20190507_213707.jpg
    IMG_20190507_213707.jpg
    69.2 KB · Views: 14
I do not know that turntable. Is there a retaining clip somewhere around the center post? Most of them have something there. Once that is removed, you may be able to stuff a pair of spoons under the platter from opposite sides and pry up on it. If that center post comes out, a whack to the center with the handle of a screwdriver while giving it some upward pressure often pops them apart.
 
Just noticed you're in Lakewood, OH. I'm on the east side of Cleveland and have this model but mine's a 1/U. Also looking for a manual/schematics. Trying to figure out how to get the output signal cleaner. And my turntable doesn't want to drop all the way down to play a record. Missing the 45 adapter and the longer shaft so I'm not sure if it's an operational issue with mine. Do you have an AM antenna for your? Mine didn't have one-would love to see what it looks like. Still trying to find parts. Good luck with your tuner cord.
 
I had to restring both the AM/SW and FM on one of these (the first re-stringing I've ever done) and wow, was it a miserable experience! If I can give a couple tips for anyone finding this thread in the future: you want 0.4mm string, but it needs to have nearly no stretch to it. I first found some string from a seller on eBay advertising braided nylon 0.4mm string specifically for radio repair, but it had far too much stretch for this application. I imagine it might be fine for radios requiring a shorter length. I ended up using 0.4mm Dorisea "Extreme Braid" fishing line. It has nearly zero stretch. I did have to apply resin to get it tacky enough, and it can still be a little temperamental in spots, but it beats taking it apart and doing it again. I had the benefit of a spare, already strung chassis to reference to ensure I was doing it right, and it was still pretty frustrating. Oh, and if you need the spring that connects the ends if the tuning string: you want a 0.3mm (wire diameter) x 3mm (spring coil outer diameter) x 15mm (spring free length, which includes the end loops). I was able to get an assortment of small springs on Amazon that included this size.

Just to note, I had the original and unbroken steel (?) wire to work with, so did not have to worry about trying to replace that.
 
Back
Top Bottom